Lester B. Pearson International Airport Terminal 1 Map (Most Up-To-Date)
Terminal 1 is a massive, curved hub-and-piers layout built around a central node that feeds three split airside zones (Domestic D, Transborder F, International E), plus vertically stacked ground-transport curbs outside. As part of the Pearson hub complex, the biggest navigation penalties come from entering the wrong stream (especially toward E Gates) or choosing the wrong pickup level—both can trigger long backtracks, extra checks, or missed-connection risk.
Map Table
| Zone | Connection | Walk Time |
|---|---|---|
| Concourse D (Domestic) | central node near D1–D20 | D39 → node ~250 m |
| Concourse E (International) | D20 “Connections” → E stem → E hammerhead | D39 → E68 ~1,000 m; ~12–20 min |
| E hammerhead (E68–E82) | long stem + circular end-cap | stem + arc ~450 m combined |
| Ground pickups (L1 vs L0) | Arrivals Level (L1) vs Ground Level (L0) Door P/Q rideshare | baggage hall → Door P/Q ~150 m; ~3–5 min |
Lester B. Pearson International Airport Terminal 1 Map Strategy
- Budget the D→E move like a mini-terminal transfer: treat E68–E82 as “far end,” plan for the long stem plus the circular hammerhead so a wrong-direction loop doesn’t burn your buffer.
- Commit at the right moment: when you need E Gates, lock onto purple “Connections / E Gates” signage at the D20 junction and avoid drifting deeper into mid/high-number D gates where the backtrack penalty spikes.
- Assume checkpoint logic can change: if the international security option is closed, switch immediately to the domestic checkpoint plan and then execute the D20 Connections corridor airside instead of searching landside.
- Make pickups fail-proof by level first, door second: rideshare requires Ground Level (L0) Door P/Q—don’t wait on Arrivals Level (L1) where you’ll be stacked above your driver and effectively invisible.
2025 Lester B. Pearson International Airport Terminal 1 Map + Printable PDF
2026 Terminal 1 routing still hinges on split-zone wayfinding (D/E/F) and which security/checkpoint stream you enter. International access can shift if the dedicated international screening point is closed, funneling passengers through the domestic checkpoint and adding an airside walk to the D20 Connections corridor—so a printable map is most useful for locking in the correct checkpoint, the D↔E path, and the E-gates hammerhead geometry.
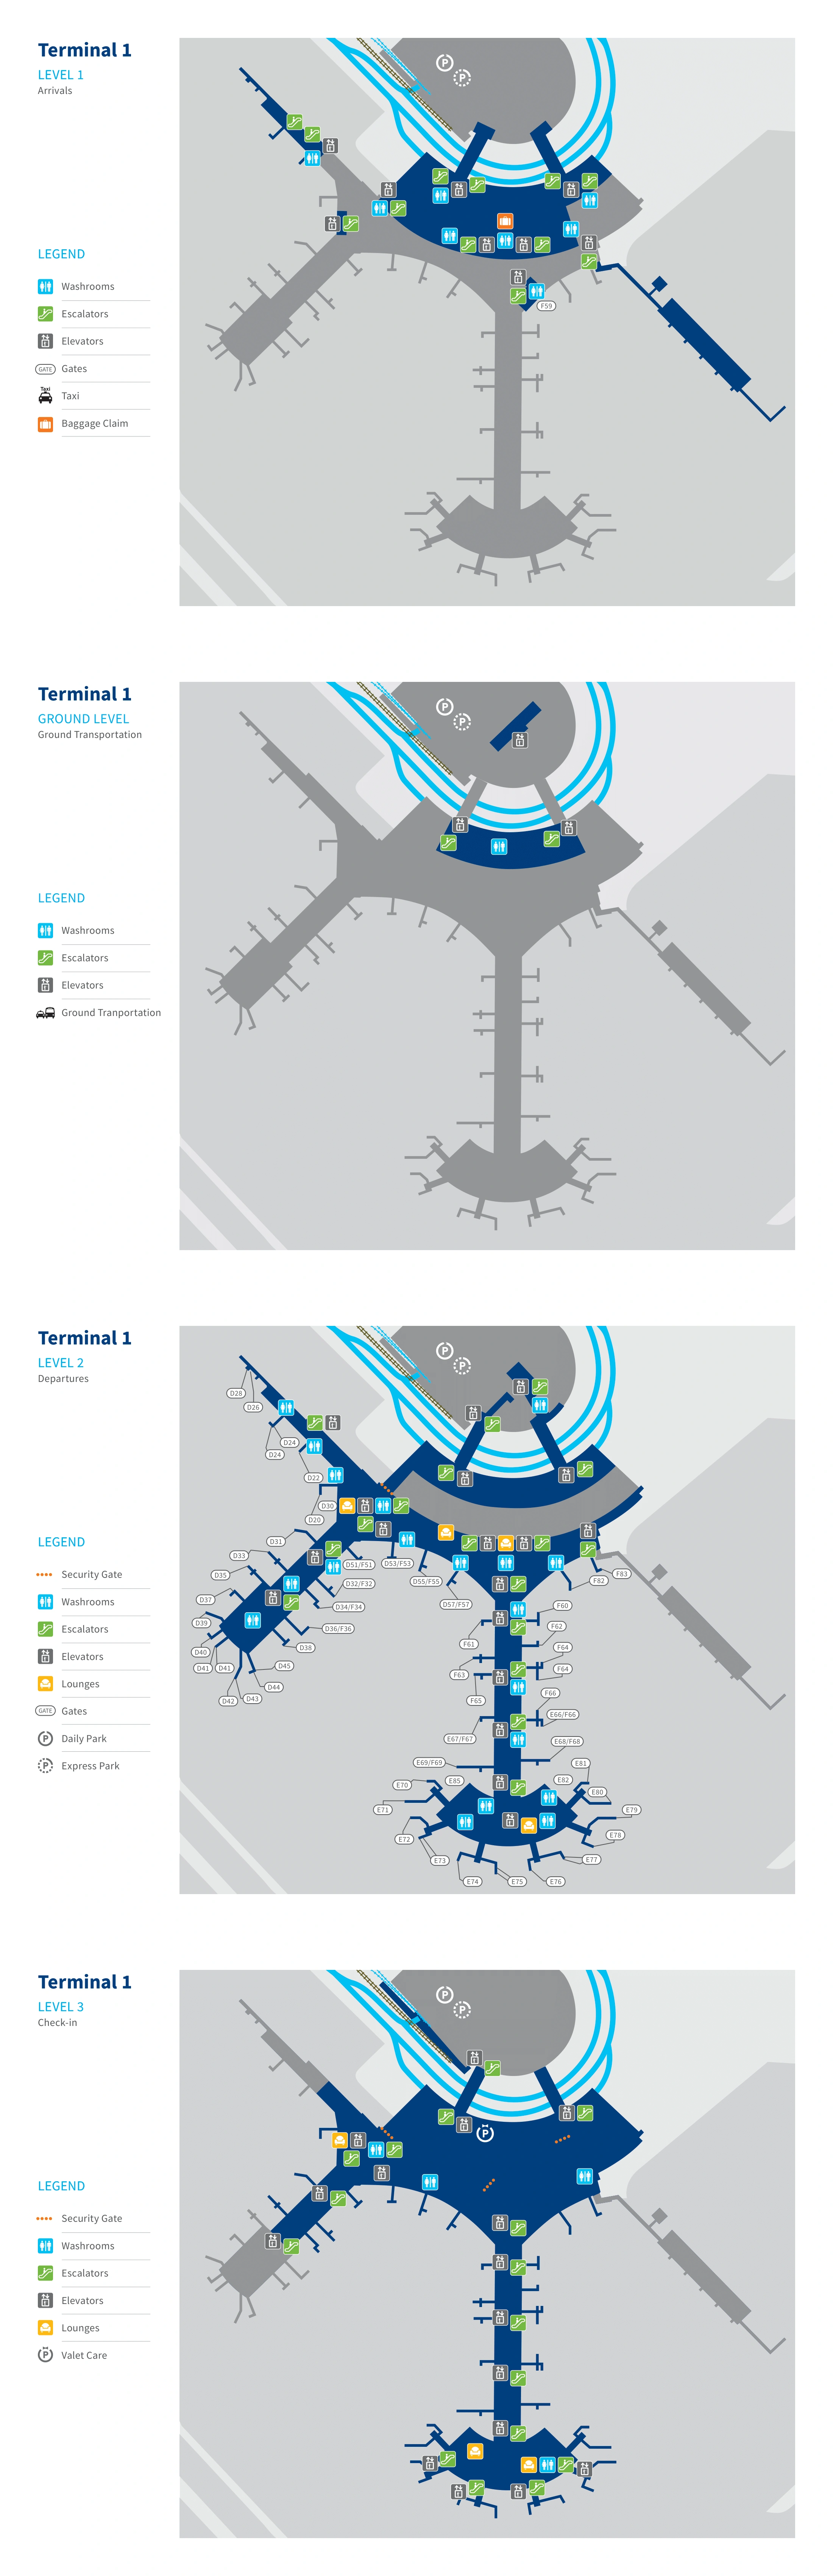
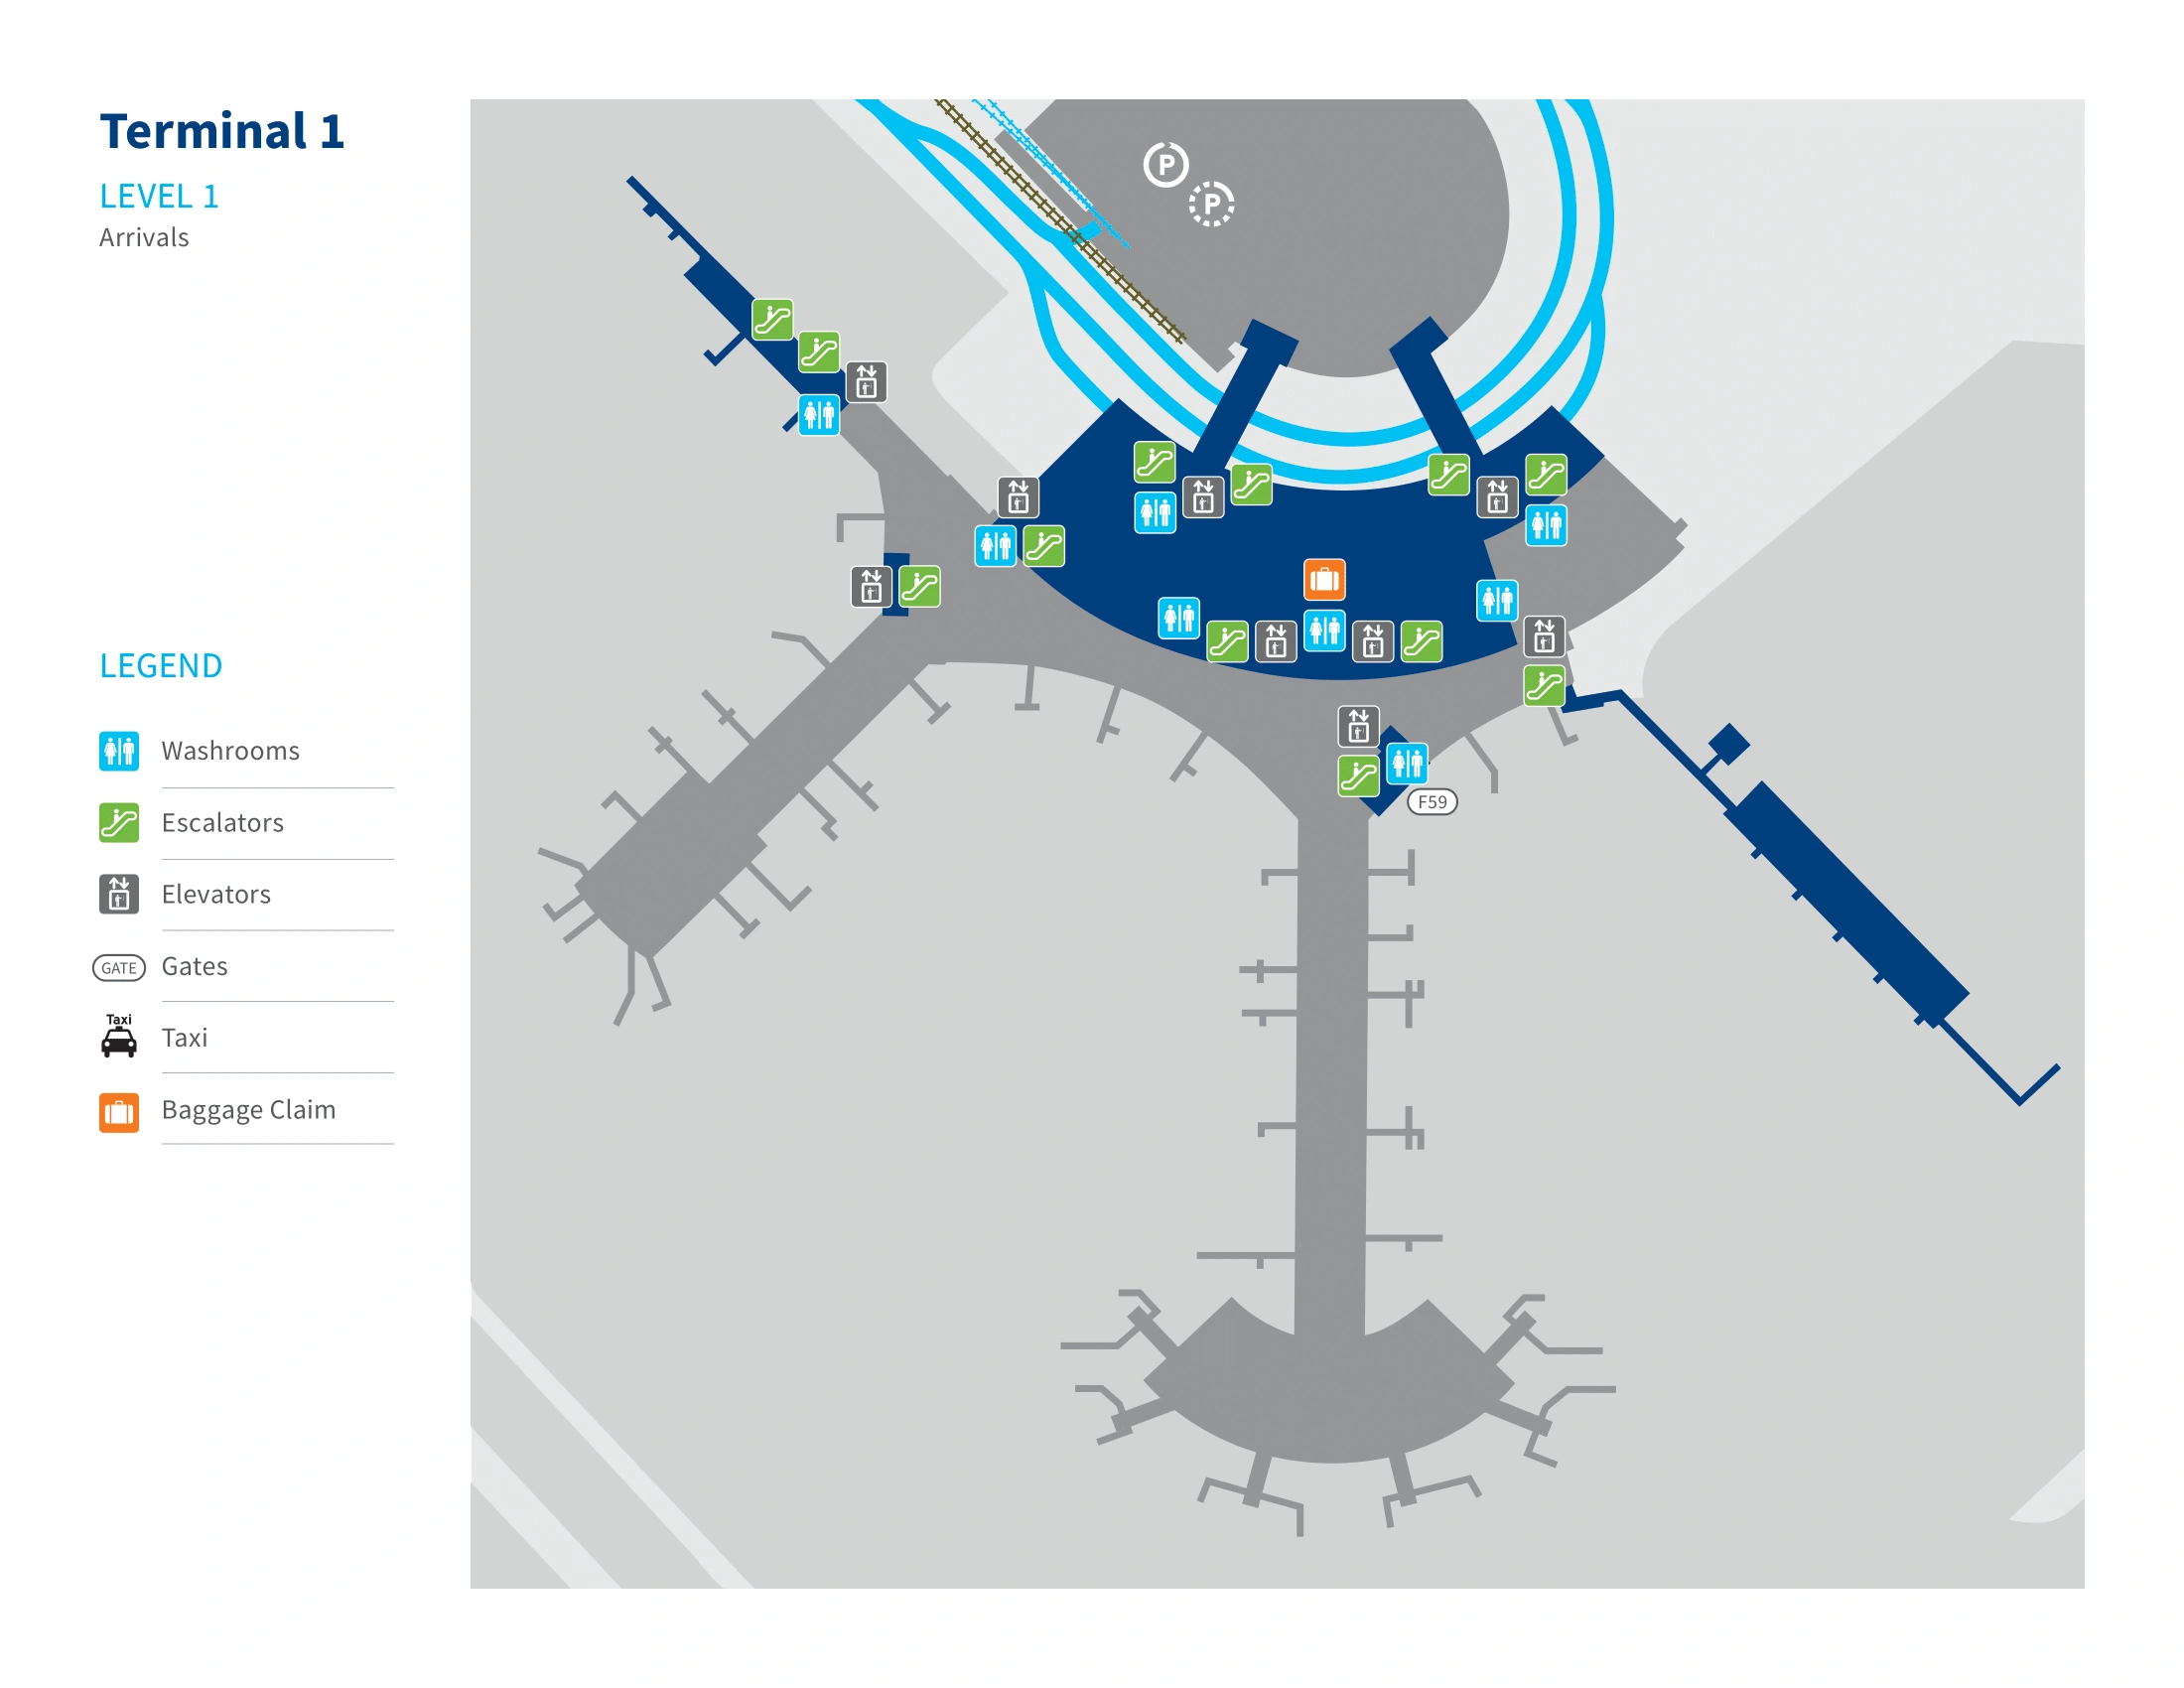
Lester B. Pearson International Airport Terminal 1 Level 1 Arrivals Map 2025
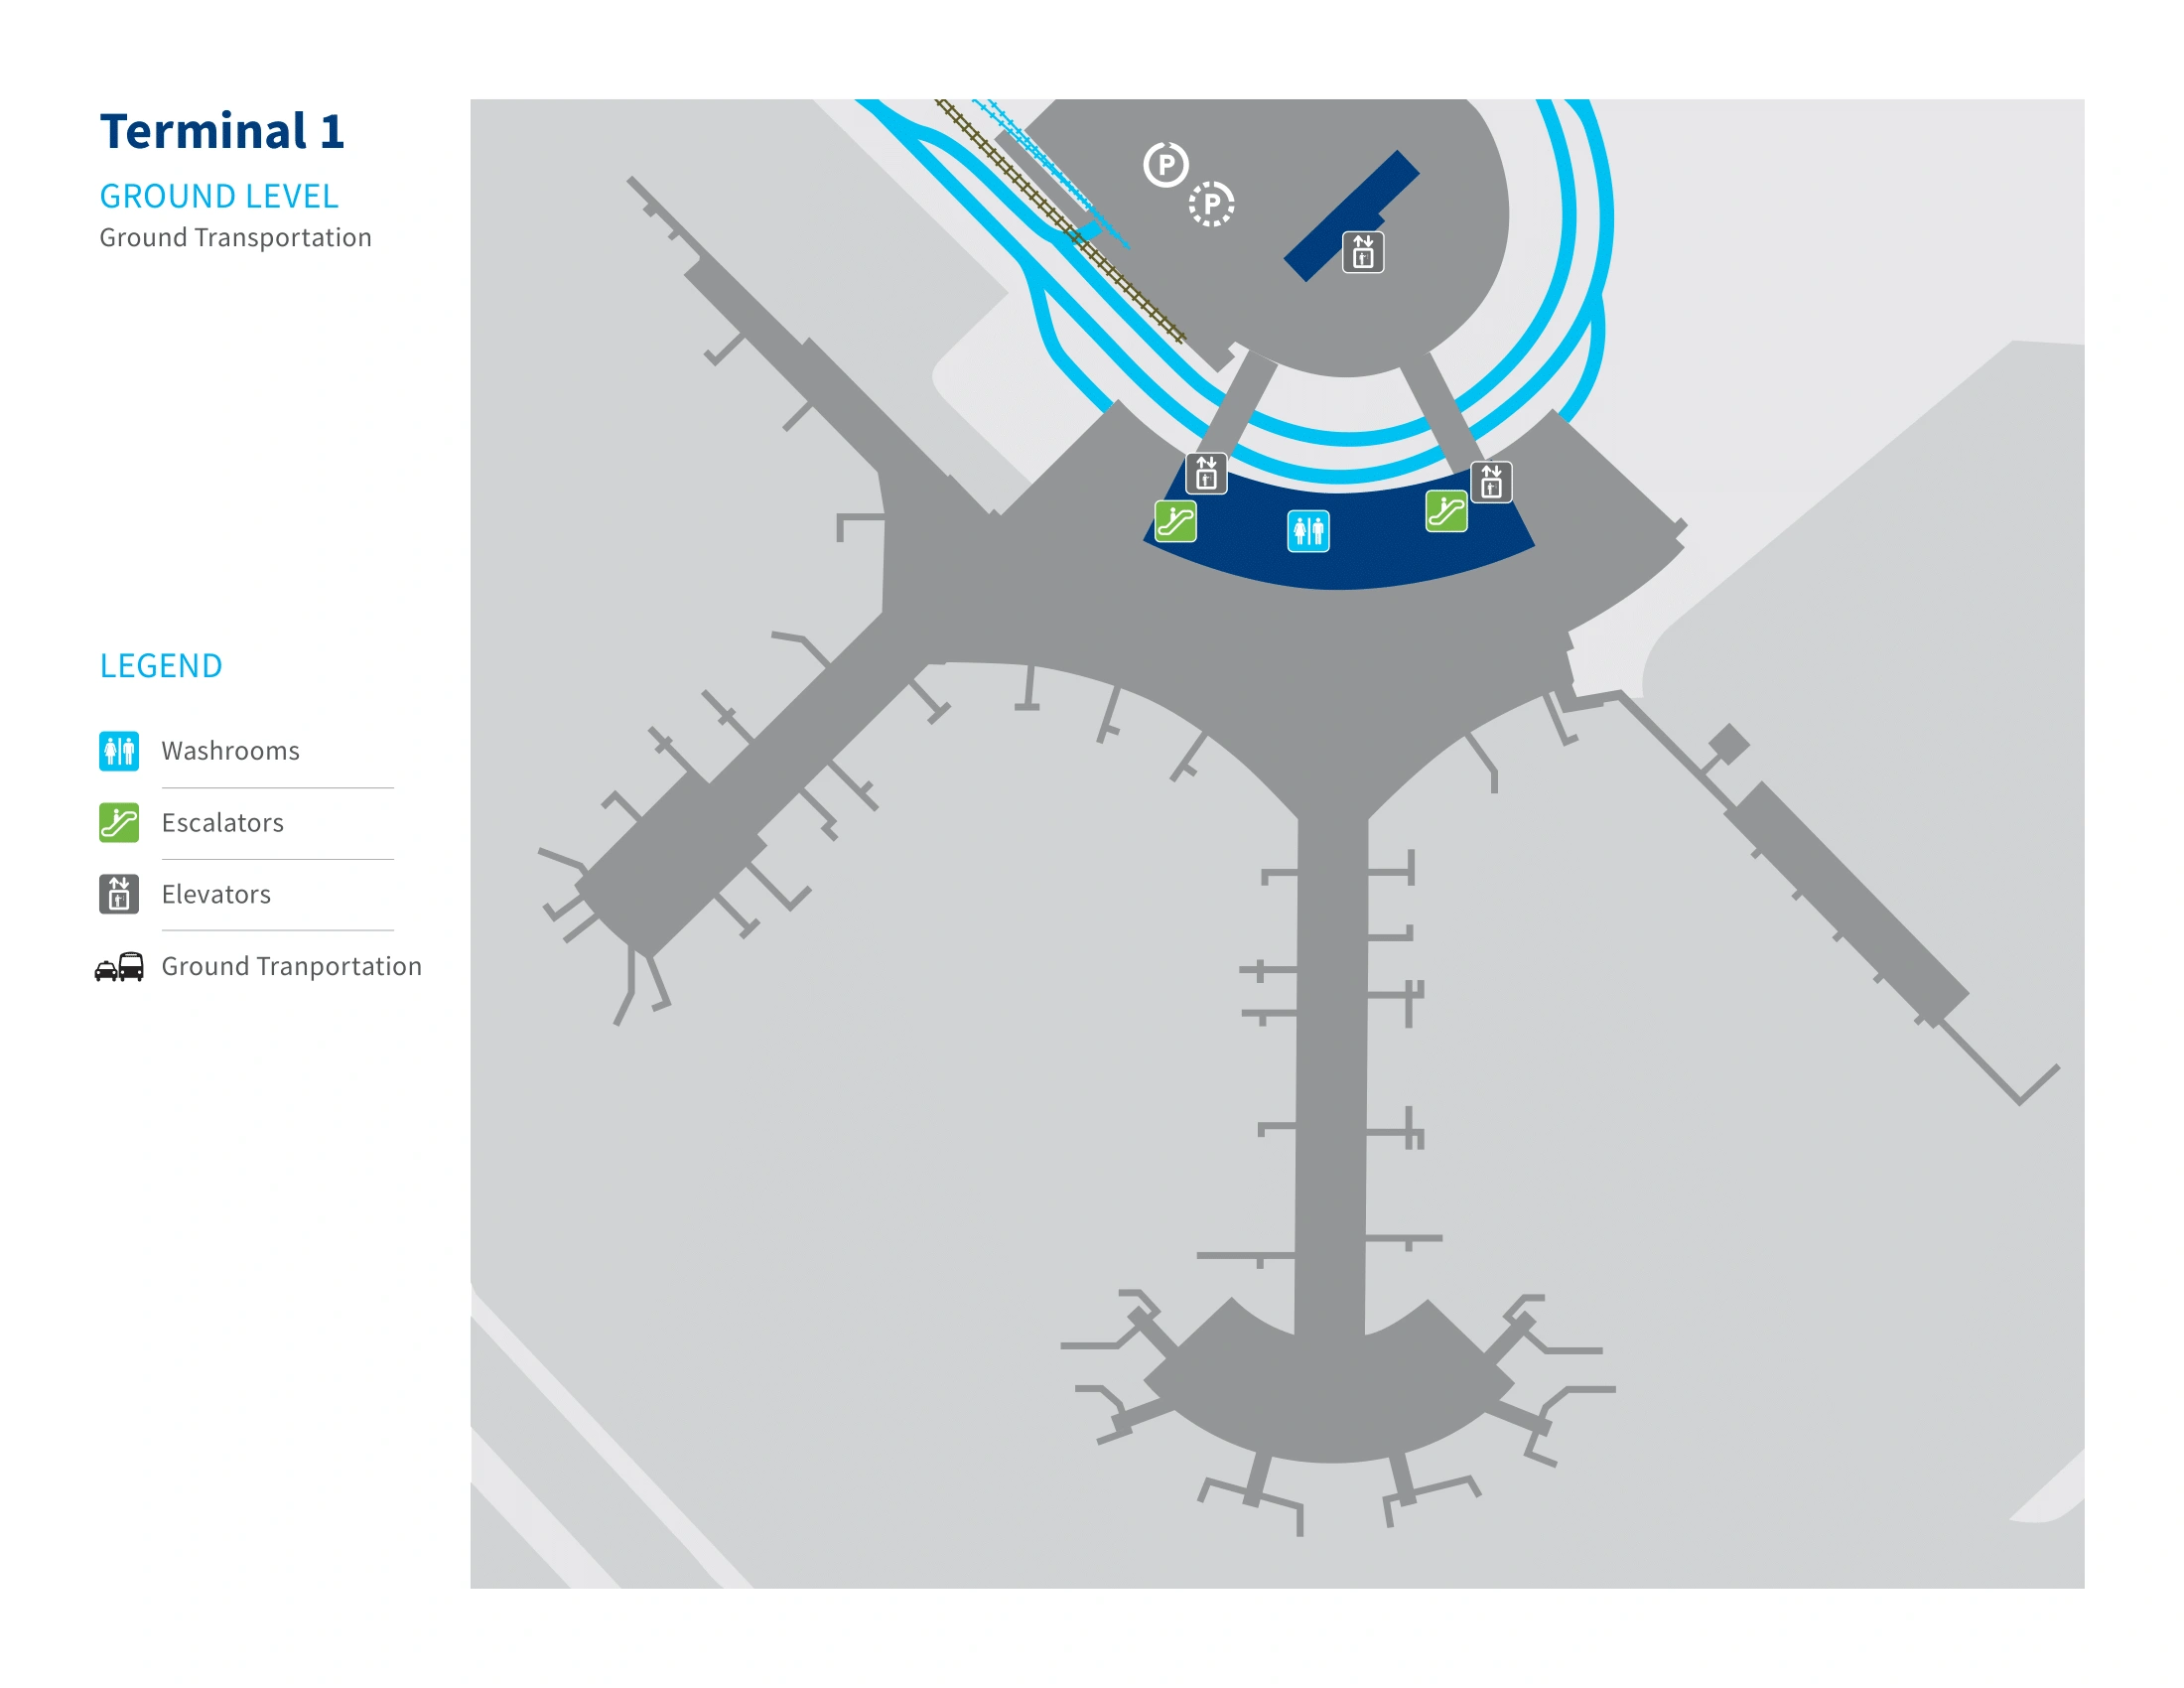
Lester B. Pearson International Airport Terminal 1 Level 1 Ground Transportation Map 2025
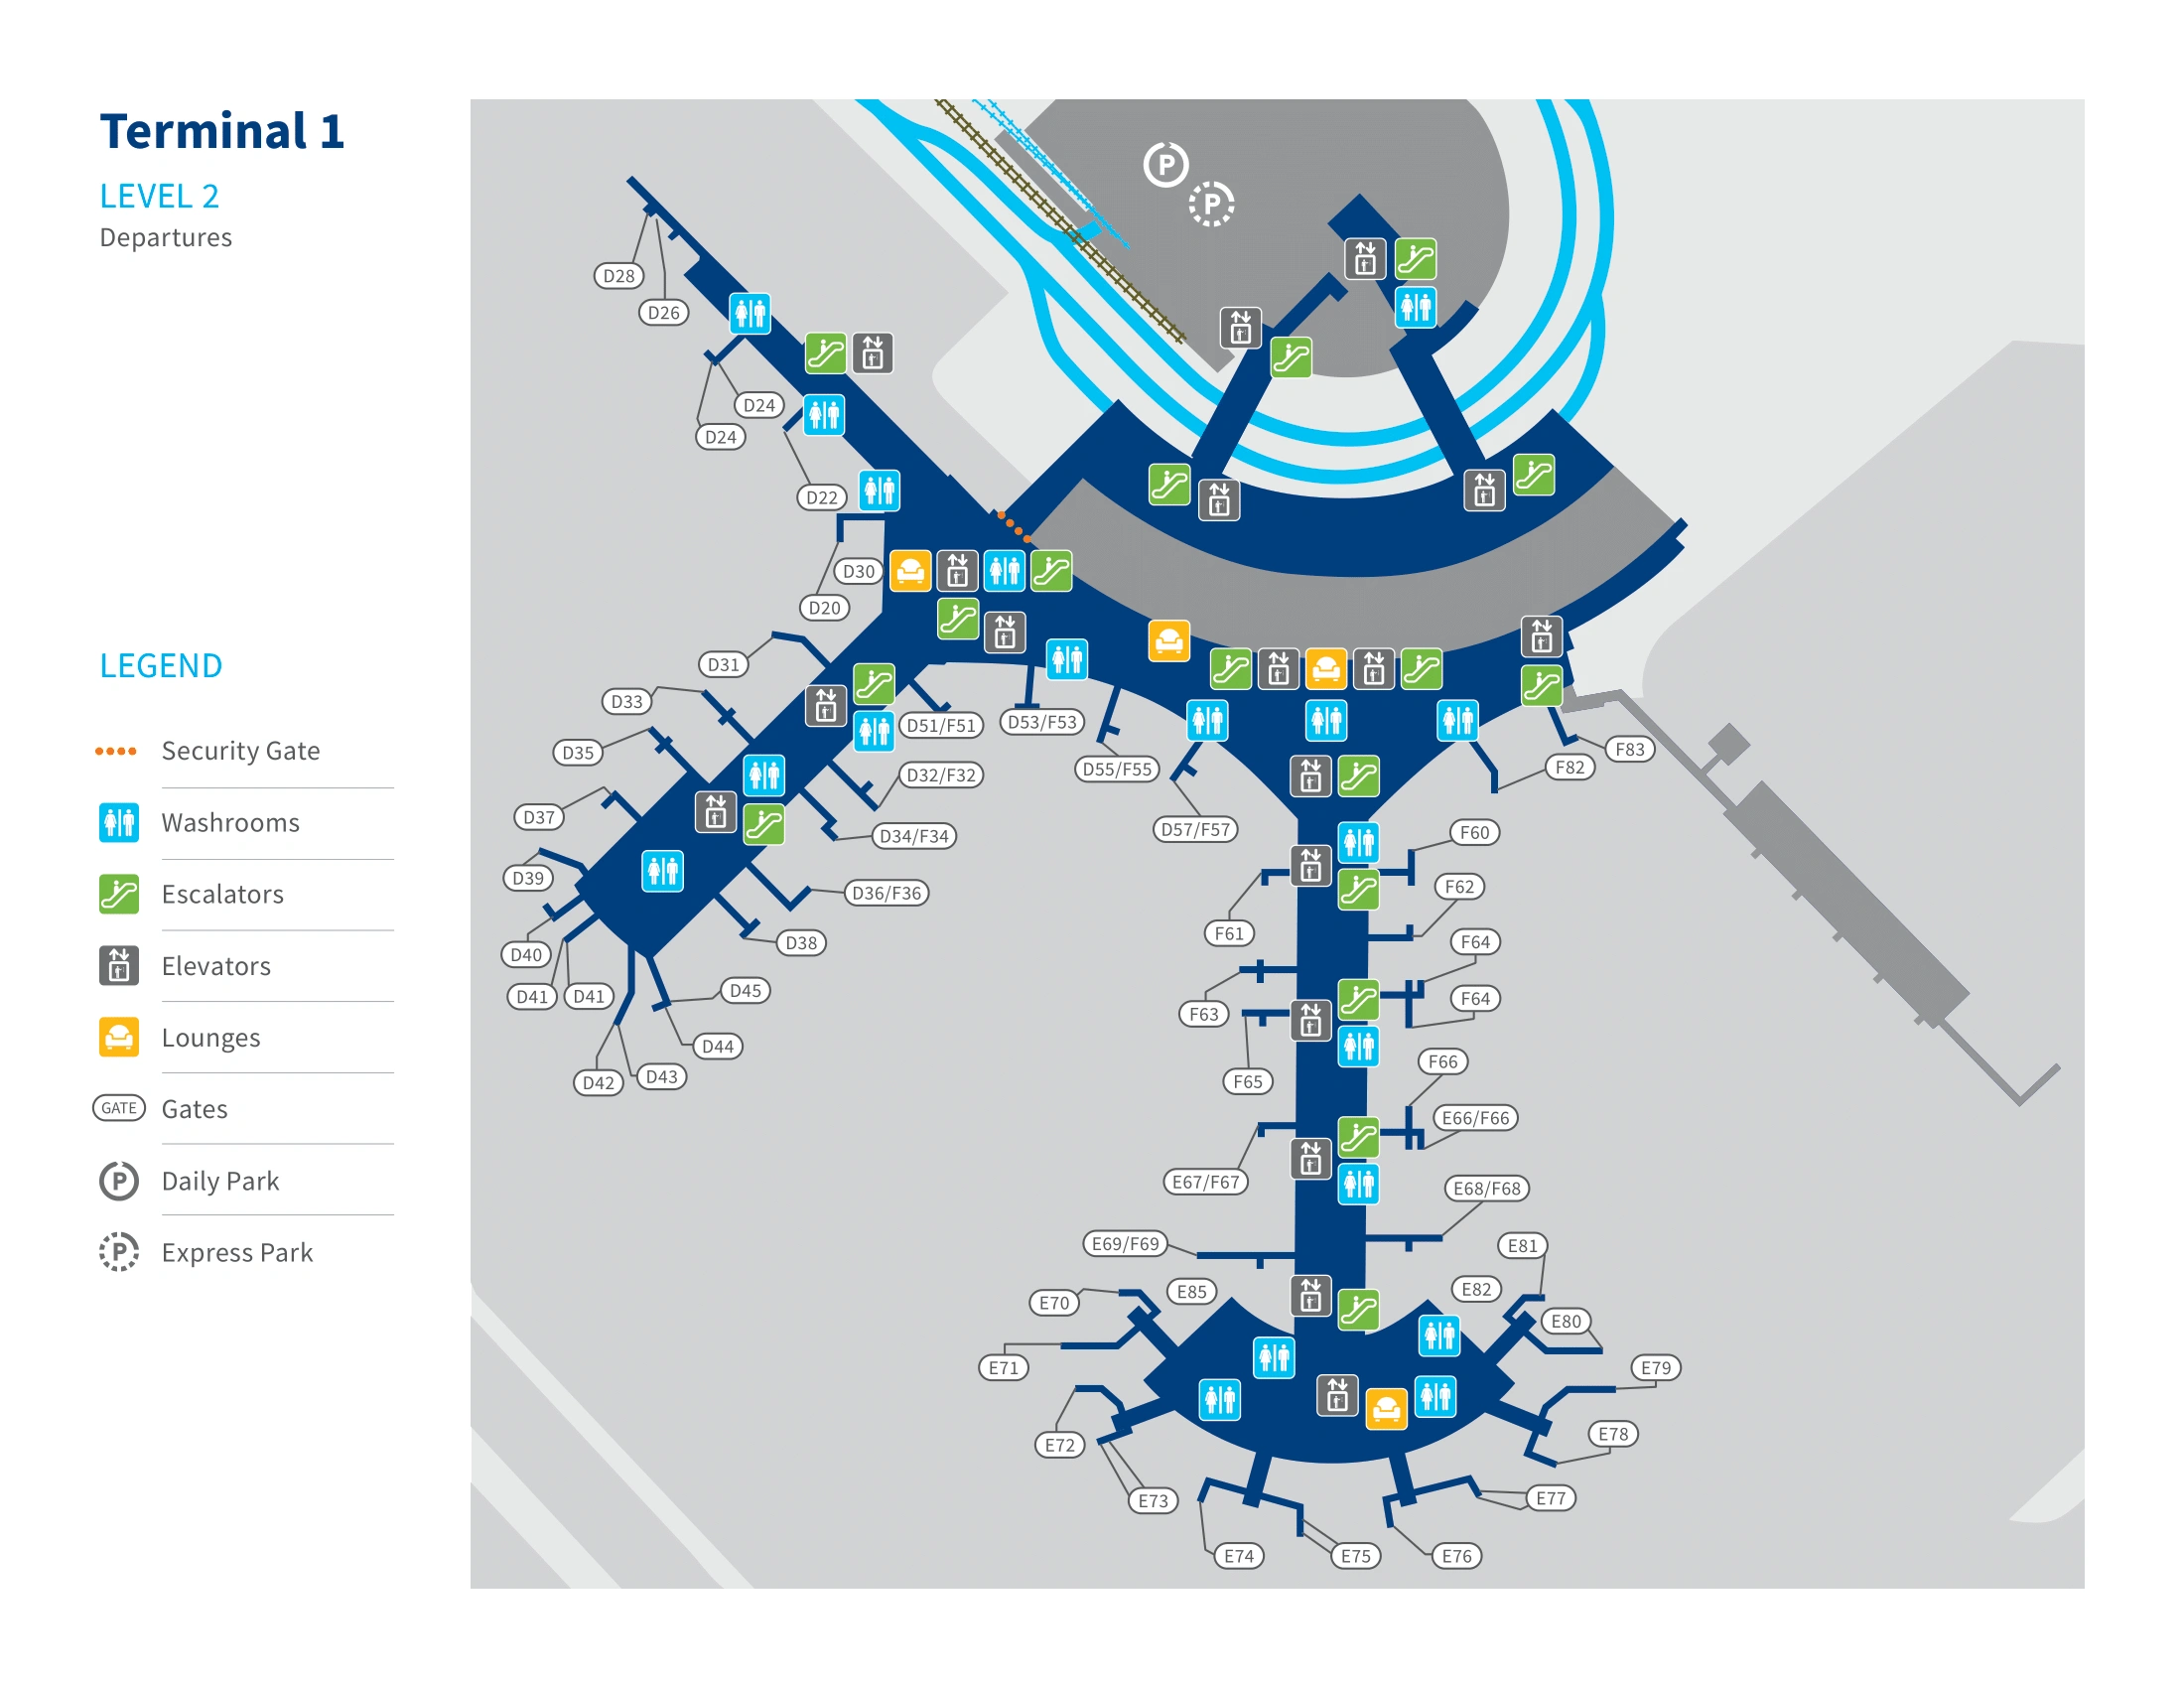
Lester B. Pearson International Airport Terminal 1 Level 2 Departures Map 2025
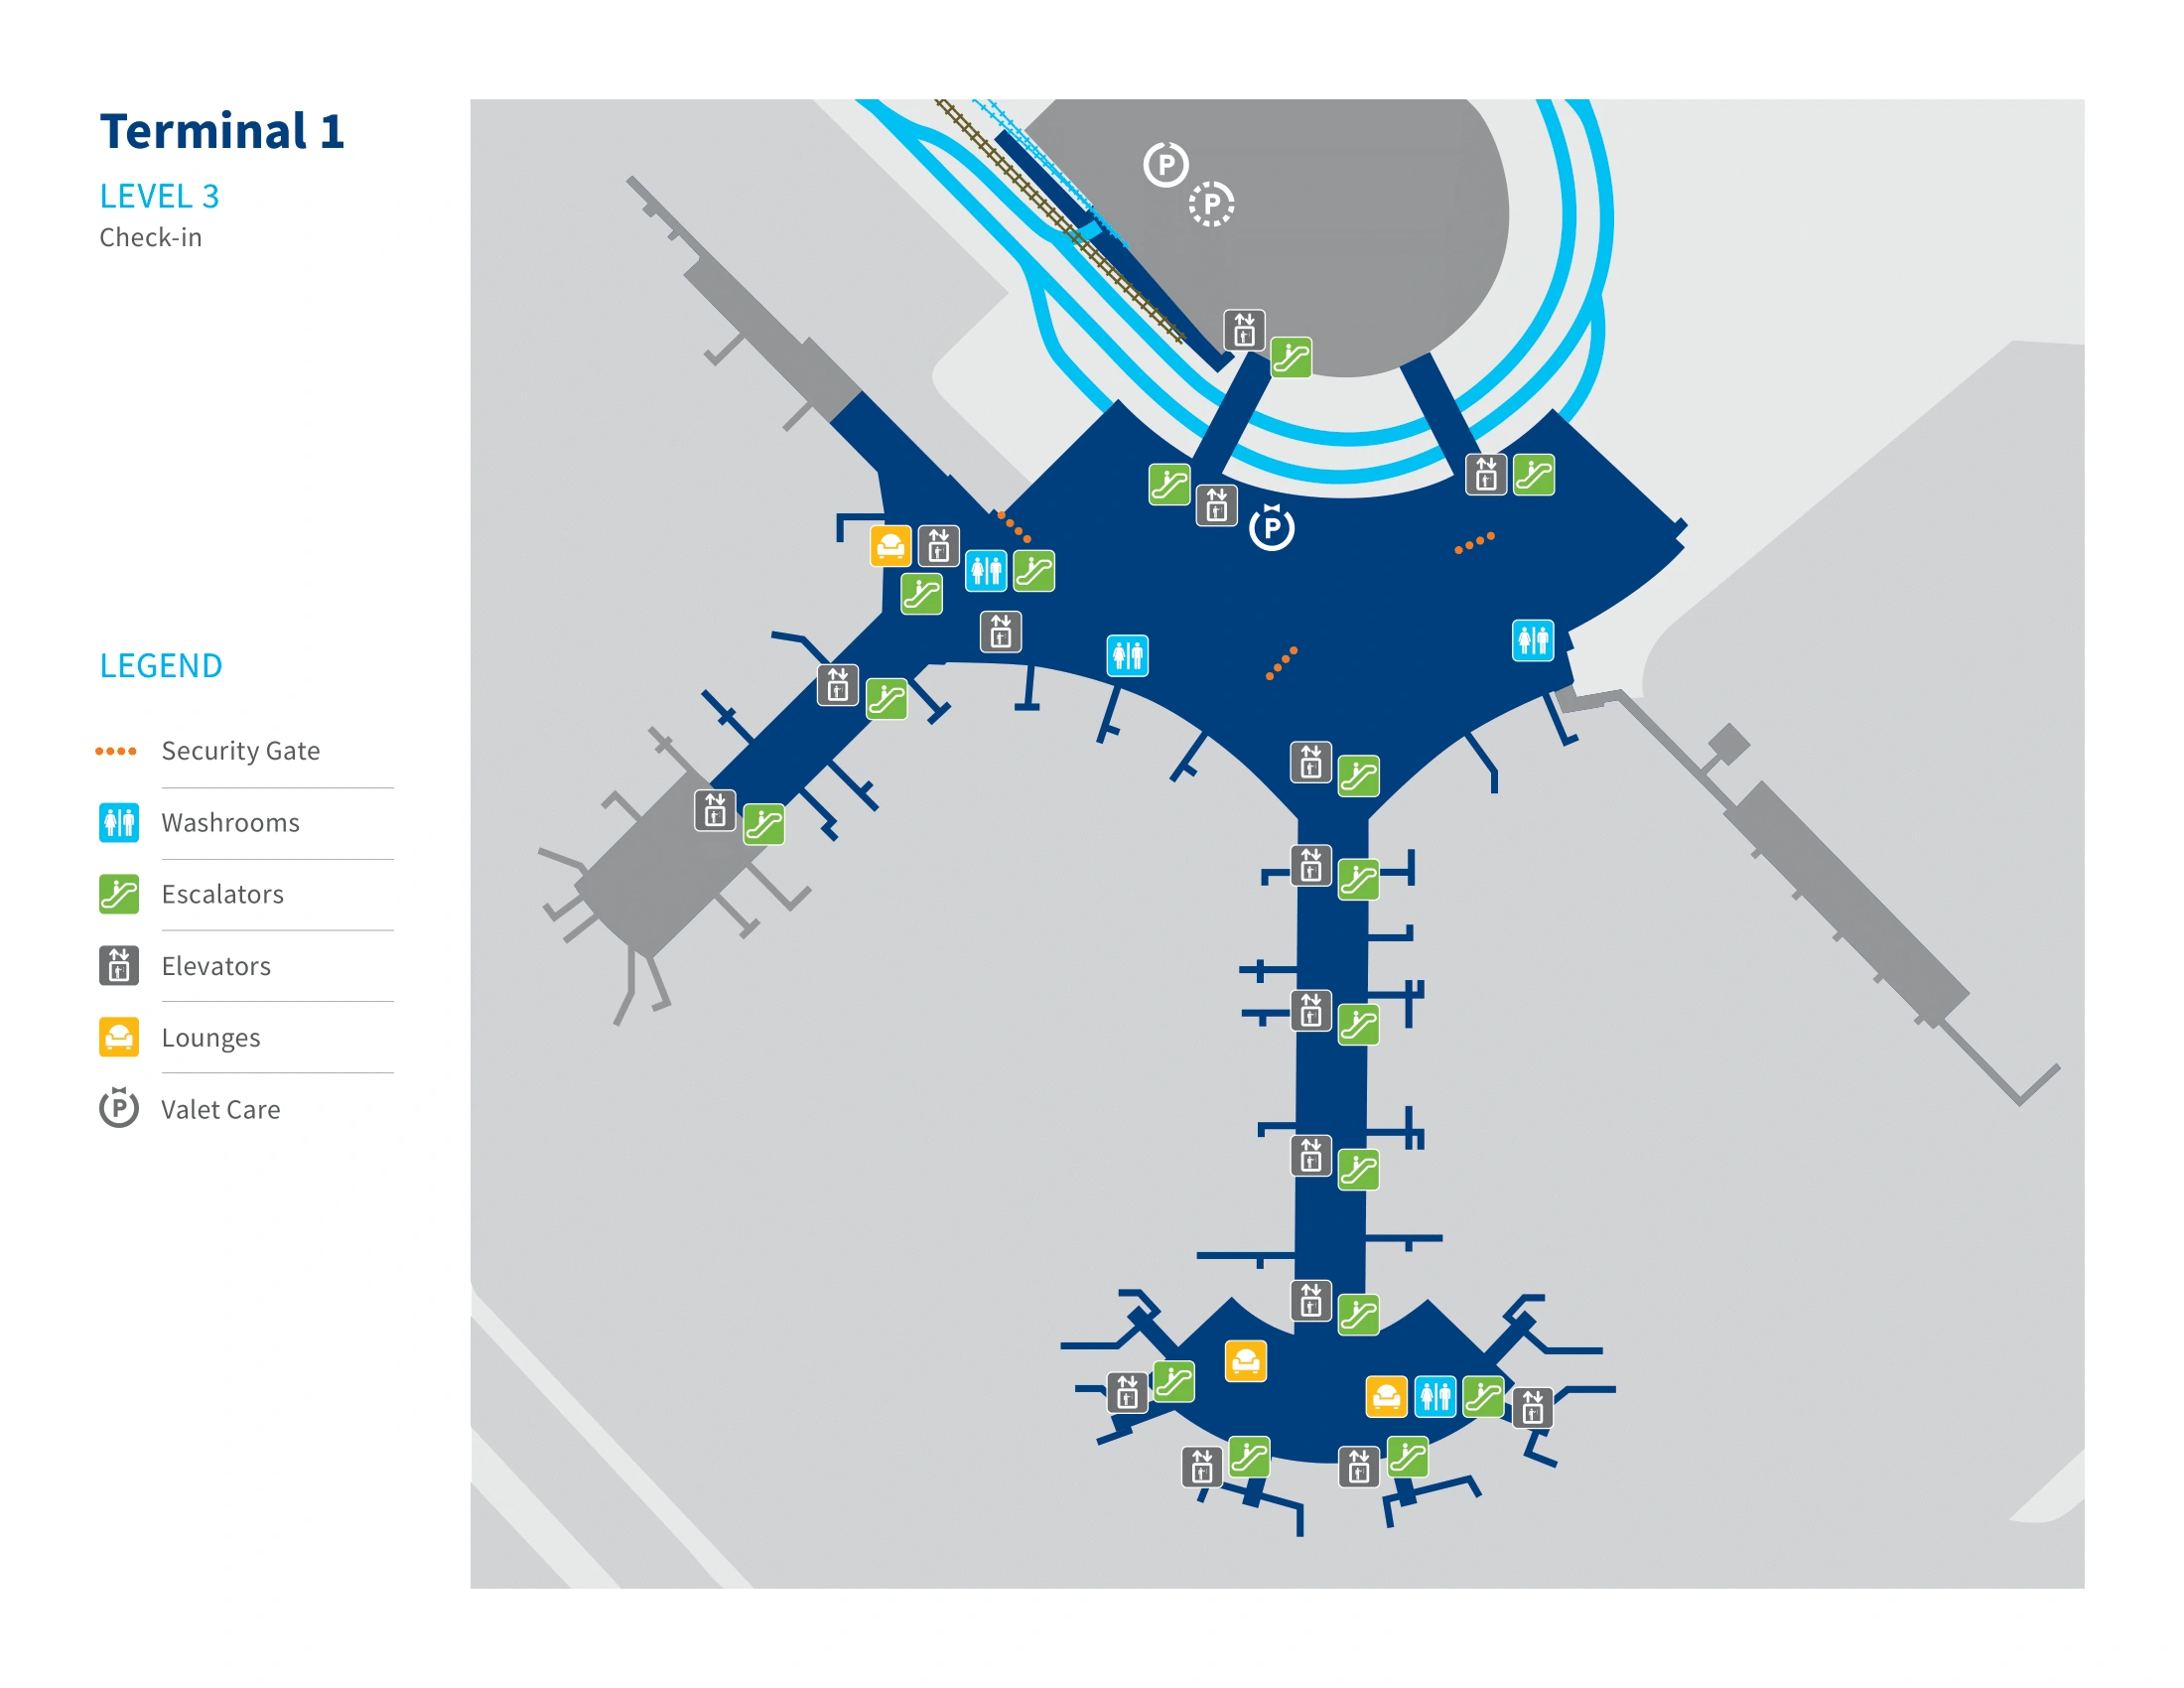
Lester B. Pearson International Airport Terminal 1 Level 3 Check In Map 2025
2025 Lester B. Pearson International Airport Terminal 1 Map Guide
What is the exact walking distance (meters) from Gate D39 to Gate E68 inside YYZ Terminal 1?
The walking distance is 1,000 meters from Gate D39 to Gate E68 using the standard D→Node→E-connector→E-pier→hammerhead path. That distance assumes continuous airside movement with the Connections routing toward E Gates, not a landside exit and re-screen.
| Segment | Landmark-to-landmark | Meters |
|---|---|---|
| A | Gate D39 → central node | 250 |
| B | across central node plaza → Connections approach | 100 |
| C | E-connector corridor (moving-walkway tube) | 200 |
| D | E-pier stem → hammerhead entry zone | 300 |
| E | hammerhead arc → Gate E68 | 150 |
| Total | D39 → E68 | 1,000 |
Where is the first “point of no return” landmark (exact escalator/sign location) that indicates you’ve gone too far toward D Gates when you actually need Connections → E Gates?
The point of no return is the Gate D20 junction at the Domestic node, where purple overhead signs for “Connections / E Gates” hang above a glass-door entrance and a staffed boarding-pass podium. If you keep walking past this D20 sign cluster into the mid/high-number D-gate pier, you’ve already missed the correct E-stream entry and your backtrack penalty starts climbing.
This landmark sits just past the central Starbucks kiosk area, beside the Maple Leaf Lounge (Domestic) elevator bank. The visual “commit” cue is the glass partition doors immediately after the document-check podium—once you go through, you’re in the unidirectional connector toward E and can’t simply turn back into the Domestic concourse.
What is the shortest mapped route from the Domestic arrivals corridor to the International E-gates “hammerhead” (E68–E82 area)?
The shortest route stays airside on Level 2 and uses the D20 “Connections / E Gates” corridor into the E-pier stem, avoiding the baggage hall and any landside re-screen. That path is the fastest because it commits you to the unidirectional D→E connector instead of sending you down to Arrivals and back up through security.
From your domestic arrival gate in Concourse D, walk toward the low-numbered D gates (D1–D20) into the central node, ignoring “Baggage Claim / Exit” signs that lead down. At the Gate D20 junction, follow the purple “Connections / E Gates” overhead signage to the boarding-pass podium and glass doors, then enter the long connector corridor with moving walkways. The corridor deposits you at the base of the E-pier; continue straight down the stem to the circular hammerhead and follow the arc to your specific gate in the E68–E82 cluster.
Where exactly is the boarding-pass checkpoint (if any) separating the E-gates international departure pier from the main Terminal 1 corridor?
The boarding-pass checkpoint is at the Gate D20 junction, right where the Domestic concourse feeds into the “Connections / E Gates” corridor. It’s a staffed document-check podium positioned in front of the glass-partition doors that mark the entrance to the long connector “tube” toward the E pier.
This is not the main CATSA screening hall; it’s a verification stop to control who enters the international connector stream. The landmark triangulation is the overhead purple “Connections / E Gates” sign array near D20, beside the Maple Leaf Lounge (Domestic) elevator bank and just past the central Starbucks kiosk area. Passengers without an eligible onward boarding pass are typically turned back at this podium before the glass doors.
What are the exact map locations (level + nearest landmark) of the Terminal 1 security entry points that can feed passengers to E Gates?
The primary security entry for E Gates is Security Checkpoint 3 on Departures Level (Level 3), aligned with the international check-in area. The alternate path is Security Checkpoint 2 on Departures Level (Level 3), aligned with the domestic Air Canada check-in area, which then requires an airside walk to the D20 Connections corridor to reach E.
| Checkpoint | Level | Nearest landmark | Where you emerge airside |
|---|---|---|---|
| Security Checkpoint 3 (International) | Level 3 (Departures) | international check-in aisles (roughly Aisles 4–7) | E/F node; shortest walk to E pier |
| Security Checkpoint 2 (Domestic) | Level 3 (Departures) | Air Canada domestic check-in aisles (roughly Aisles 1–3) | D concourse; then walk to D20 Connections for E |
If the E-gates security area is closed, what is the alternate security entry point (exact location) people are redirected to in Terminal 1?
The alternate entry is Security Checkpoint 2 (Domestic) on Departures Level (Level 3), aligned with the Air Canada domestic check-in area. When the dedicated international screening point isn’t operating, international-bound passengers clear security here, enter the D concourse, and then route airside to the D20 “Connections / E Gates” corridor to reach the E pier.
This reroute is easiest to recognize landside by aiming for the domestic end of the Departures hall (near the Air Canada domestic kiosks and priority check-in zone), then following signs to Security Checkpoint 2 instead of searching for the international checkpoint area. After screening, your airside landmark to “pivot” toward E is the D20 junction with purple “Connections / E Gates” signage and the glass-door entrance into the connector tube.
Where is the Verified Traveller / priority lane located relative to the main Terminal 1 security entrance (exact checkpoint position on the departures level)?
The Verified Traveller / priority lane is at Security Checkpoint 3 (International) on Departures Level (Level 3), positioned at the far left of the checkpoint array when you’re facing the screening lanes. This placement puts it closest to the boundary where the international check-in zone meets the Air Canada priority/check-in interface area.
If Checkpoint 3 is closed and passengers are redirected, the Verified Traveller option shifts to Security Checkpoint 2 (Domestic) on Level 3, where the priority lane is at the far right side of that checkpoint array when facing the screening lanes. The practical landmark is the domestic Air Canada check-in banks immediately behind the Checkpoint 2 entrance.
Where exactly are Rideshare pickups Door Q and Door P located on Terminal 1 Ground Level (which side of the terminal frontage, and which curb zone)?
Door Q and Door P rideshare pickups are on Ground Level (Level 0) along the Terminal 1 frontage, toward the southern/domestic end of the terminal curve. The correct curb is the Inner Curb, the lane directly beside the terminal’s glass doors.
This placement is the core “vertical kill zone” trap: Door Q/P are directly below the Arrivals Level curb. If you exit on Arrivals Level (Level 1) near the same frontage and wait outside, your app can show the driver “here” while the driver is one level beneath you at the Level 0 inner curb. Stay inside, go down to Level 0, then exit at doors labeled Q or P and remain at the inner curb without crossing roadway lanes.
What is the shortest walking route from Terminal 1 baggage claim exit to Door Q/P rideshare pickup (including the correct level change, if any)?
The shortest route is to stay inside Terminal 1 after baggage claim on Arrivals Level (Level 1), go down one level to Ground Level (Level 0), then exit at Door P or Door Q to the inner curb. That one-level descent is the make-or-break step that prevents the “driver is below you” pickup failure.
From the baggage claim area, walk toward the central “Meeting Place” atrium zone and use the nearest escalator/elevator bank there to go down to Level 0. On Ground Level, follow the rideshare signage to the glass exits marked P or Q, then step outside and wait at the inner curb (the curb closest to the building). Do not exit to the Arrivals curb first, and do not cross the traffic lanes to the outer islands.
Where is the Hotel Shuttles pickup pole R3 located relative to Terminal 1 arrivals doors (exact curb segment/door letter area)?
Hotel shuttles use Ground Level (Level 0), not the Arrivals Level curb, and pole R3 is in the Zone R shuttle area clustered near Door S. Relative to the main Terminal 1 arrivals doors above, this is toward the far southern end of the frontage where the Ground Level signage transitions from Door P/Q rideshare to S/R shuttle markings.
From the terminal interior, the clean triangulation is: go down to Level 0, exit near Door S, then look for the “R” zone poles along that curb segment. If you exit at Door P or Q first, you’re close but not at the shuttle cluster—continue walking along the Ground Level curb in the direction of the S/R signs until you reach the pole lineup that includes R3.
Where is the cell phone lot access route relative to Terminal 1 arrivals pickup lanes (exact turn-in from airport roads) to avoid illegal curb-waiting loops?
The cell phone lot is accessed off Network Road and Viscount Road, not from the Terminal 1 Arrivals pickup ramps. To avoid illegal curb loops, drivers should stay out of the terminal frontage lanes entirely and follow roadway signage for “Cell Phone Lot” and “Viscount Station” before committing to the Terminal 1 arrivals/departures ramps.
From the airport approach roads (including the Highway 409 approach and the Silver Dart Drive corridor), the correct move is to take the signed turn toward Viscount/Network Road rather than entering the Terminal 1 loop. Once staged, drivers leave the lot only after the passenger is physically at the curb with a door letter, with a typical 3–5 minute drive from the lot back to the terminal frontage.
Where is the Terminal Link / inter-terminal train boarding point in Terminal 1 (exact level + nearest door/escalator landmark)?
The Terminal Link boarding point is on Level 5 in the parking garage structure connected to Terminal 1, reached via the enclosed pedestrian bridge. The closest consistent landmark is the main central elevator banks in Terminal 1 that serve multiple levels—take them up to Level 5, then follow “Terminal Link” signage across the bridge to the platform.
From either Departures (Level 3) or Arrivals (Level 1), route to the large central elevators rather than hunting for a train on the curb levels. Once on Level 5, the key confirmation cue is the enclosed bridge spanning the roadway; crossing it puts you into the garage-side access leading directly to the Terminal Link station for Terminal 3.
What is the exact walking distance (meters) from Terminal 1 to Terminal 3 using the signed pedestrian route (not “as-the-crow-flies”)?
The walking distance is 722 meters using the signed outdoor pedestrian route between Terminal 1 and Terminal 3. That figure reflects the sidewalk path along the terminal frontage roads and crosswalks, not a straight-line measurement.
The route typically starts by exiting Terminal 1 to the landside frontage (commonly from the Arrivals level area), then following the designated sidewalks under/along roadway ramps and across marked crossings until you reach Terminal 3’s entrance frontage. This walk is exposed to weather and roadway conditions, which is why the Terminal Link train is usually the operationally safer default even when the meter distance looks short.