Orlando International Airport Terminal A Map (Most Up-To-Date)
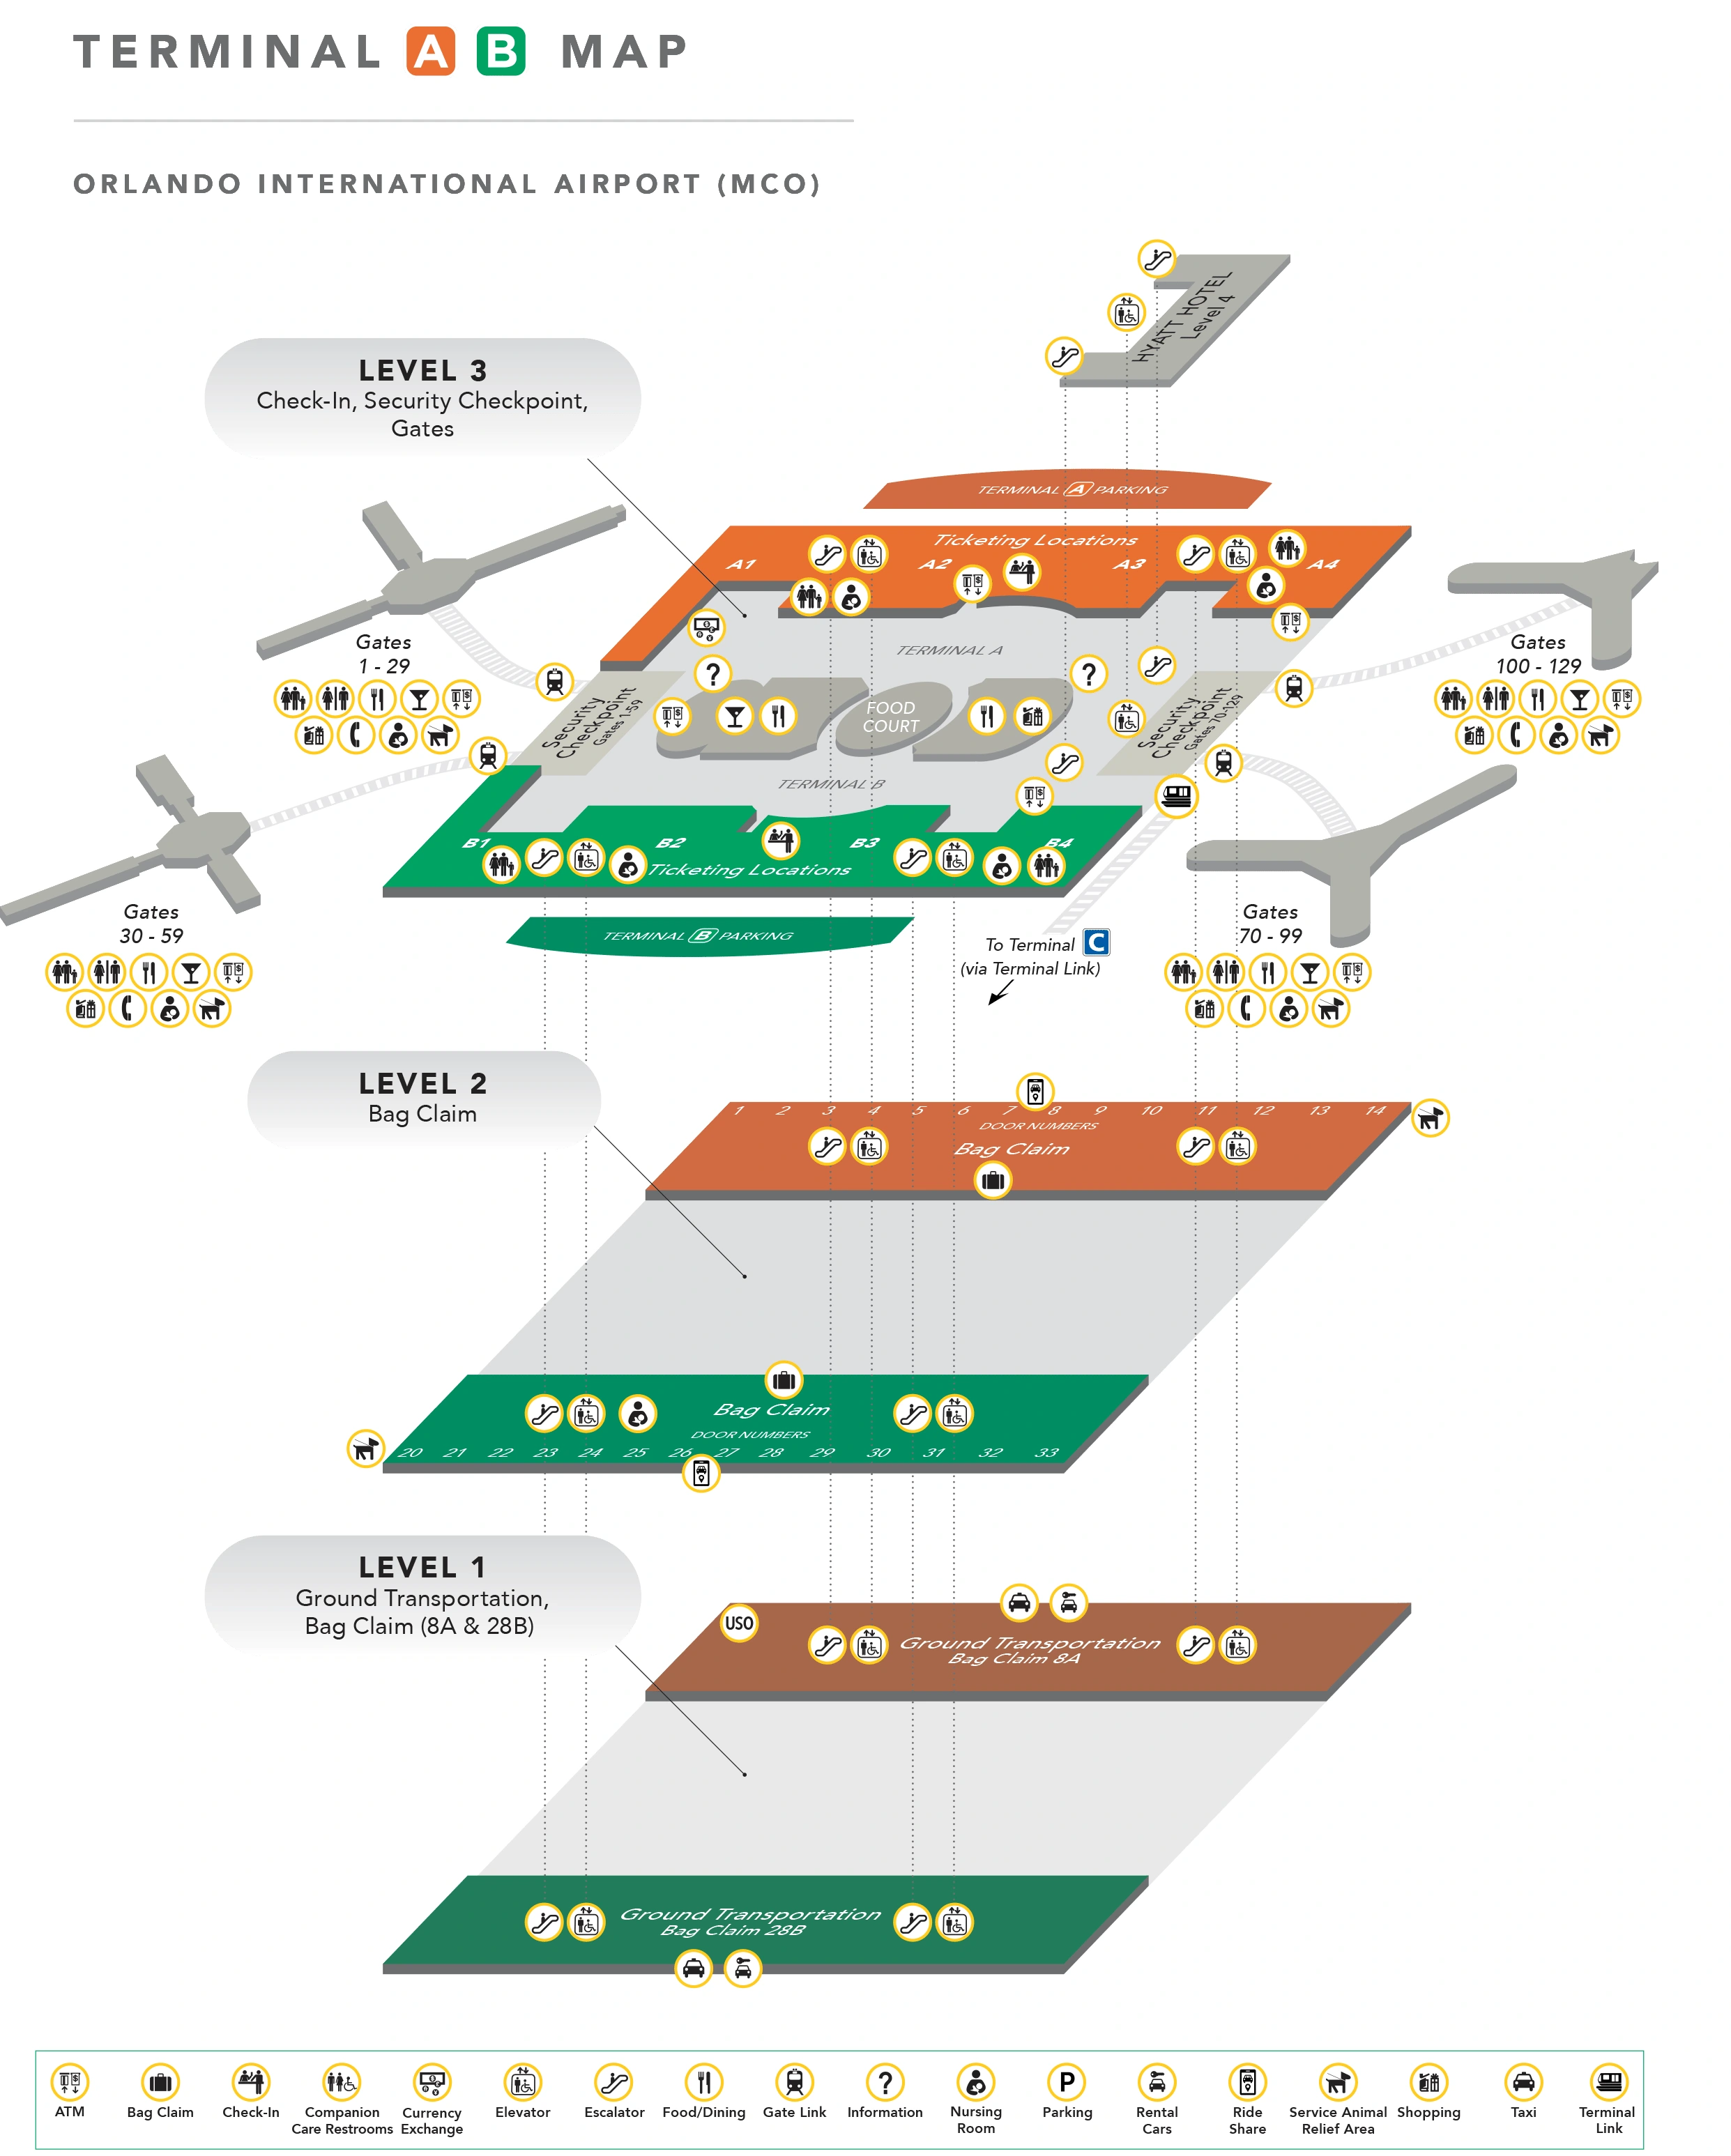
Orlando International Airport’s Terminal A is the north face of a single, rectangular Main Terminal within Central Florida’s main airport complex (MCO), not a standalone building. The landside hall runs east–west, with A-side ticketing along the north wall (Level 3), mirrored baggage claim along the north side (Level 2), and shared security at the west/east ends. The scale is “big-box” wide: you can cross A-to-B through the central atrium, but security and tram choices create hard one-way boundaries.
| Zone | Connection | Walk Time |
|---|---|---|
| Level 3 — A-side ticketing (north wall) | West Security (Gates 1–59) | 6–10 min |
| Level 3 — West Hall (post-TSA) | APM to Airside 1 (Gates 1–29) | 2–4 min |
| Level 3 — West Hall (post-TSA) | APM to Airside 3 (Gates 30–59) | 2–4 min |
| Level 2 — A-side baggage claim (Carousels 1–16) | Rideshare curb (Doors 1–14) | 2–5 min |
| Level 1 — A-side ground transport | Off-airport rental shuttles (A11–A13) | 4–8 min |
Orlando International Airport Terminal A Map Strategy
- Ignore “Terminal A” as a self-contained concept; navigate by gate ranges and the west/east checkpoint split (Gates 1–59 vs Gates 70–129).
- Treat the post-TSA tram decision as a point-of-no-return: confirm “Gates 1–29” versus “Gates 30–59” before committing to a platform.
- Use A/B vertical cores deliberately: orange “A” markers for Terminal A baggage claim access after the tram, and green “B” markers only if your claim is on the B-side.
- Make ground-transport choices by level first, then door/bay: Level 2 for rideshare doors, Level 1 for shuttle bays, so you don’t loop between curbs.
2026 Orlando International Airport Terminal A Map + Printable PDF
In 2026, the Terminal A wayfinding challenge remains the same: A/B labels describe the building faces and baggage/ticketing zones, while checkpoint choice and APM platform choice are gate-range driven. The West Hall checkpoint still feeds both Airside 1 and Airside 3, and the tram system continues to function as a hard boundary where a wrong choice can trigger an exit-to-landside reset.
Orlando International Airport Terminal A Map Guide
What is the exact physical location (landmarks + level) of the Terminal A-side TSA entrance used for Terminal A check-in passengers?
The Terminal A-side TSA entrance is the north approach into the West Security Checkpoint on Level 3 (Departures) at the west end of the Main Terminal atrium. From A-side ticketing (north wall counters like Spirit/Frontier/JetBlue), walk inward toward the central atrium, then continue west toward the pre-security West Hall cluster anchored by the Food Court and the Universal Orlando Store. The definitive overhead confirmation is “Gates 1–59,” which marks the West checkpoint bank; entering from the north flank simply keeps you closer to the A-side counters before the stanchions merge.
From Terminal A ticketing, what is the shortest mapped walking route to reach the B-side checkpoint (for MCO Reserve) without accidentally entering the wrong queue?
Walking straight across the Level 3 atrium to the south flank of the West Security Checkpoint is the shortest route to the Terminal B MCO Reserve entry. From Terminal A ticketing counters on the north wall, walk perpendicular away from the counters into the open central atrium, aiming toward the west end “Gates 1–59” checkpoint bank. When you reach the first stanchions/queue mouths on the north side (the natural A-side approach), do not step into the General/PreCheck lanes; keep walking past those entrances across the atrium toward the south wall until you’re closer to the United/American counter side, then join the MCO Reserve/CLEAR-marked entry on that B-side flank.
Where is the exact point (doorway/connector) where you lose the ability to cross to the other secure side and would be forced to exit + re-clear TSA?
The tram exit portals at the Main Terminal end of the Airside APM are the point of no return because they funnel you through one-way doors into the non-secure Level 3 atrium. The critical moment happens when you step off the Airside 1 tram and pass the one-way glass/anti-backtrack doors that discharge arriving passengers into the landside atrium. From that doorway forward, there is no connector to any other secure platform or airside without re-entering a TSA checkpoint; you must walk back to West Security and re-clear if you need a different tram or airside.
After clearing Terminal A security, which tram/monorail platform (left/right) serves Airside 1 (gates 1–29), and what are the nearest fixed landmarks to confirm you’re at the correct platform?
The right-hand platform serves Airside 1 (Gates 1–29) after you clear the West Security Checkpoint. From the recomposure area (shoes/belts back on), face into the West Hall APM station and verify the large overhead gantry sign that reads “Gates 1–29” above the right-side entrance. The closest fixed confirmation points are the station split immediately after the TSA exit and the adjacent glass exit doors where arriving passengers from Airside 1 stream out near that right-side platform entrance.
Where are the warning signs (and which tram door/side) that indicate you must board the correct tram for specific gate ranges?
The warning signs are mounted overhead on the fixed station headers at the West Hall split immediately after the TSA recomposure area, not on the tram doors themselves. As the secure corridor divides into two platform entrances, the right-side header reads “Gates 1–29” and the left-side header reads “Gates 30–59,” each with directional arrows. Because tram door configurations can vary, the controlling decision is which platform entrance you walk into under those overhead gate-range signs; that’s the last clear, map-stable checkpoint before boarding.
For Terminal A / Airside 1 gates 11–17, where is the nearest overflow seating zone (outside the immediate gate pen) shown on the map?
The nearest overflow seating zone is the Airside 1 central hub food court seating area near the tram station. Walking back “inbound” from Gates 11–17 toward the Airside 1 APM doors takes you out of the narrow Gate 10–19 pier and into the wider convergence space with tables and open benches.
From the Gates 11–17 cluster, walk east toward the Airside 1 hub where the three gate corridors meet. Use the food vendors as your fixed confirmation landmarks, especially the Burger King and Cold Stone Creamery storefronts around the open seating. If you can see the tram station corridor/doors in the same sightline as the food court tables, you’re in the correct overflow zone for waiting outside the gate pen.
From the worst-crowded gate cluster in Terminal A’s typical low-cost carrier area, what is the closest restroom and its exact walking distance (or nodes/turns) on the map?
The closest restroom is the restroom block directly across from Gate 11 on the Airside 1 Gates 10–19 pier, about 50–75 feet from the midpoint of the cluster (around Gate 15). From the crowded center of the pier, walk straight along the main corridor toward Gate 11 with no turns; the restroom entrance is on the opposite side of the walkway from the gate frontage. If that doorway is saturated, the next practical fallback is the central hub near the tram exit, reached by continuing east off the pier into the wider food court hub.
After riding the tram back to the main terminal, where exactly are the big illuminated “A” vs “B” markers that determine which escalator/elevator bank drops to Terminal A baggage claim?
The big illuminated “A” vs “B” markers are mounted high above the Level 3 atrium escalator/elevator banks on the north (A) and south (B) sides of the main terminal. After you exit the inbound tram platform into the central landside atrium, look up toward the vertical-core banks: the orange/red “A” sits above the north-side bank that drops you to Terminal A baggage claim, while the green “B” sits above the south-side bank. Walking to the orange “A” core before going down is the key move that keeps you aligned with Carousels 1–16.
What is the exact level + door/bay location for rideshare pickup on the Terminal A side, starting from Terminal A baggage claim?
Rideshare pickup is on Level 2 (Arrivals curb) at Terminal A, typically spanning Doors 1–14. From the Terminal A baggage claim hall (Carousels 1–16), stay on the same level and walk to the glass exit doors along the curbside frontage; the door numbers above the exits are your fixed confirmation landmarks, and your app pickup instructions should match a Door 1–14 zone on the A-side. During late-night operations (commonly around 9:00 PM–2:00 AM), pickups may be shifted to Level 3 to reduce arrivals congestion, but the default mapped node remains Level 2 at Doors 1–14.
From Terminal A baggage claim, where is the exact bus/shuttle stop for the rental car facility (node name + nearest landmark + level)?
The off-airport rental car shuttle stops are on Level 1 (Ground Transportation) at A-side Spaces A11–A13. From Terminal A baggage claim (Level 2, Carousels 1–16), take the nearest elevator or escalator down one level to Level 1, then exit toward the A-side ground transportation curb where the bay/column markers are posted. The fixed confirmation landmarks are the posted bay labels on the columns—look specifically for “A11,” “A12,” and “A13”—which designate the off-airport rental shuttle loading zone separate from other bus and hotel shuttle areas.
From Terminal A top/garage parking, which elevator bank/bridge delivers you to the fastest entry point for Terminal A ticketing?
The Garage A elevator bank that feeds the pedestrian bridge into Level 3 (Departures) is the fastest entry path to Terminal A ticketing. Park in Garage A and follow signs for the terminal connector/moving walkway bridge, then use the nearest elevator core on the terminal-facing side of the garage that drops you onto the bridge level. That bridge delivers you into the Main Terminal’s north side directly in front of the Terminal A ticketing counters (the Spirit/Frontier/JetBlue counter wall), avoiding an atrium cross-over from the B-side.
Where are the nearest elevators (not escalators) from Terminal A security exit to the tram level, and what landmarks confirm the correct shaft?
The nearest elevators are positioned in the post-security West Hall station area between the two APM platform entrances for Gates 1–29 and Gates 30–59. After you exit the West Security Checkpoint and reach the recomposure zone, look ahead to the station split; the elevator shaft is the central vertical-core column structure between the escalator banks that rise toward the tram level. The fixed confirmations are overhead signs reading “APM Station” or “Tram” and the fact that the elevator doors sit between the two platform entry headers rather than off to a side corridor or service area.
If you go to The Club @ MCO (near specific gates), what is the mapped point of no return where transferring to another gate cluster would require re-clearing security?
The Airside 1 tram boarding doors for the return trip are the point of no return because riding back forces a landside exit and a new TSA screening to reach any other airside. The Club @ MCO sits in Airside 1 near Gate 1 (by XpresSpa), so you can only use it after you’ve already committed to the Airside 1 APM.
If you leave the lounge area and enter the Airside 1 APM station to board the tram back, the arrival flow at the Main Terminal discharges you through one-way portals into the non-secure Level 3 atrium. From there, reaching Airside 3 (Gates 30–59) requires re-clearing the West Security Checkpoint before boarding the other tram.
On the Terminal A side, what are the exact curb locations (Arrivals vs Departures) and the closest vertical path to reach baggage claim fastest?
Arrivals curb is on Level 2 and Departures curb is on Level 3 on the Terminal A face of the Main Terminal. For the fastest vertical path to Terminal A baggage claim, use the Terminal A-side escalator/elevator bank that drops exactly one level from Level 3 down to Level 2.
If you enter from the Level 3 departures curb and need baggage claim quickly, go inside and immediately target the vertical core signed for “Baggage Claim,” then descend one floor to Level 2 (the baggage hall for Carousels 1–16). Avoid going down to Level 1 unless you’re specifically heading to ground transportation bays, because Level 2 is the baggage layer and the direct match for arrivals curb and claim access.

