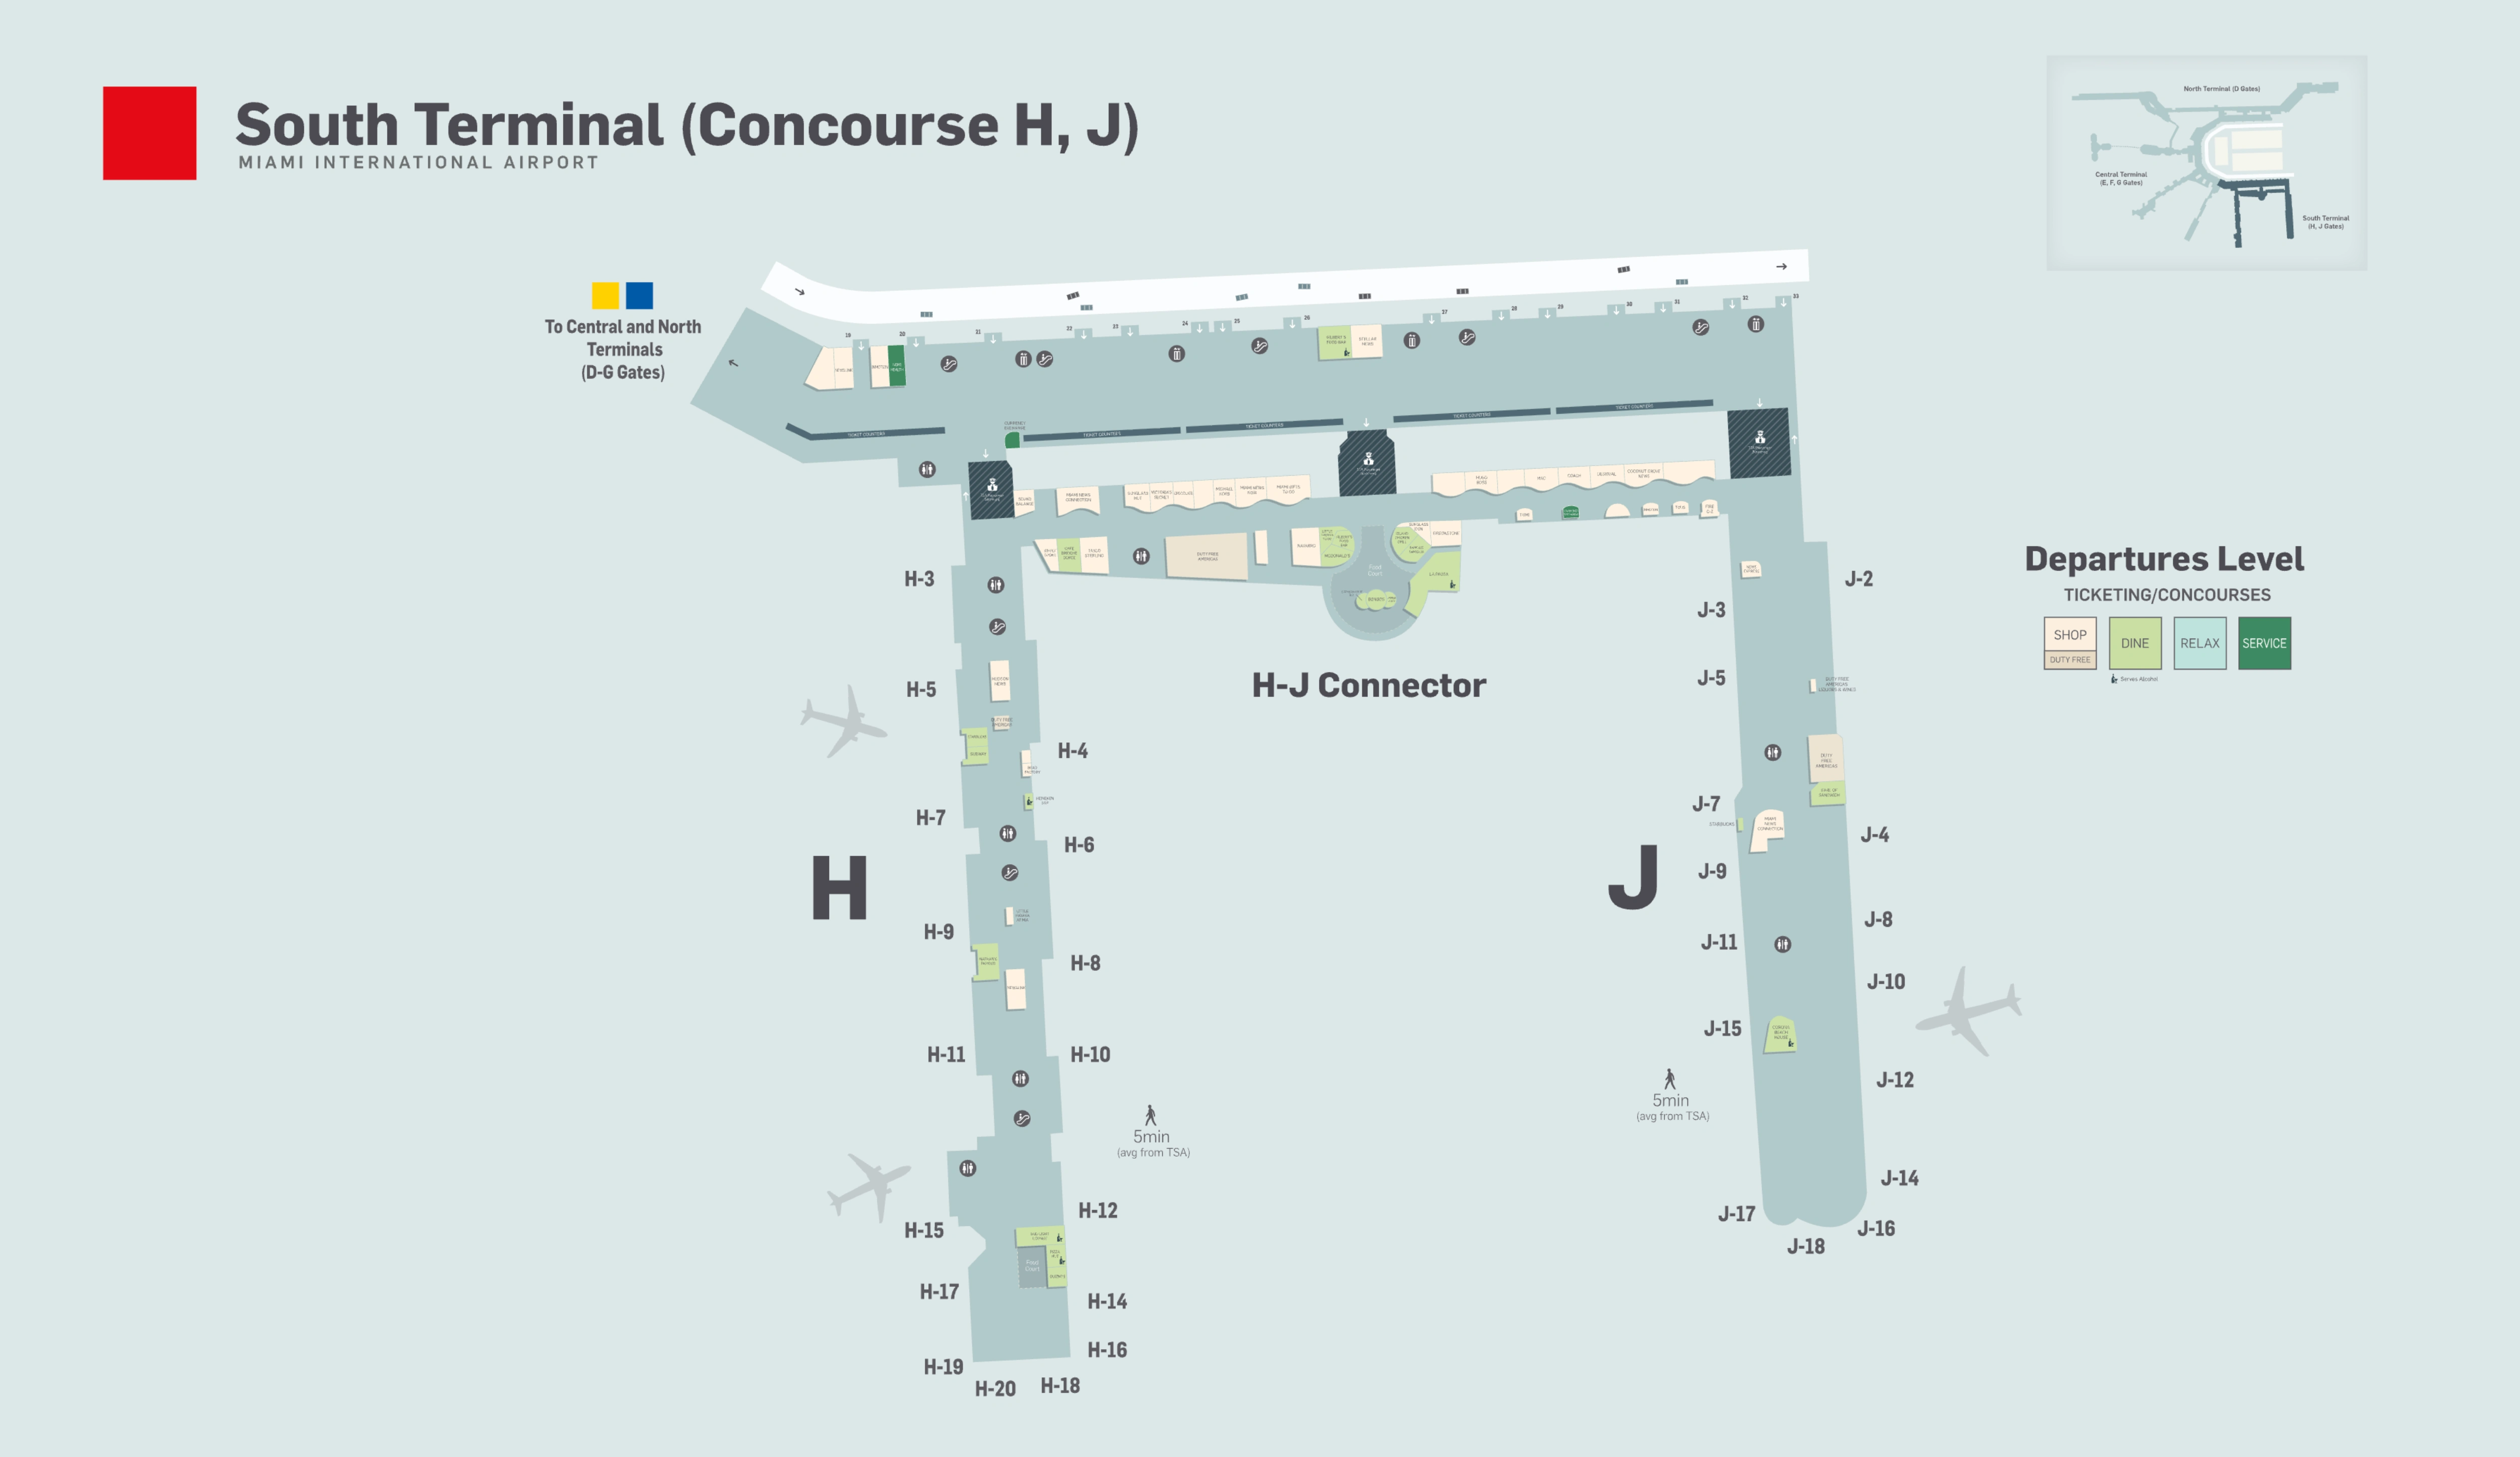
Miami International Airport South Terminal Map (Most Up-To-Date)
Miami International Airport’s South Terminal is a two-pier complex: Concourse H (older, more segmented) and Concourse J (newer, long linear spine) joined by the H–J Connector at the root. The whole footprint runs generally southeast from the central terminal core, with the longest walks at the far end of J. Within Miami’s primary airport hub, passenger flow is dominated by three levels (Arrivals L1, Departures L2, MIA Mover/Skyride L3) and a single “safe” security node in the connector.
Map Table
| Concourse | Gate Range | Security Checkpoints | Airside Connectivity |
|---|---|---|---|
| H | H3–H20 | CP 8, CP 9 | H–J connector |
| J | J2–J18 | CP 9, CP 10 | H–J connector |
| H–J Connector | central node | CP 9 | H ↔ J only |
| South Terminal boundary | — | — | no airside link to D/E/F/G |
Miami International Airport South Terminal Map Strategy
- Treat the far end of Concourse J as a stamina event: Gate J18 arrivals funnel into a sterile corridor to FIS/CBP (about 0.6–0.7 miles), with no usable restrooms/water until the processing hall zone.
- After customs, assume you are landside and “reset”: use the bag re-check belt for through-tagged bags, then go up to Departures Level 2 and aim for Security Checkpoint 9 in the H–J Connector to re-enter.
- Use Checkpoint 9 as default when timing is tight or it’s late: Checkpoints 8 (H) and 10 (J) can be closed, and a wrong choice forces a 3–5 minute backtrack landside before you even start the security line.
- Keep the connectivity rule straight: H and J connect airside via the H–J Connector on Level 2, but there is no airside path from South Terminal to Central/North (F/G/E/D); terminal-to-terminal moves require exiting secure, going landside, and using Level 3 Skyride moving walkways.
2026 Miami International Airport South Terminal Map + Printable PDF
The South Terminal layout in 2026 still runs on the same high-friction logic: international arrivals feed into a sterile corridor to FIS/CBP, then eject landside and force a TSA re-screen to return to gates. Checkpoint 9 in the H–J Connector remains the only 24-hour checkpoint, while Checkpoints 8 (H) and 10 (J) operate limited day/evening windows that can trigger backtracking.
2026 Miami International Airport South Terminal Map Guide
What is the exact walking route (and distance) from the furthest Concourse J gates to passport control / CBP processing in the South Terminal?
The walk from the furthest Concourse J gate area (typically Gate J18) to passport control/CBP in South Terminal is about 0.6–0.7 miles and realistically takes 15–20 minutes before any immigration line. Arrivals are diverted into a sterile corridor system that runs parallel to (but separated from) the departures concourse, so you cannot access gate-area restrooms, shops, or seating during the walk.
| Segment | Route vector | Distance / time |
|---|---|---|
| J18 arrivals exit | sterile corridor entry | immediate |
| Sterile corridor run | follow “Arrivals / FIS / Immigration” along the glass-walled lane above/along the J spine toward the concourse root | ~0.5–0.7 miles total; ~15–20 min typical |
| FIS entry | corridor terminates at Federal Inspection Services hall | end point |
| CBP hall | US/Visitor/GE/MPC queues | processing begins |
After exiting customs in Concourse J, what is the exact path to the correct TSA re-screen checkpoint (including level + landmark) for departing flights?
Security is not optional after customs: once you pass the customs exit, you are landside and must go back through TSA to reach any departure gates. The most reliable re-entry is Security Checkpoint 9 on Level 2 in the H–J Connector, because it is the only 24-hour checkpoint in the South Terminal.
After you exit the Customs Hall into the Level 1 greeter’s lobby, follow “Departures” to the main elevator/escalator bank and go up to Level 2. On Level 2, walk toward the central spine between the H and J ticketing areas and follow signs for “Concourse H & J / Security Checkpoint 9.” The key landmark is the H–J Connector zone: Checkpoint 9 sits between the Delta-side counters (H side) and the Lufthansa/LATAM-side counters (J side), and its airside exit drops you directly into the connector near the lounge/food cluster.
Are Concourses H and J connected airside without re-clearing security, and where is the H–J connector corridor located (level + nearest gates/landmarks)?
Concourses H and J are connected airside, so you can walk between them without re-clearing TSA once you are already in the South Terminal secure zone. The connection is the H–J Connector corridor on Level 2 (Departures level), sitting at the root where both concourses begin.
The corridor is effectively the “hinge” between the H stem and the J stem: on the H side it’s closest to the low-number H gates near the concourse root (around H3/H4 area), and on the J side it’s closest to the low-number J gates at the start of the pier (around J2/J3). If you clear Security Checkpoint 9, you step out directly into this connector; turning one way feeds Concourse H and turning the other feeds Concourse J, with the main amenity cluster and lounge access concentrated in the same connector zone.
If you clear security at Concourse H, what gate ranges / areas can you reach airside (H only vs H+J), based on the South Terminal’s checkpoint layout?
Clearing security at Concourse H (Security Checkpoint 8) gives you airside access to both Concourse H and Concourse J, not H-only. The South Terminal secure side is a unified loop across H ↔ H–J Connector ↔ J, so you can reach every H and J gate once you are screened.
| Where you clear security | Airside gates you can reach | Not reachable airside |
|---|---|---|
| Concourse H (CP 8) | H3–H20, J2–J18 | D, E, F, G |
| H–J Connector (CP 9) | H3–H20, J2–J18 | D, E, F, G |
| Concourse J (CP 10) | J2–J18, H3–H20 | D, E, F, G |
What is the fastest landside transfer path from South Terminal (H/J) to North Terminal (D), and where exactly are the entry points (doors/levels) to start that route?
The fastest South-to-North transfer is landside on Level 3 using the Skyride moving walkways toward Concourse D, because there is no airside bridge from H/J to D. The route starts by exiting the secure area, getting to Level 3, then riding the moving walkways north past Central Terminal areas until you reach the D block.
From South Terminal public areas, use the nearest elevator/escalator bank to go to Level 3 (the “logistics layer” that also carries MIA Mover access). On Level 3, follow signs toward “Concourses E–D” and step onto the Skyride moving walkways heading north. Stay on Level 3 until you arrive at the North Terminal (D) section, then go down to Level 2 for departures and enter a Concourse D security checkpoint (whichever is closest to your gate). Typical end-to-end time on the walkways is about 15–20 minutes from the South Terminal core to the North Terminal core.
If you mistakenly go airside in the wrong terminal for your departure (e.g., you’re in H/J but flying from D/E), what is the least-backtracking exit + re-entry plan (exact exits, walkways, and checkpoints)?
There is no airside route from South Terminal (H/J) to Concourse D/E, so you must exit security and re-clear at the correct terminal. The least-backtracking plan is to leave the secure zone via the nearest “Exit / Baggage Claim” lane, get to Level 3, take the Skyride moving walkways north, then re-enter TSA at D/E.
Exit the South Terminal secure area using the closest posted “Exit / Baggage Claim” path (not a gate corridor), which drops you to the public terminal side. Immediately use the nearest elevator bank to go up to Level 3, then follow overhead signs to the Skyride moving walkways toward “Concourses E–D” and ride them north until you reach the D/E terminal block. From there, go down to Level 2 (Departures) and enter the closest Concourse D/E security checkpoint for your gate; the typical total penalty for this wrong-terminal mistake is roughly 45–60 minutes once you include the walk plus a fresh TSA line.
Where exactly are the South Terminal (H/J) TSA checkpoints located, and which one yields the shortest walk to common departure gate zones?
The South Terminal has three TSA checkpoints: Checkpoint 8 at the Concourse H entrance (west), Checkpoint 9 in the H–J Connector (center, 24-hour), and Checkpoint 10 at the Concourse J entrance (east). The shortest walk depends on your gate zone, but Checkpoint 9 is the safest default because it reliably feeds both concourses and doesn’t close.
Use Checkpoint 8 when you are departing from mid-to-high H gates and you are entering during its operating window; it lands you closest to the H pier without extra connector walking. Use Checkpoint 10 when you are departing from deeper J gates (J-side pier) and it is open; it minimizes the initial trek down the long J spine. Use Checkpoint 9 when timing is tight, it’s late, you’re unsure which concourse you truly need, or you want the most stable access to both H and J from one entry point in the central connector zone near the main amenity/lounges cluster.
Where are the CLEAR / PreCheck / priority-style lanes (if present) in H/J, and at which checkpoint entrance do they physically start?
CLEAR and TSA PreCheck access in the South Terminal is routed through the checkpoint you choose, so the physical “start” is at the checkpoint entrance queue mouth for CP 8 (H), CP 9 (H–J Connector), or CP 10 (J). Checkpoint 9 is the most consistently available option because it operates 24 hours, while CP 8 and CP 10 follow limited schedules.
On the landside Departures Level 2, each checkpoint entrance has its own lane split immediately at the stanchions: look for the CLEAR podiums and the dedicated TSA PreCheck lane markings at the front of the checkpoint entry. In the H–J Connector, the CP 9 entry is the easiest to identify because it sits between the H-side (Delta-area) and J-side (Lufthansa/LATAM-area) ticketing zones; the CLEAR/PreCheck access begins right at that CP 9 queue mouth rather than deeper in the concourse. At CP 8 (H entrance) and CP 10 (J entrance), the expedited lanes begin at those respective checkpoint facades on Level 2, before you reach the x-ray/ID check positions.
For lounge-driven routing (e.g., enter J to use a lounge), what is the exact post-security path from the nearest checkpoint to the lounge area, and what is the re-screen penalty path to return to H for departure?
There is no re-screen penalty to return from J to H once you are airside in the South Terminal, because H and J are connected by the H–J Connector inside the secure zone. The only time you “pay” TSA again is if you exit to landside (or if you clear customs and get dumped landside).
From Security Checkpoint 9, walk straight into the H–J Connector airside node, then turn toward Concourse J and follow the main J spine toward the low-number J gates; lounge access concentrated at the connector is reached by staying in that central node, while J-pier lounges are reached by continuing down the concourse toward the mid-J gate area (the common anchor zone is around J5/J6). To return to Concourse H for departure, reverse the route: walk back along the J spine to the connector node, cross the H–J Connector, and continue into Concourse H—no exit lanes, no TSA, just a continuous airside corridor.
In the South Terminal, where are the critical vertical transitions (elevators/escalators) that connect arrivals → processing → departures, and which specific choke points create the most backtracking risk?
The critical vertical transition is the elevator/escalator bank at the Concourse J international exit greeter’s lobby, because it is the main lift point from Level 1 (Arrivals/Customs exit) up to Level 2 (Departures/security) and Level 3 (MIA Mover/Skyride). This bank becomes a choke point when multiple widebodies unload and luggage carts stack up.
After international processing, the backtracking risk comes from choosing the wrong level on the first ascent: pressing Level 3 when you need Level 2 forces you to hunt for a down path or wait for another elevator in a crowded lobby, and it delays your re-screen entry. A second risk point is staying on Level 1 too long after customs and drifting toward curbside doors; once you commit to the curbside flow, you often have to fight against traffic to get back to the elevators for Departures. When the J-lobby elevator bank is saturated, the lowest-friction workaround is to walk west toward the older H-side public area on Level 1 and use the less-loaded elevator banks there to go up to Level 2 for Checkpoint 9.
What is the exact route from Concourse H arrivals to the correct exit/level for ground transportation or rideshare pickup, minimizing wrong-level detours?
Ground pickup for Concourse H arrivals is primarily on Level 1, so the cleanest route is to stay on Arrivals and exit directly to the lower curb unless your rideshare app explicitly directs you to Departures Level 2. The easiest failure to avoid is going upstairs out of habit and then having to come back down with bags.
From Concourse H arrivals, follow signs for “Baggage Claim / Ground Transportation” and remain on Level 1 through the baggage claim hall to the curbside doors. Use the door anchors for South Terminal H on the lower roadway (commonly posted as Door 31 or Door 34) to align with pickup zones and reduce wrong-door wandering. For Uber/Lyft, check the in-app pickup instructions after landing; if it specifies “Departures,” take the nearest elevator up to Level 2 and exit to the upper roadway instead of waiting on Level 1.
Where are the nearest restrooms/water/seating clusters along the H–J connector and main J spine, so travelers can plan a “pause point” during long walks (with gate-level anchors)?
Restrooms and seating are easiest to find in the H–J Connector core and around the mid-J gate cluster, with the most reliable “pause point” anchor near Gate J6 for water. This matters because the sterile arrivals corridor to CBP is effectively an amenity desert, so planning breaks works best once you’re back in the departure ecosystem.
Use the H–J Connector amenity cluster as the first reset point after screening: restrooms are grouped in the central connector block near the main food/retail hub. On the Concourse J spine, anchor to the J5/J6 zone for restrooms plus a water refill station near J6, then use the deeper concourse restroom node around J11/J12 as the next predictable stop if you’re walking toward the far gates. For seating, the most controllable “quiet pause” is an adjacent, less-active gate hold room (for example, if J7 is packed, check the neighboring J8 hold room just a short walk away).