Taiwan Taoyuan International Airport Terminal 2 Map (Most Up-To-Date)
Taiwan Taoyuan International Airport Terminal 2 is an H-system “south–north” airside concourse with a central hub and two gate piers (Zone C south, Zone D north), built as a vertical stack: Level 2 for arrivals/transfer processing and Level 3 for departures gates. Within Taiwan’s primary Taipei-area aviation hub, most transfer stress comes from being funneled through the single Level 2 transfer security node before you can climb back up to the C/D gates.
Map Table
| Zone | Key Nodes | Connection | Walk Time |
|---|---|---|---|
| Zone C | Gates C1–C10 | South airside connector to T1 Zone B | Hub-to-mid (C6/C7) ~6–8 min |
| Zone D | Gates D1–D10 | North airside connector to T1 Zone A | Hub-to-mid ~6–8 min |
| Level 2 | Transfer counters, transfer security, Skytrain platform (near C6) | T1↔T2 airside corridor, Skytrain | Connector hub-to-hub ~18–22 min |
| Level 4 | Rest zone, major lounges | Escalators/elevators from L3 hub | Security-to-rest zone ~3–5 min |
Taiwan Taoyuan International Airport Terminal 2 Map Strategy
- Treat Level 2 as the mandatory funnel: all T1↔T2 arrivals converge into transfer counters + the central transfer security checkpoint before any Level 3 gate access.
- Use the Skytrain only when the time window can absorb waiting + the Level 2 backtrack; the T2 drop-off near C6 can be “close but wrong level/side of security” for Zone C targets.
- Lock your routing to Zone C vs Zone D immediately after security: left for Zone C (south), right for Zone D (north); mixing A/B with C/D doubles distance fast.
- Plan for the dealbreaker: far C-gates plus late-night Skytrain call-mode can flip the best choice from “train” to “walk,” especially on short connections.
2026 Taiwan Taoyuan International Airport Terminal 2 Map + Printable PDF
2026 transfers in TPE Terminal 2 still hinge on the same “layer-cake” layout: the Skytrain and inter-terminal corridor feed you into Level 2 processing, then you must clear the central transfer security checkpoint before reaching Level 3 gates. Night operations remain a gotcha: the Skytrain can switch to on-demand mode, so the correct platform-side action changes under tight connection windows.

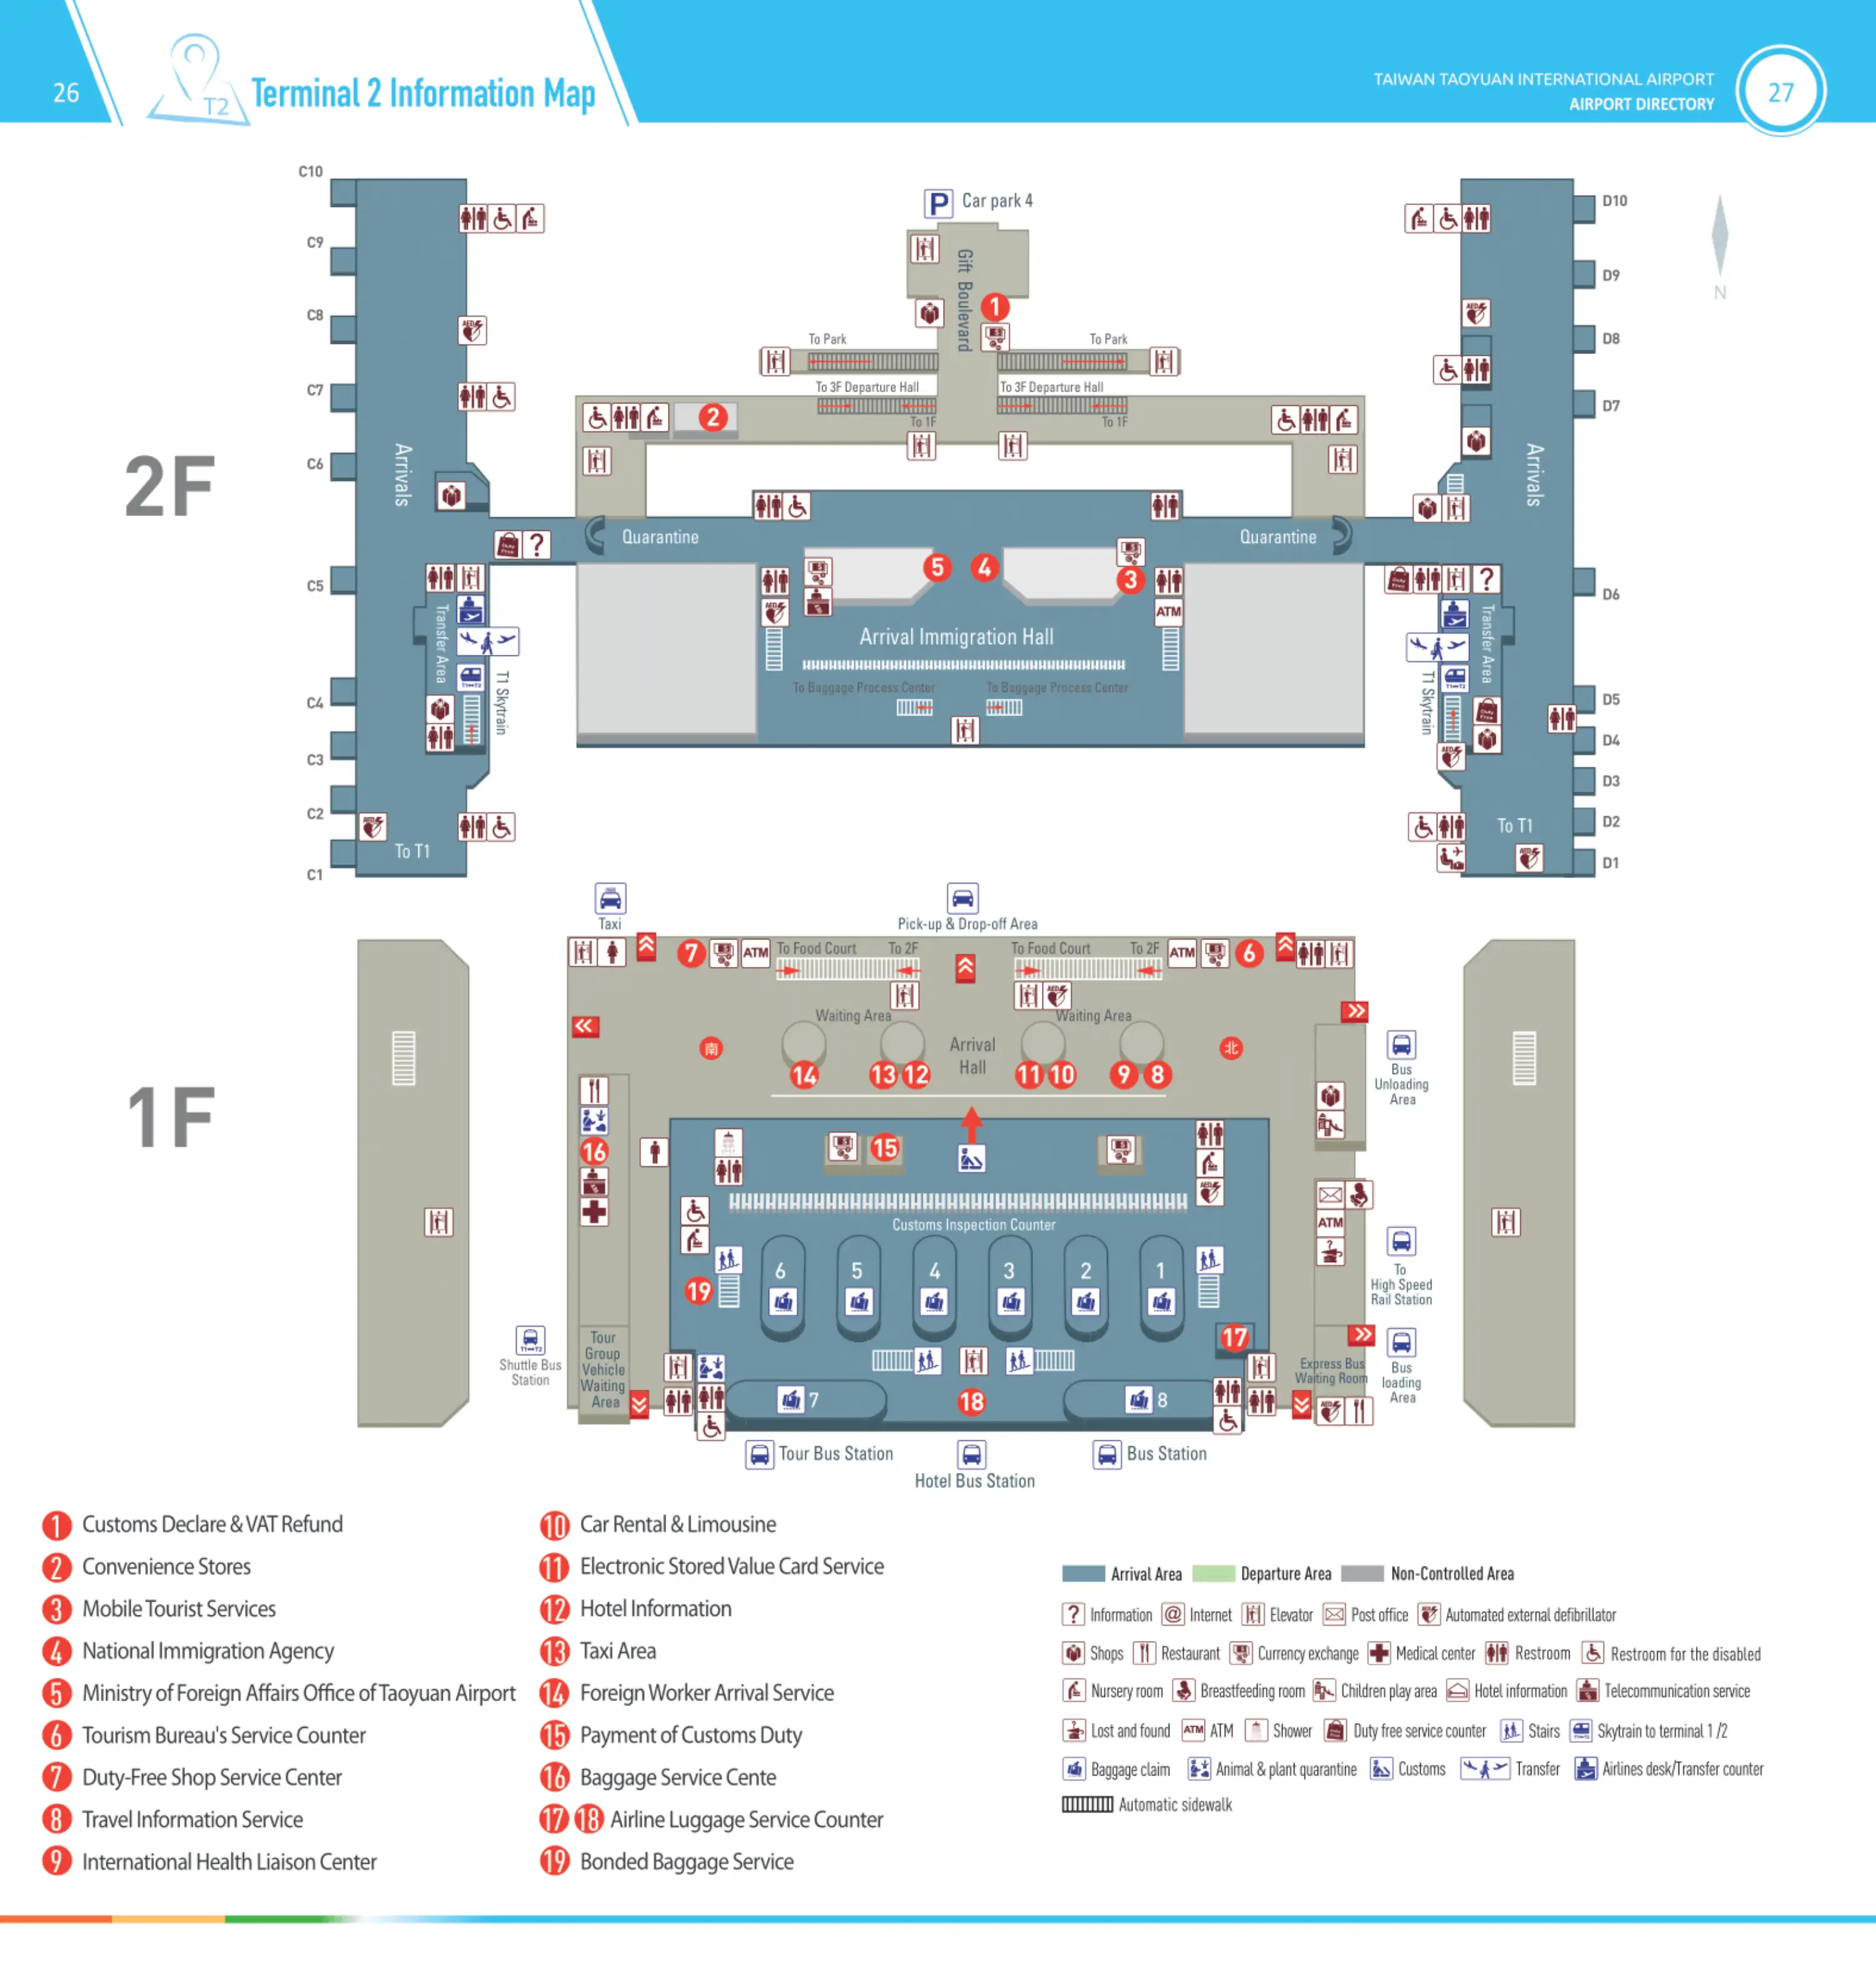
Taiwan Taoyuan International Airport Terminal 2 Level 1 2 Map 2026
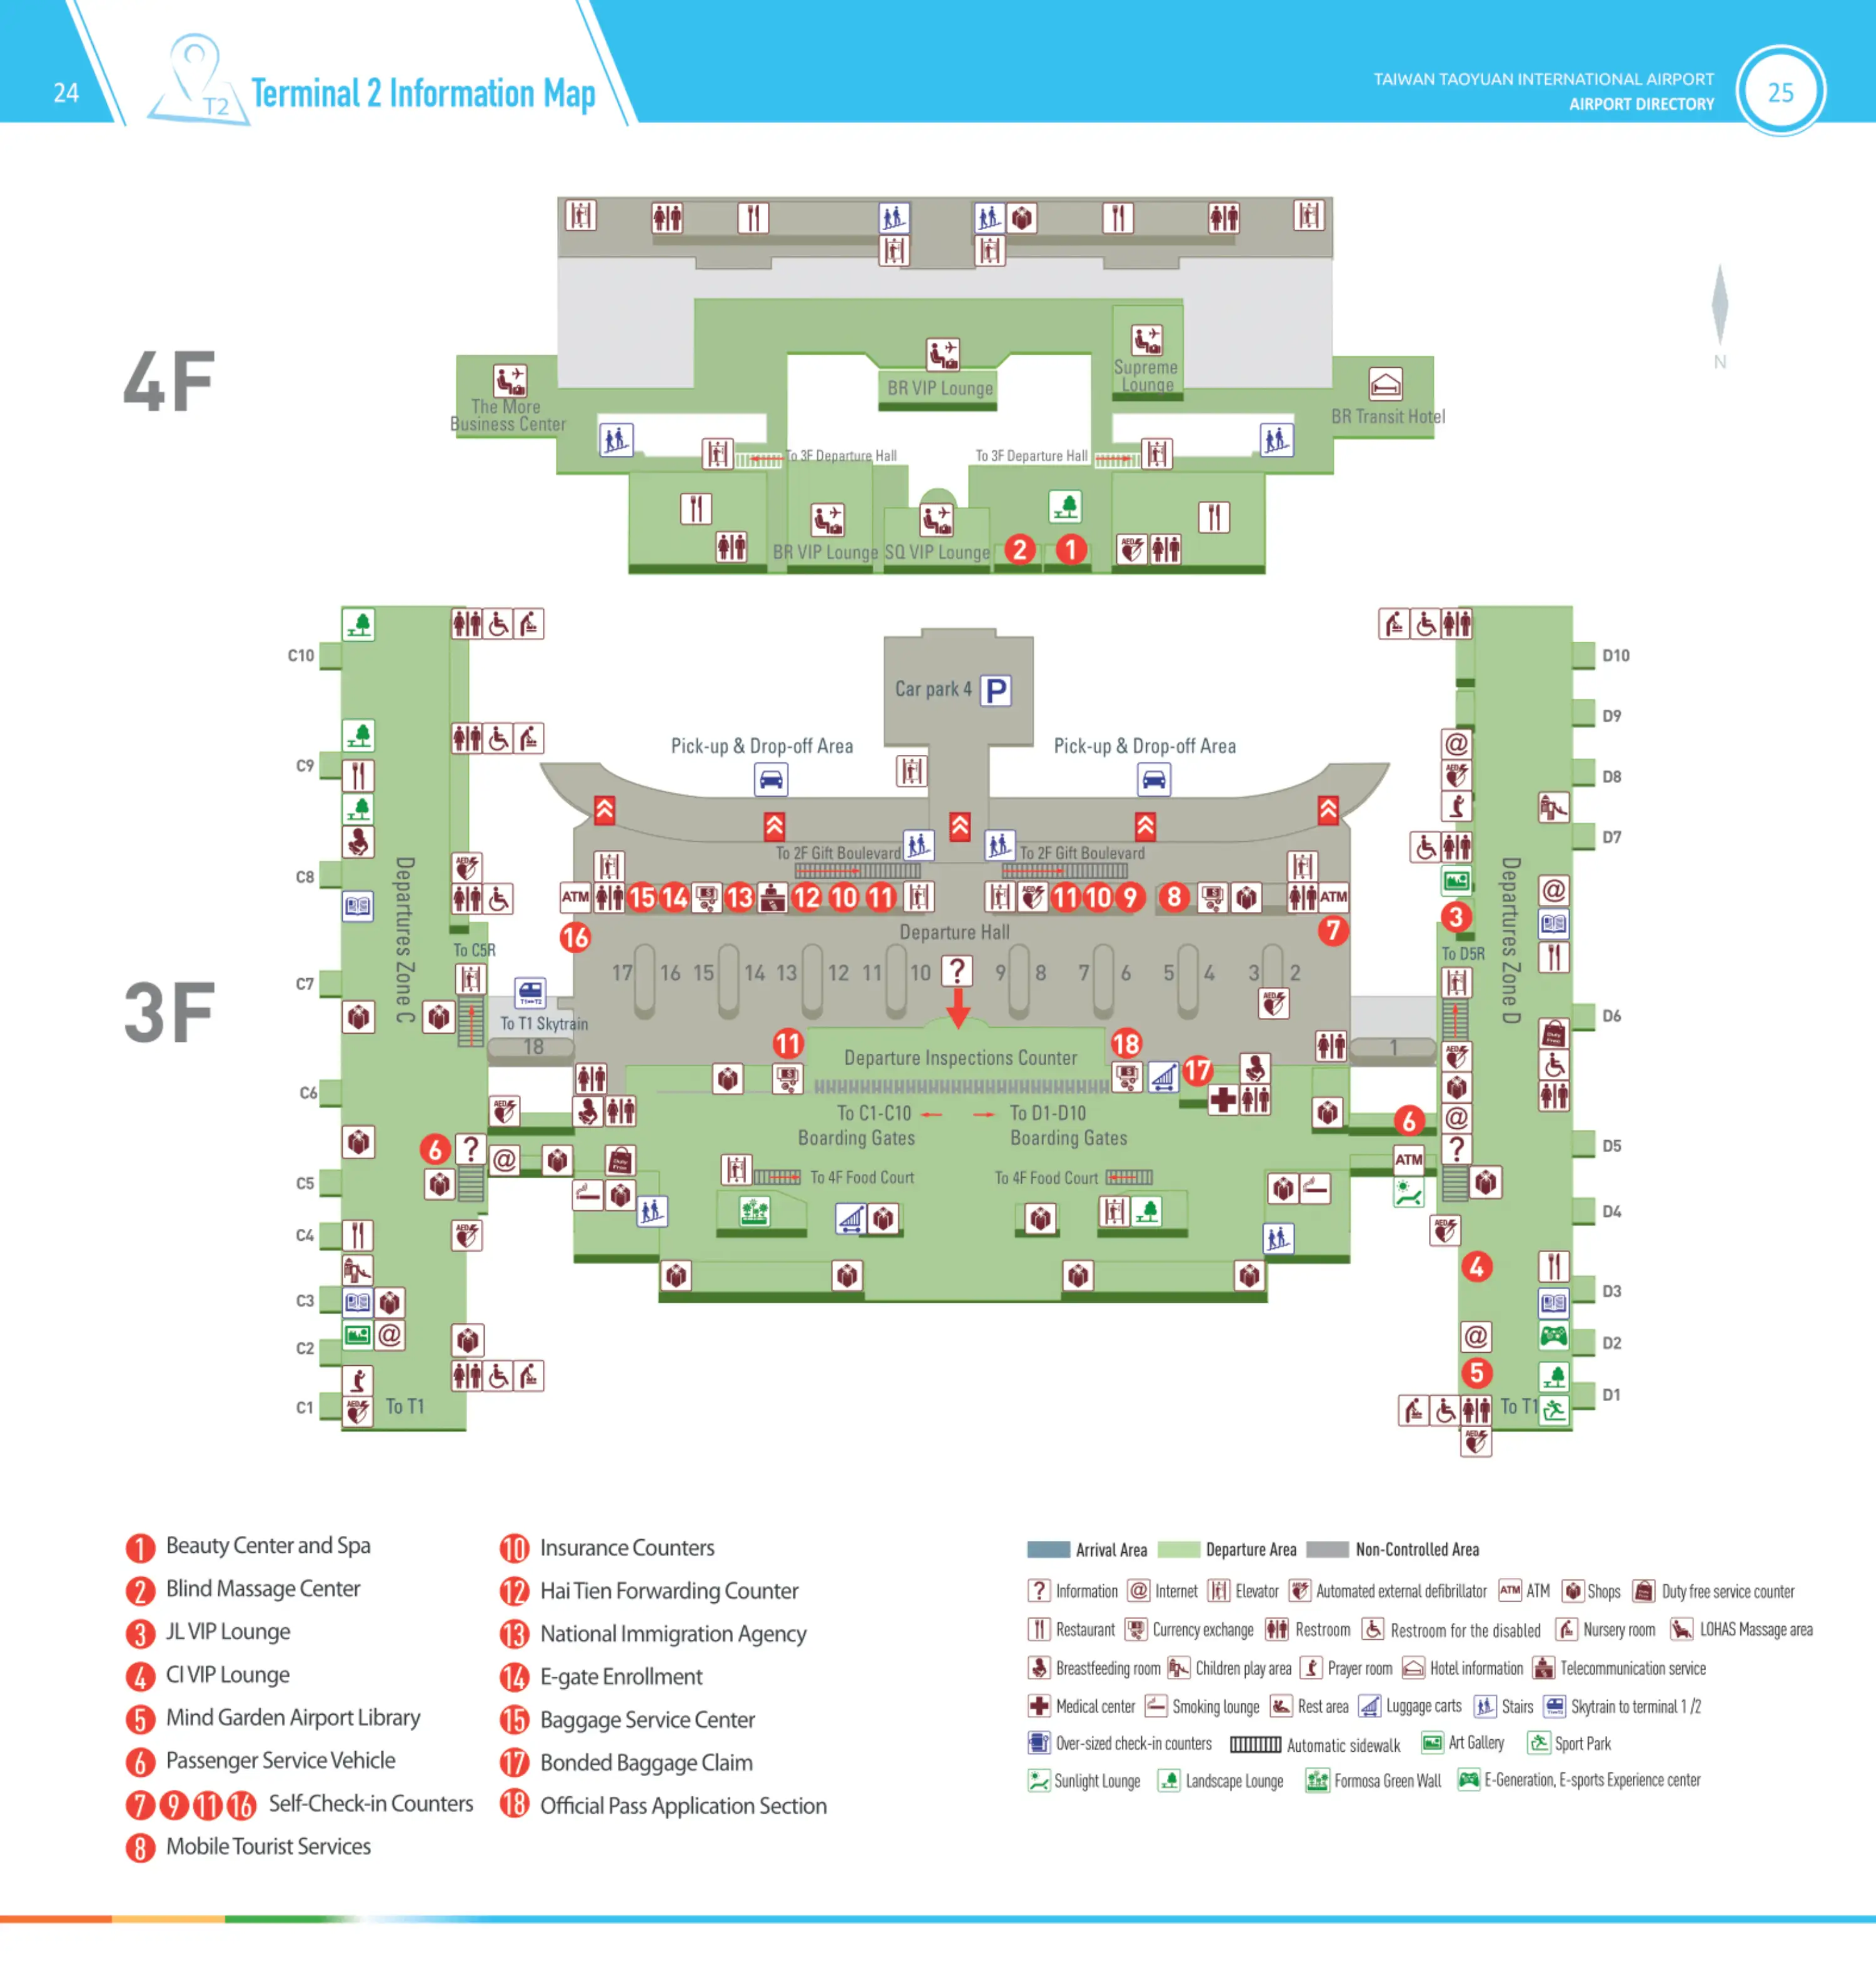
Taiwan Taoyuan International Airport Terminal 2 Level 3 4 Map 2026
Taiwan Taoyuan International Airport Terminal 2 Level B1 B2 Map 2026
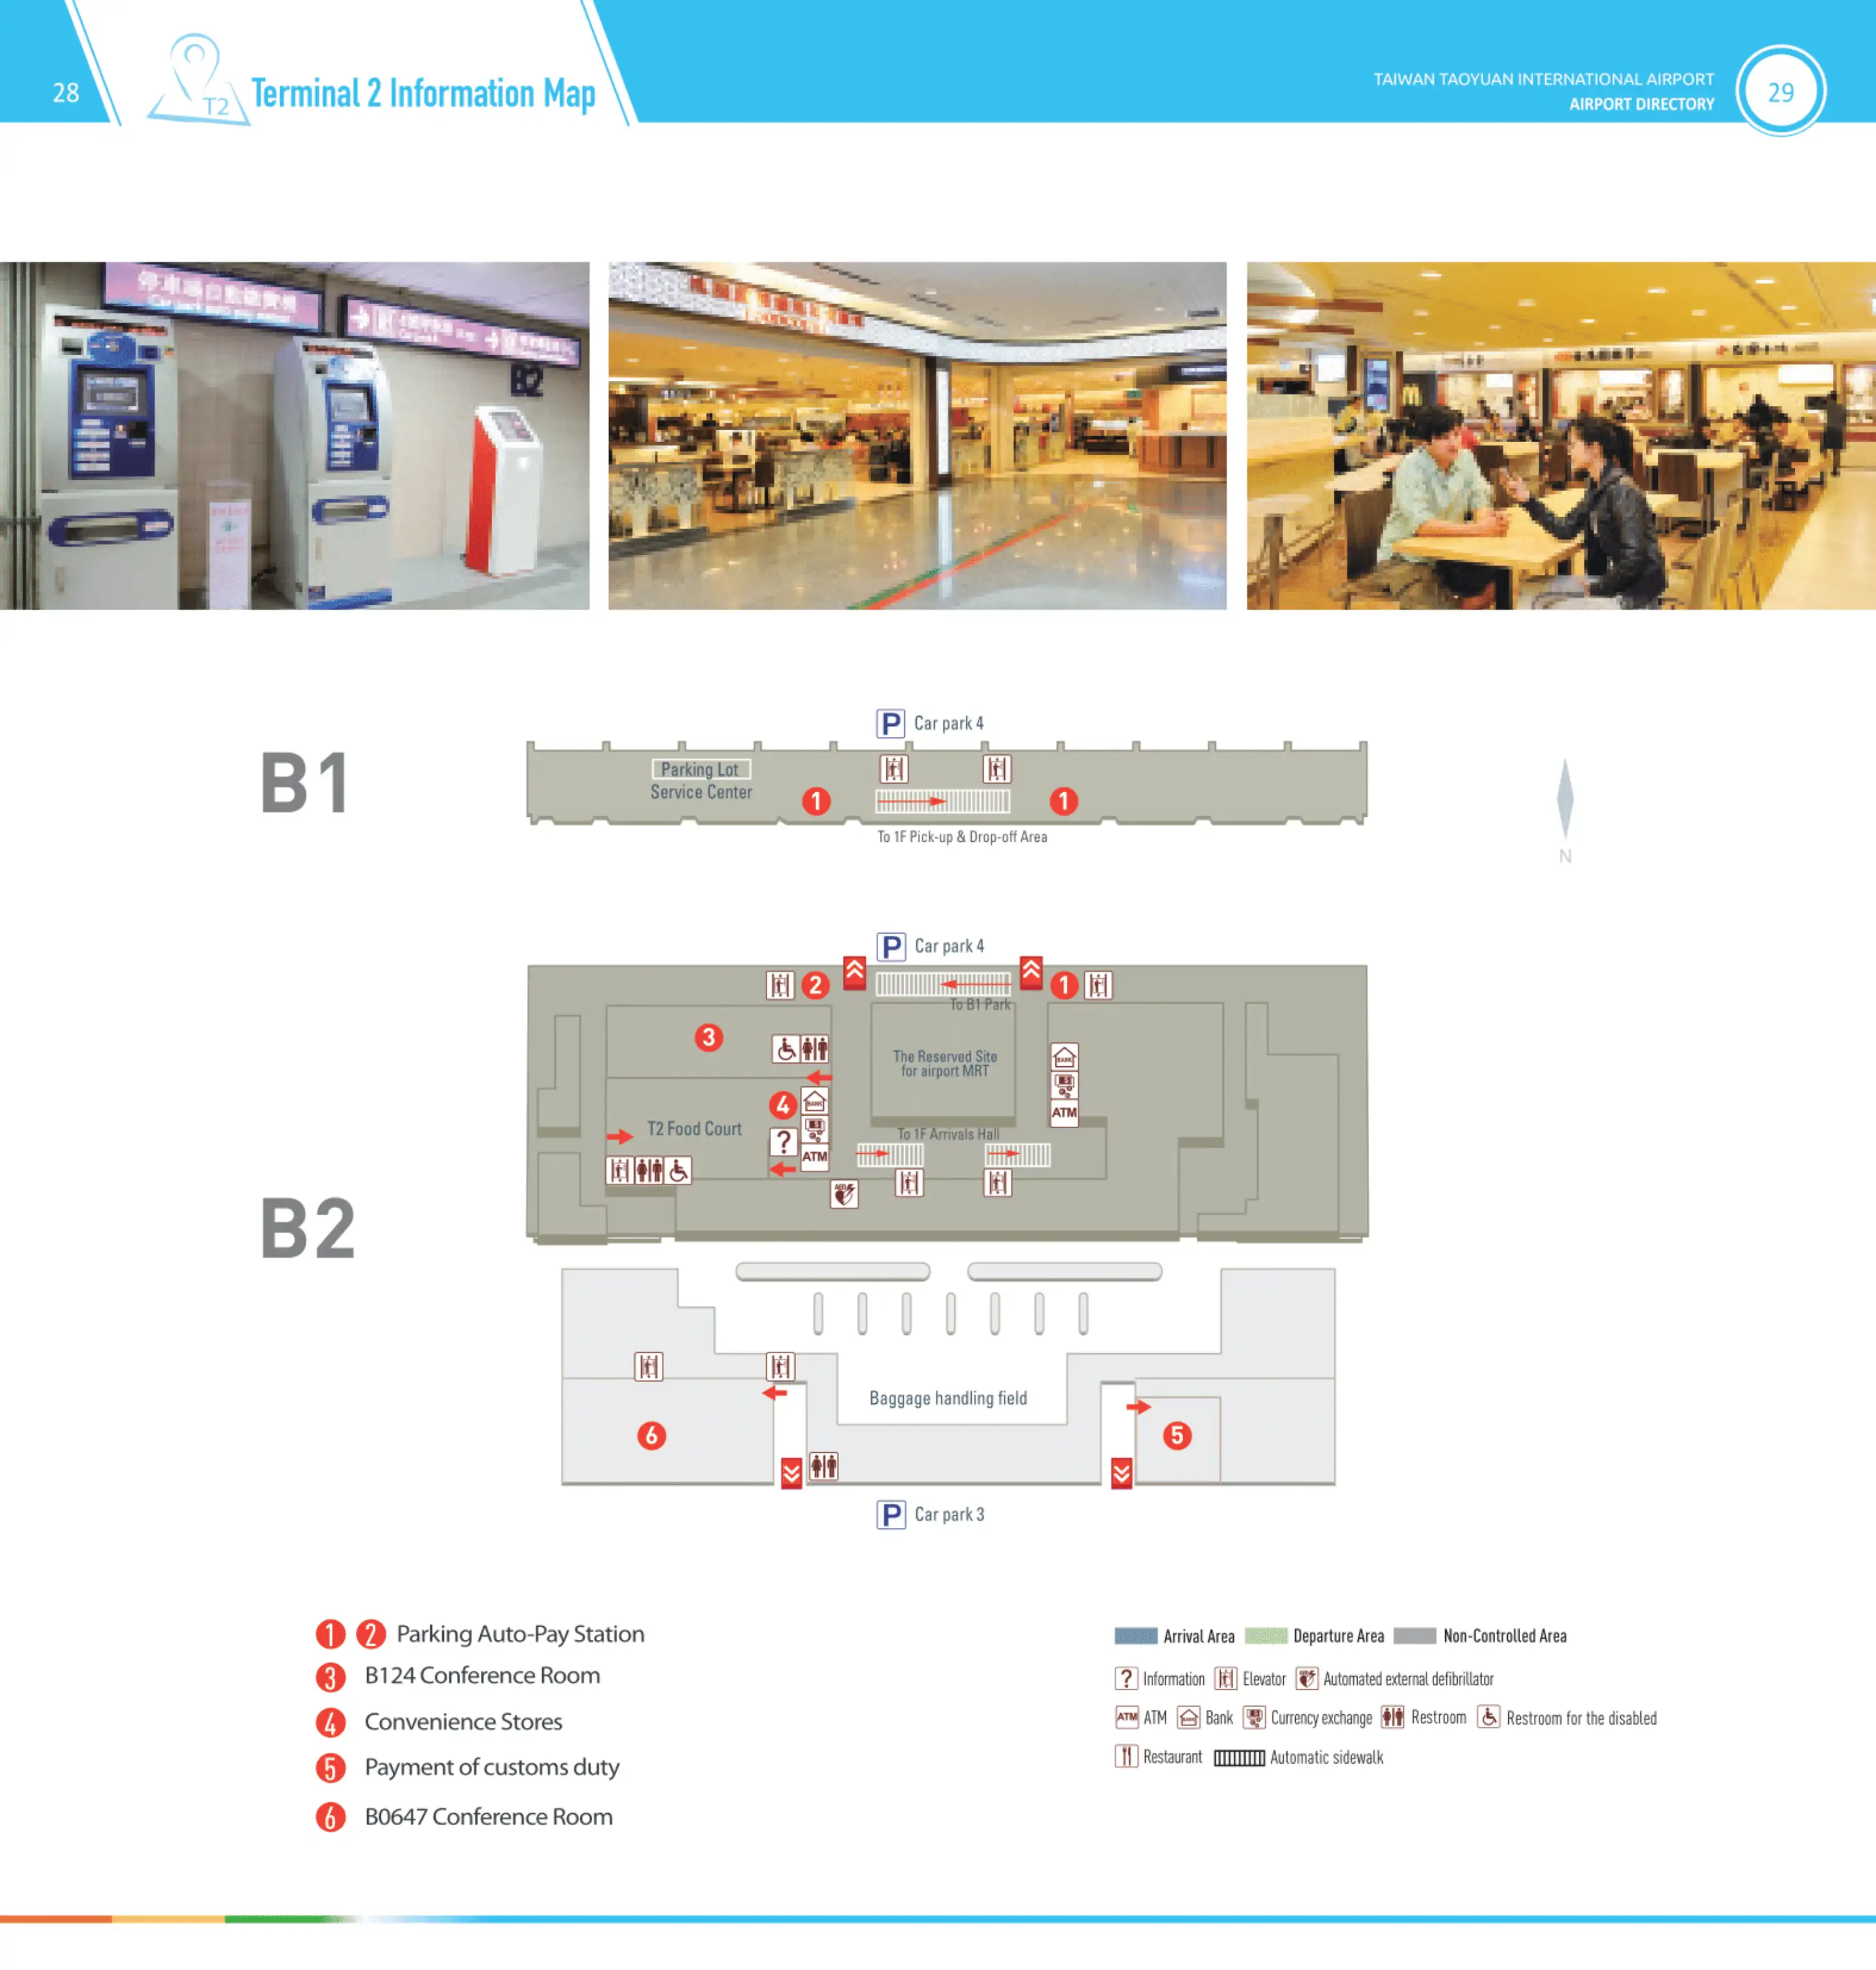
2026 Taiwan Taoyuan International Airport Terminal 2 Map Guide
What is the exact walking route (turn-by-turn via connectors) from the Terminal 2 transfer security exit to Gate C7?
Walking takes about 6–8 minutes and runs ~500–550 meters from the Terminal 2 transfer security exit to Gate C7. The path is a single straight pier walk after you make the correct “Zone C” turn at the departures hub.
Exit transfer security on Level 2, then take the escalators/elevators immediately after screening up to Level 3 departures and emerge into the central duty-free atrium (Ever Rich Duty Free). Turn left for Zone C (south side), then walk straight into the C pier, passing gates in order: C1, C2, C3, C4, C5, then the mid-pier node at C6. Gate C7 is immediately past C6 on the same Level 3 corridor.
Where is the Terminal 2 Skytrain platform located relative to the “transfer lounge” area (which side, which level, which corridor)?
The Terminal 2 Skytrain platform sits on Level 2 (arrivals/sterile airside) near the mid-pier area by Gate C6, not inside the central transfer lounge/rest area. It’s positioned down on the arrivals layer, while the main transfer amenities cluster is above and around the Level 3 central hub.
From the central transfer processing area on Level 2 (transfer counters + transfer security), you reach the Skytrain by following the Level 2 arrivals corridor running out toward Zone C until you’re at the C6 mid-pier node. If you’re coming from the Level 3 departures side, the Skytrain “node” you’ll notice is also by C6, but that’s the vertical access point (escalator/elevator down) to the Level 2 platform area rather than the central hub amenities zone.
What is the exact airside walking distance from Terminal 1 Zone B gates to Terminal 2 Zone C gates using the inter-terminal corridor (not the Skytrain)?
The airside walk is about 1,200 meters from the Terminal 1 Zone B central hub to the Terminal 2 Zone C central hub via the South Airside Connector. Walking time usually lands around 18–22 minutes at a moderate pace, with 12–15 minutes possible if you move briskly and the travelators are flowing.
From the Zone B hub (around gates B1–B3), follow “Transfer/Transit” toward the south connector and stay on the B→C alignment until you reach the Terminal 2 side near the Zone C root (around gates C1–C3). If you’re measuring end-of-pier to start-of-pier instead, the B9 area to the C1 area is closer to ~650 meters along the same connector.
Where exactly are the Terminal 2 transfer counters for Zone C and Zone D positioned relative to the Skytrain arrival point?
The Terminal 2 transfer counters sit in the Level 2 central hub immediately before the transfer security checkpoint, not at the Skytrain arrival point near C6. The Skytrain drops you mid-pier on Level 2 by Zone C (near Gate C6), and you must walk “back” along the Level 2 sterile arrivals corridor toward the center to reach the counters.
| Segment | Direction from Skytrain drop-off (L2 near C6) | What you hit |
|---|---|---|
| C6 arrivals corridor | Backtrack toward the terminal center | Corridor widens toward central hub |
| Central hub (L2) | Continue until the security/immigration split area | Transfer counters bank |
| Immediately after counters | Same central hub zone | Transfer security checkpoint |
What is the exact shortest path from Terminal 2 Gate C6 (near the lounge cluster) to Gate C7, including level changes if any?
Walking takes about 1 minute and covers roughly 60 meters from Gate C6 to Gate C7 on Terminal 2’s departures level. No level changes are involved if you’re already at the gates.
From the Level 3 Zone C pier, face the main concourse corridor with Gate C6 behind/alongside you, then continue straight in the same direction away from the central duty-free hub. Gate numbering increments outward from the hub, so C7 appears immediately after C6 on the same Level 3 passage, with the themed C7 waiting room just past the C6 area.
Where is the transfer security checkpoint located on the Terminal 2 transfer path (which corridor feeds into it from the T1↔T2 connector)?
The transfer security checkpoint is in Terminal 2’s Level 2 central hub, fed directly by the Level 2 sterile arrivals corridor that the T1↔T2 south connector ramps into. It is not located out on the gate piers and cannot be bypassed to reach Level 3 gates.
From the T1 Zone B→T2 Zone C walking connector, you’re brought down into Level 2 as you approach the Terminal 2 center, then you follow the widening arrivals/transfer corridor until you reach the main split between “Transfer/Transit” and “Immigration/Arrivals.” The transfer security lanes sit at that central widening, adjacent to the transfer counters, before the escalators/elevators that release screened passengers up to Level 3 departures.
What is the exact walking distance from the Terminal 2 Skytrain drop-off point to the farthest C-gates (end-of-concourse), measured on the terminal map?
Walking is about 250–300 meters from the Terminal 2 Skytrain drop-off point (Level 2 near Gate C6) to the farthest C-gates at the end of the pier (around Gate C10) along the C concourse alignment. That map-measured distance is “as-the-corridor-runs” from the C6 mid-pier node to the pier end.
The dealbreaker is that transfer passengers can’t use that direct mid-pier advantage to reach gates airside on Level 3 without first backtracking to the Level 2 central hub for transfer security. So while C6→C10 is short on the map, the real transfer path becomes: C6 (L2) backtrack to central security, up to Level 3, then walk back out toward the far C-gates.
If arriving late night, where is the “nighttime Skytrain call button” located (the exact spot passengers must go to summon the train)?
The nighttime Skytrain call button is mounted on a structural pillar/column on the Skytrain station platform itself, not outside the station entrances. You have to step onto the platform near the platform screen doors area and use the labeled control panel on the column.
Between 00:00 and 05:00, the Skytrain can sit idle in on-demand mode, so the correct move is to scan the platform columns for the panel labeled “Night Time Train” or “Call Button.” The most reliable landmark is the center portion of the platform where the main columns align with the waiting zone; the button is placed at the platform, on the pillar, within the gated station area rather than in the corridor leading to it.
Where are the largest seating clusters located near Terminal 2 Gate C7 (exact map positions), given reports of seat scarcity at that gate area?
The largest reliable seating cluster is on Level 4 directly above the Level 3 central hub, not in the Gate C7 themed waiting room. The next-best overflow seating is immediately adjacent on the Zone C pier at the Gate C6 and Gate C8 waiting areas.
Use the Level 4 public rest zone (“Shi Shi Ru Yuan” rest area) accessed by escalators/elevators from the Level 3 duty-free atrium at the center of Terminal 2. If you want to stay on the gate pier, walk one gate position toward the hub to Gate C6 or one gate position outward to Gate C8; those open-plan areas typically hold more standard row seating than C7’s “Echoic Memory of Taiwan” installation space, which trades floor area for exhibits.
What is the exact indoor route from Terminal 2 arrivals to the Terminal 2 departures level check-in hall (which escalators/elevators, which side of the hall)?
The route is Level 2 arrivals corridor to the central processing split, then up to Level 3 departures using the central escalator/elevator banks immediately after the transfer security area. If you reach Level 1 baggage claim or customs, you’ve gone past the transfer/secure divergence and are no longer on the fastest indoor path.
From a Terminal 2 arrival, follow the Level 2 corridor toward the central hub and watch for the point where signage splits between “Transfer/Transit” and “Immigration/Arrivals.” If you are staying airside for a connection, go through the Level 2 transfer security checkpoint, then take the escalators/elevators right after screening up to Level 3 and emerge into the central departures concourse by the duty-free atrium. If you are going landside to the check-in hall, continue instead toward immigration and down to Level 1, then go back up to Level 3 landside departures using the main public escalators/elevators in the arrivals hall to reach the check-in side of the terminal.


