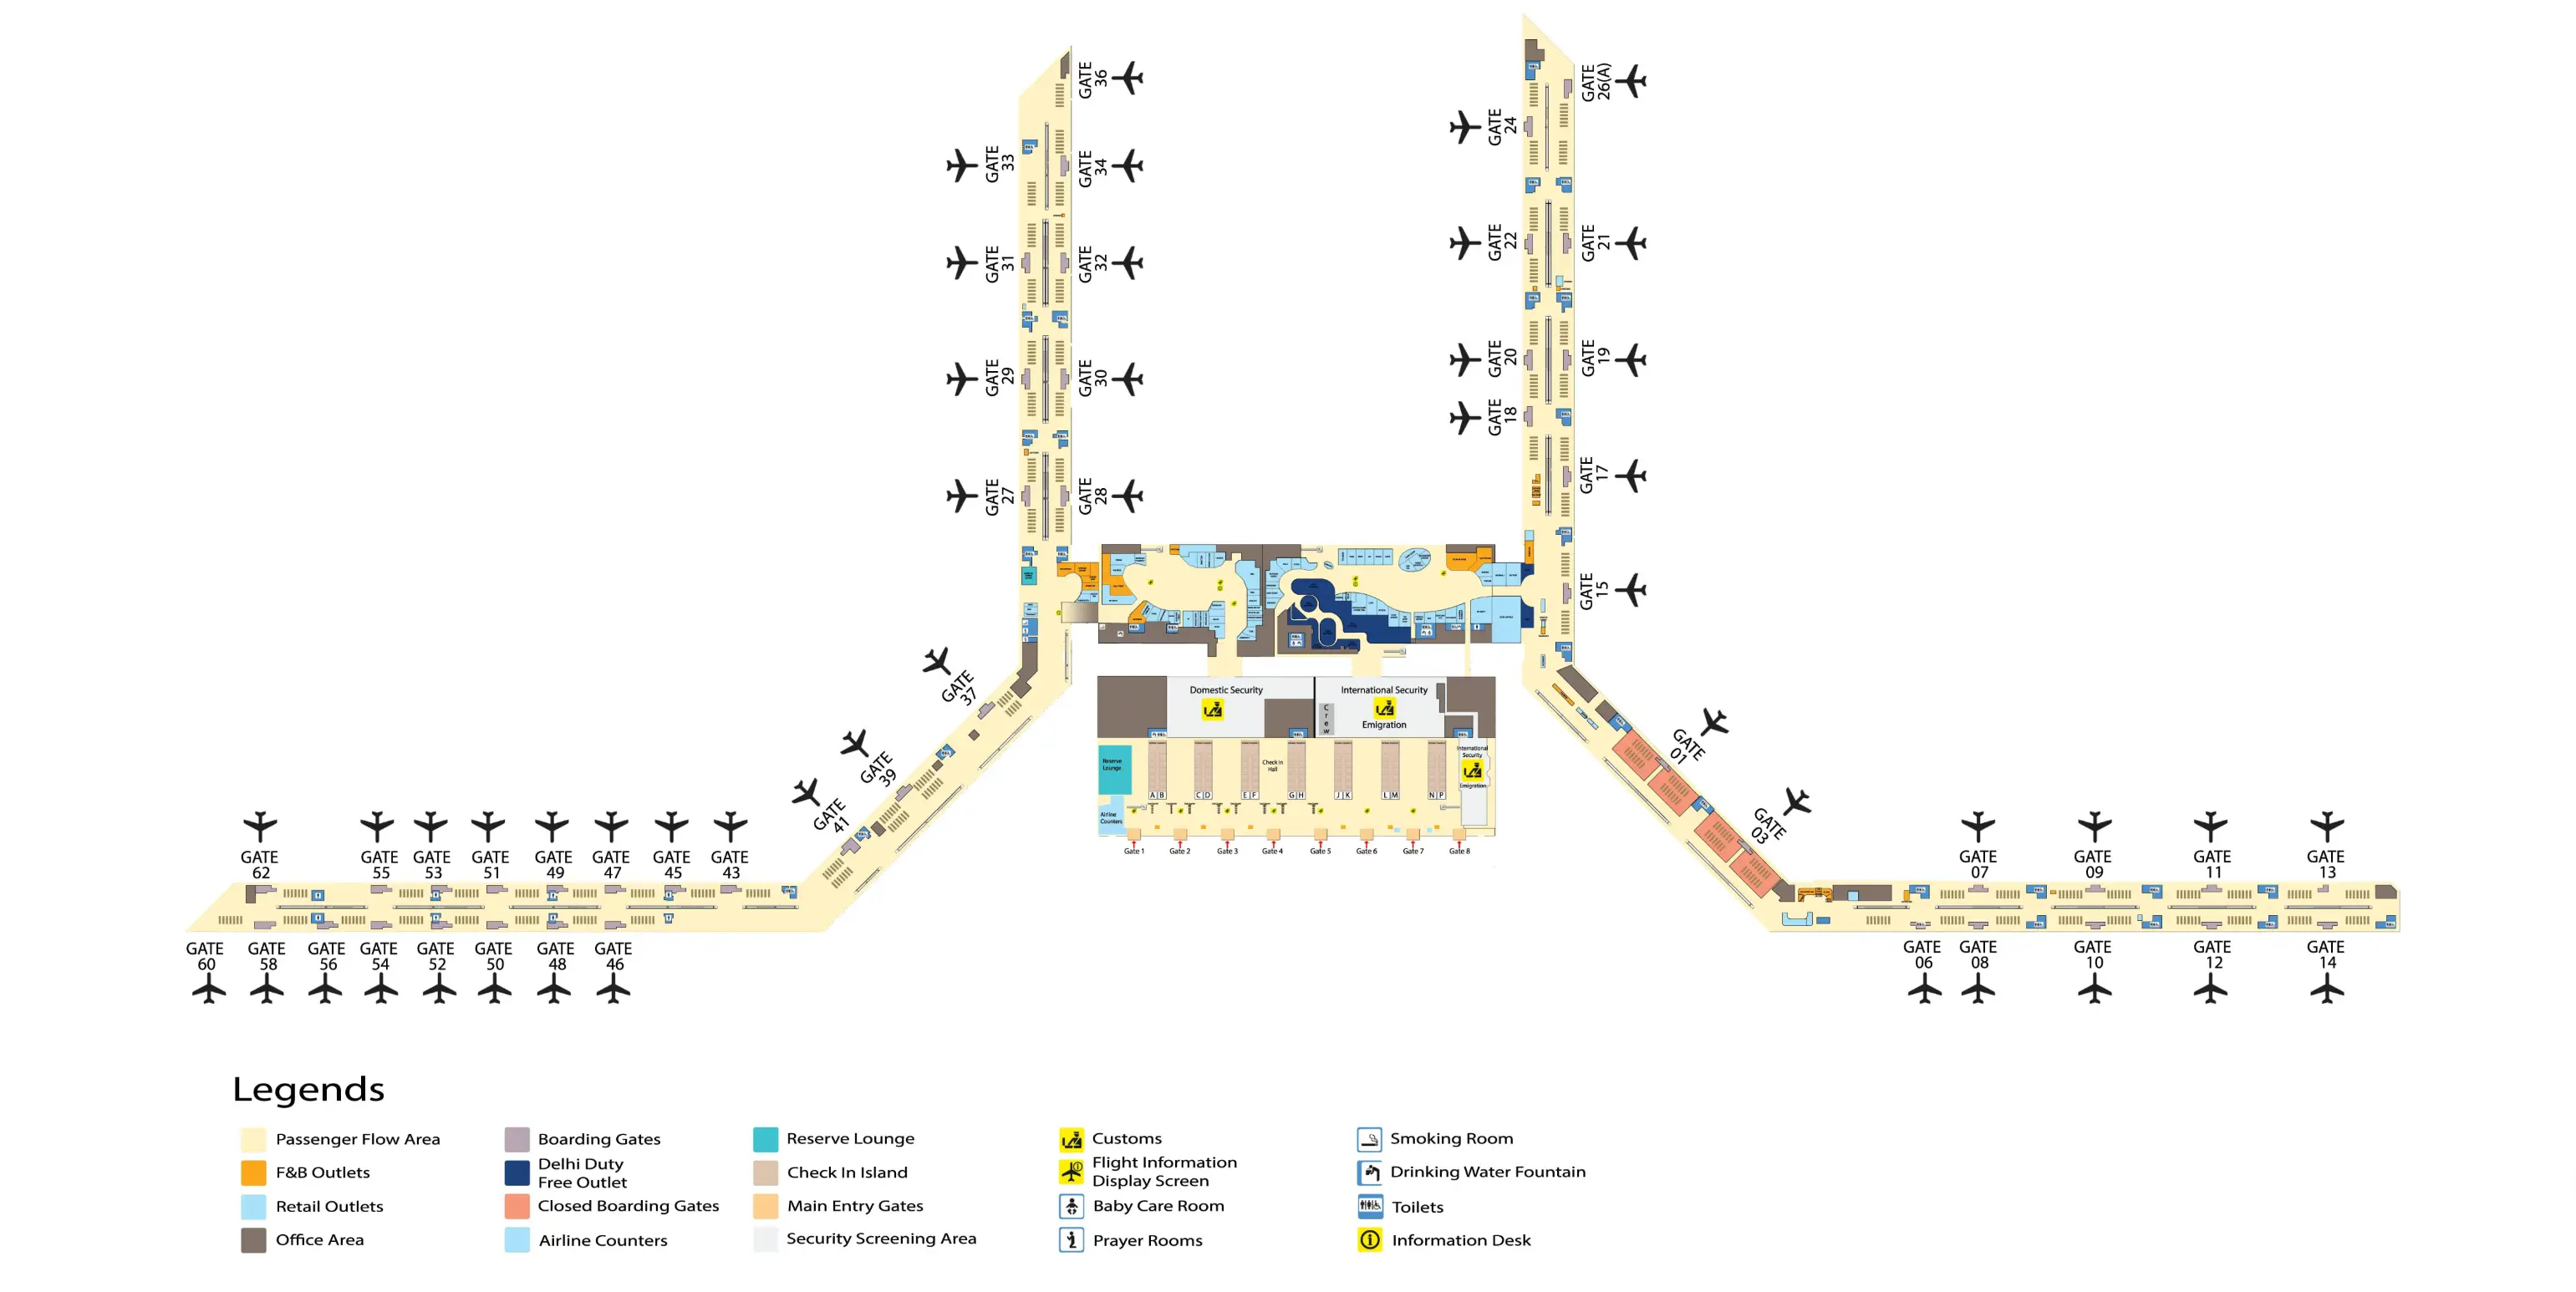
Indira Gandhi International Airport Terminal 3 Map (Most Up-To-Date)
Indira Gandhi International Airport’s Terminal 3 is a two-tier mega-terminal (Arrivals on Level 0, Departures on Level 1) built around a central “canyon” processing core that feeds long, fork-like piers. The footprint is massive (about 5.4 million sq ft), so the map logic is less “find a gate” and more “don’t miss the one doorway or level-change that forces a reset.” This page focuses on T3 navigation within Delhi’s primary aviation hub, using curb pillars and one-way splits as your fixed coordinates.
Map Table
| Level/Area | What’s Here | Hard Anchors | Typical Walk |
|---|---|---|---|
| Level 0 (International Arrivals) | Immigration, Duty-Free funnel, Baggage Reclaim, Customs | Mudra “Canyon” descent, Duty-Free chicane, Customs glass doors | long pier variability |
| Post-Customs split | Transfers lobby, public Arrivals hall | immediate right-side transfer corridor, “meeters & greeters” noise field | 15–20 m to transfer desks |
| Curbside coordinates | terminal exits, pickups, inter-terminal nodes | Pillar 9/10 (shuttle + elevators), Pillar 18 (T2 walkway) | 100–600 m |
| Level 1 (Departures) | check-in islands, main security approach | elevator bank from Pillar 9/10 zone, rear security line edge | 150–200 m from lifts |
Indira Gandhi International Airport Terminal 3 Map Strategy
- Treat every sign that mentions Transfers as a one-way gate: after Customs, the Transfers path is the immediate right-side divergence; drifting straight/left into the public hall triggers a full landside reset (elevators, check-in hall, re-screening).
- Use curb pillars as your GPS under stress: Pillar 18 = pedestrian walkway to T2; Pillar 10 = inter-terminal shuttle pickup; Pillar 9/10 = fastest vertical recovery to Departures Level 1.
- De-risk queue volatility by protecting decision points, not minutes: commit early to the correct Immigration lane cluster, and assume the pier walk + processing core can swing wide depending on gate and arrival bank.
- Anchor terminal transfers to one deterministic entry: if you’re walking to T2, lock onto Pillar 18 before you exit the doors; if you’re taking the shuttle, lock onto Pillar 10 and the transfer kiosk/booth before joining any curbside crowd.
2026 Indira Gandhi International Airport Terminal 3 Map + Printable PDF
Updated for 2026, this T3 map view stays centered on the places where a single wrong exit, level, or queue choice creates the biggest time penalty: the Customs “Transfers vs Exit” split, the vertical recovery elevators near Pillar 9/10, and the two inter-terminal “dealbreaker” anchors (Pillar 18 walkway vs Pillar 10 shuttle). Use it to lock your route before you hit the loud, crowded arrivals hall.
Indira Gandhi International Airport Terminal 3 Departure Map 2025
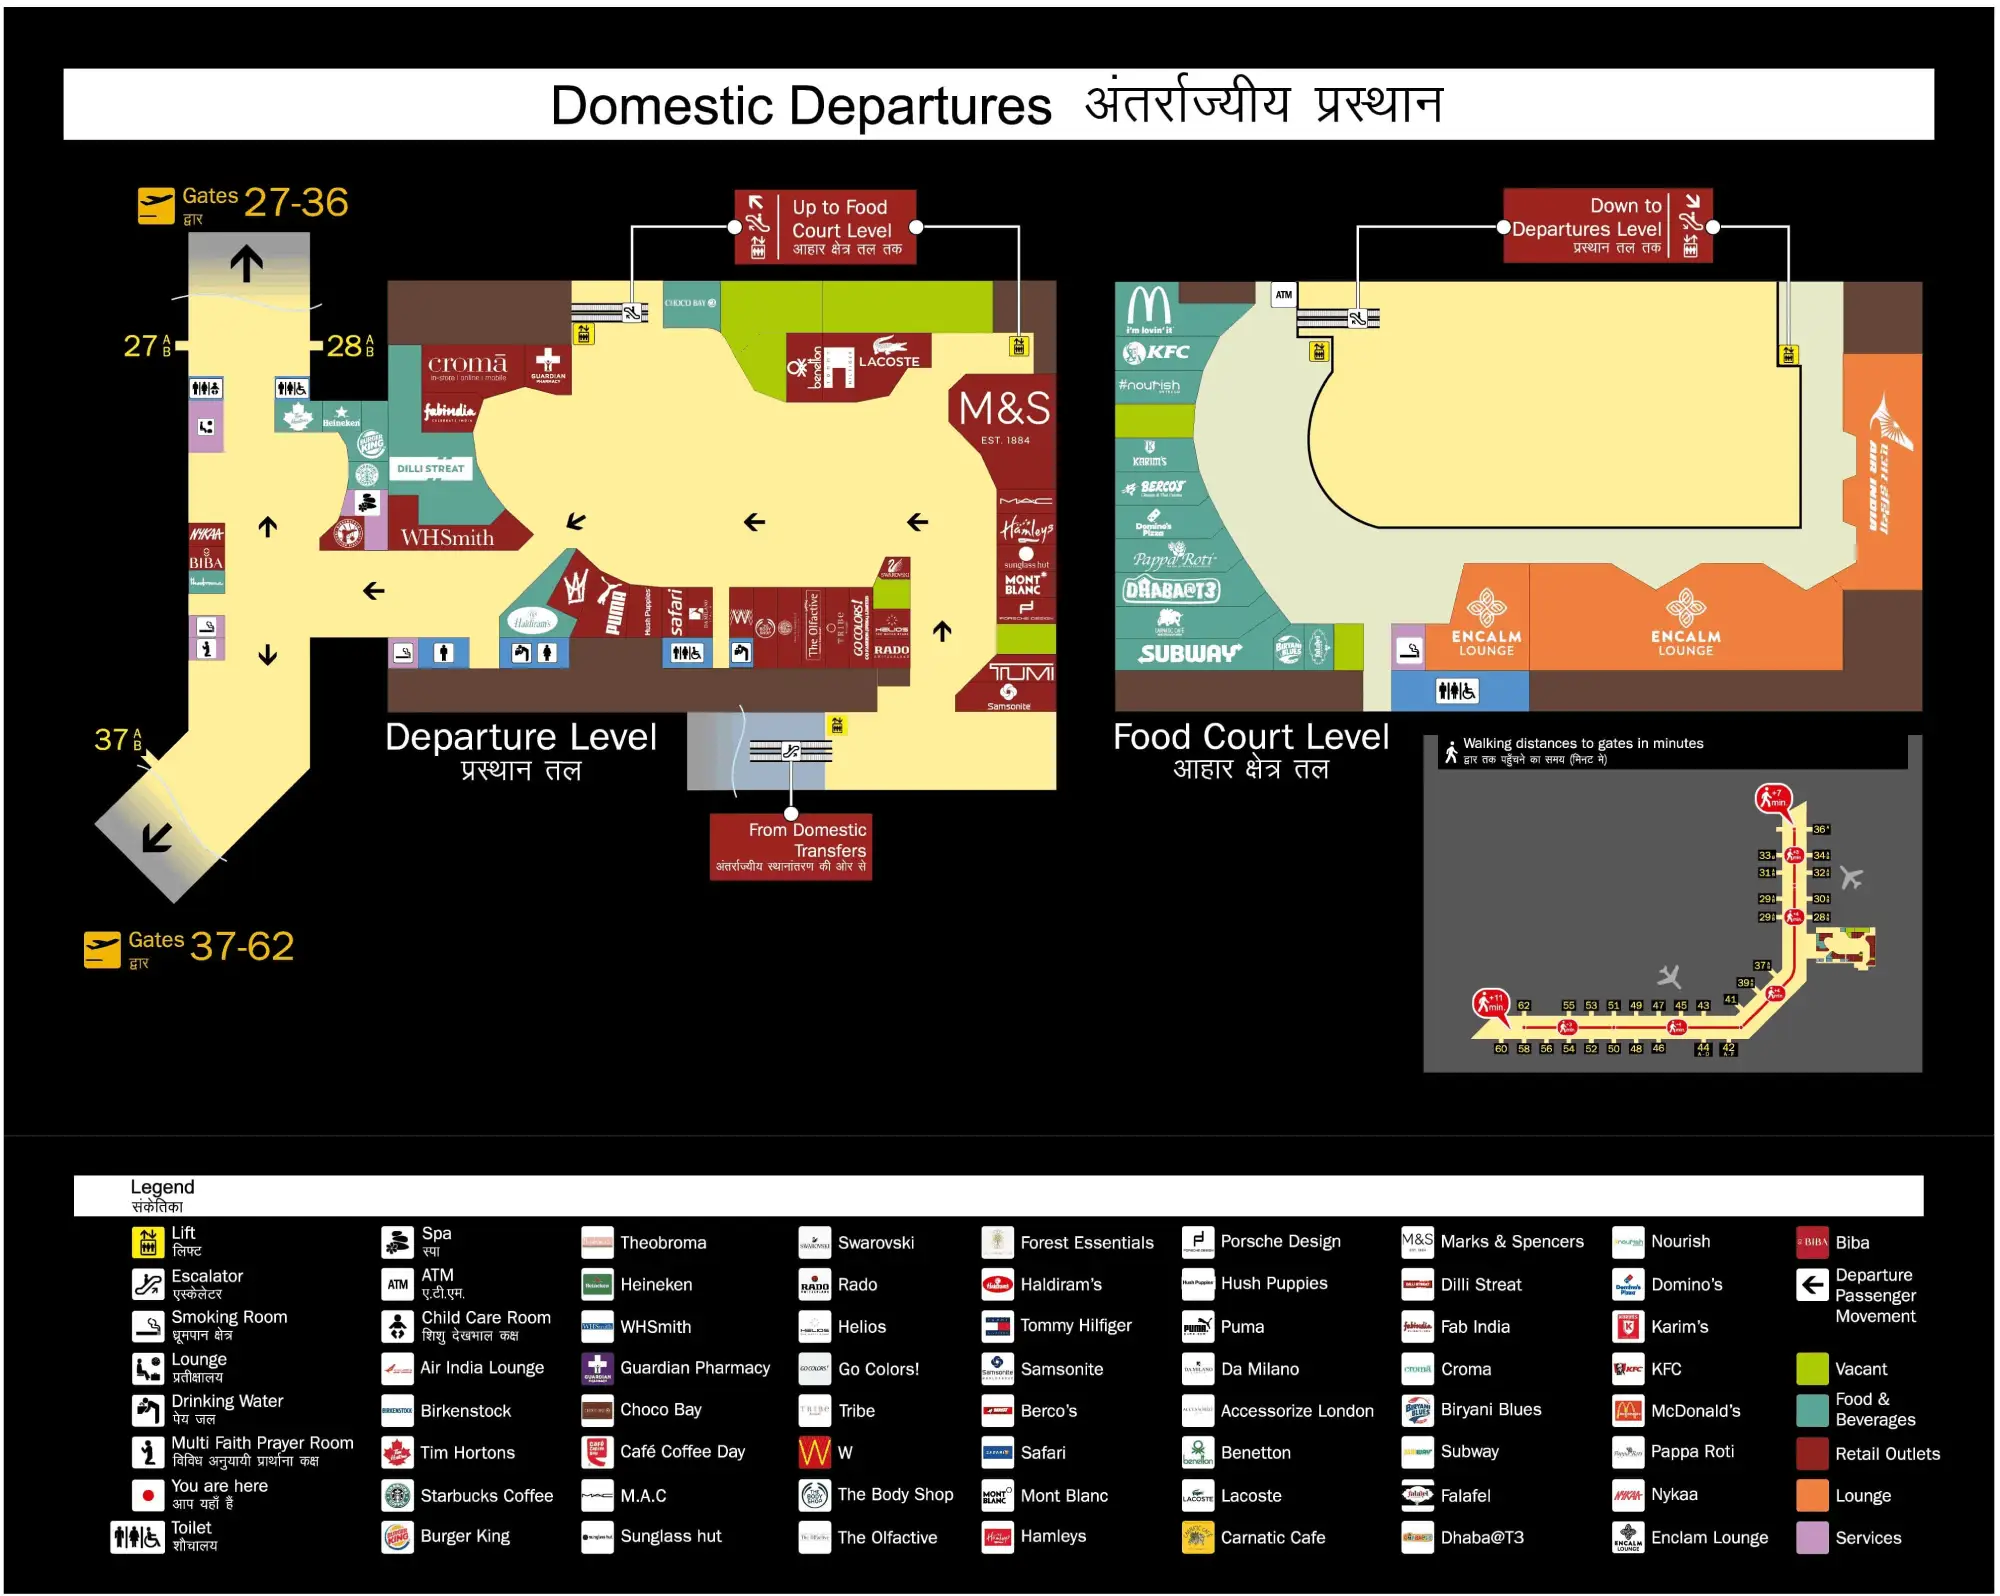
Indira Gandhi International Airport Terminal 3 Domestic Departure Map 2025
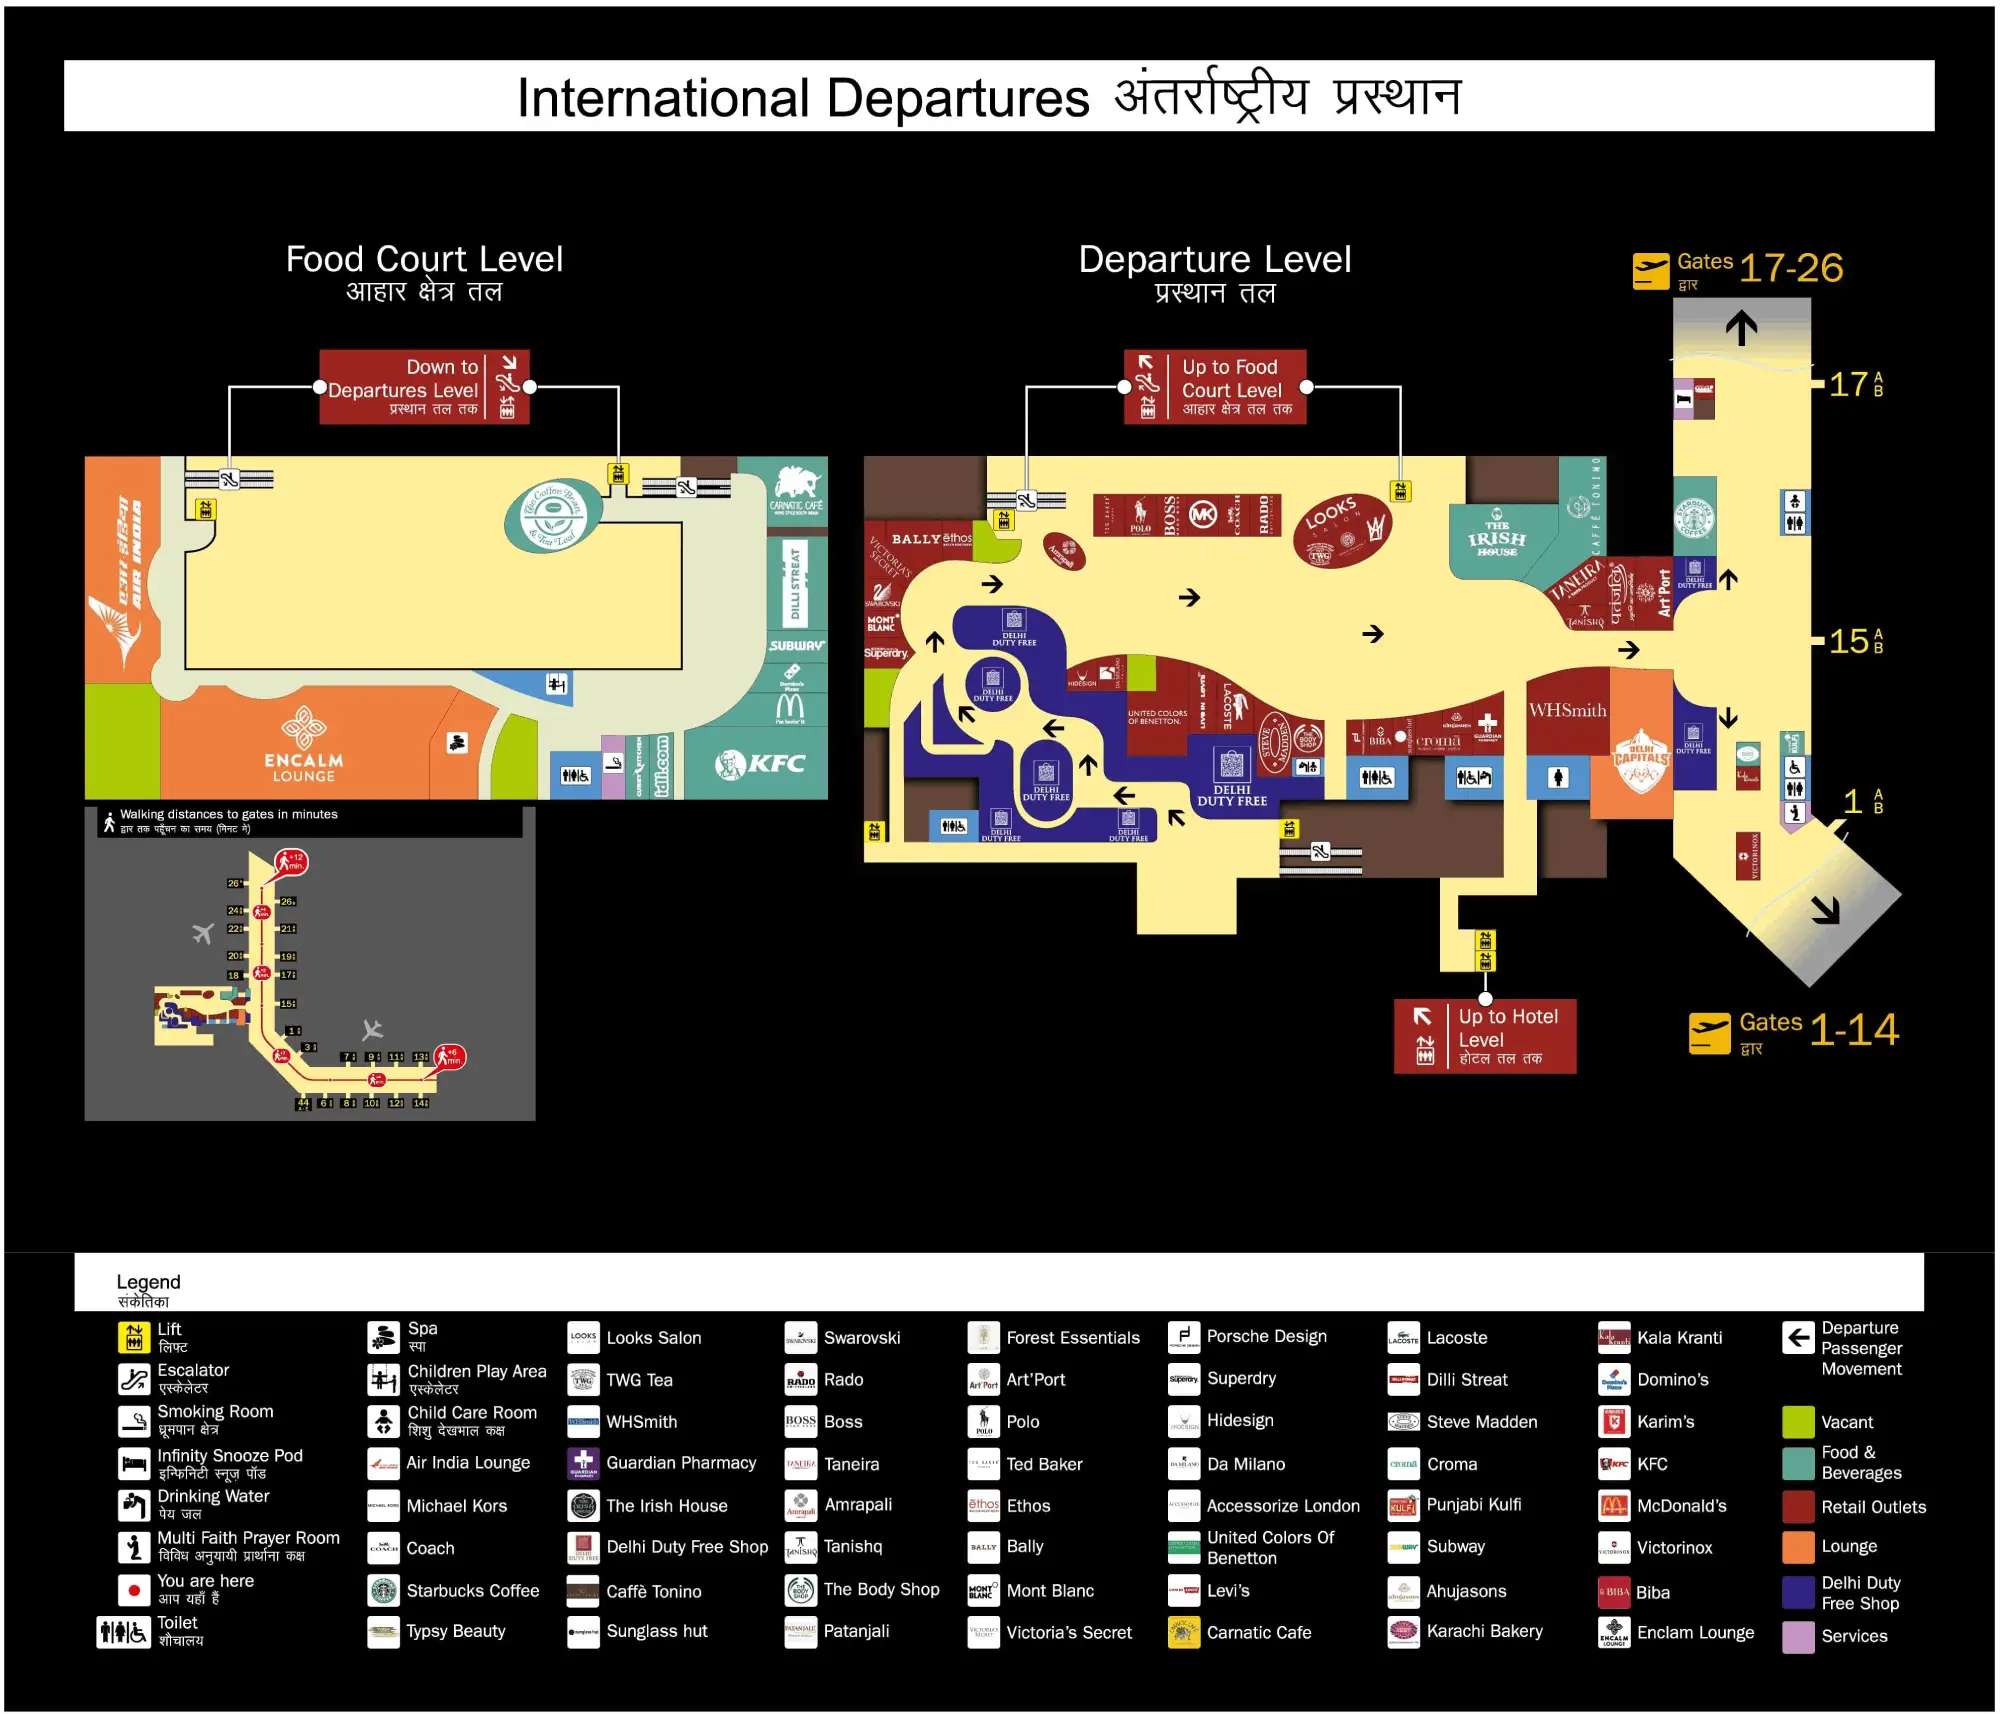
Indira Gandhi International Airport Terminal 3 International Departure Map 2025
2026 Indira Gandhi International Airport Terminal 3 Map Guide
Where is the exact pedestrian walkway entrance from T3 to T2 (level + door/exit landmark)?
The pedestrian walkway entrance sits on T3 Arrivals (Level 0) at the outer curb by Pillar 18.
From International Arrivals, exit through the public doors into the “meeters & greeters” curb area, then follow the pillar numbers up to 18 along the terminal face. The entrance reads as a covered, clearly marked “Terminal 2” pedestrian path that peels away from the curbside flow, typically starting at a zebra crossing aligned with the Pillar 18 zone. If you reach the Pillar 10 shuttle/kiosk cluster, you’re too far the other direction.
What is the walking distance (meters) from that T3 walkway entrance to the nearest T2 terminal entry point?
Walking takes about 500–600 meters from the T3 Pillar 18 walkway entrance to the first T2 entry doors.
The covered path runs directly from the Pillar 18 curb zone at T3 to the adjacent T2 arrivals-side frontage, so the distance is mostly straight-line pedestrian movement rather than an indoor maze. At a luggage-loaded pace, that’s typically 6–10 minutes door-to-door. The main “gotcha” is at the T2 end: the walkway lands you at T2 Arrivals, so you may still need the nearest elevator bank there to reach T2 Departures if you’re checking in or heading to security.
Where is the exact location of the inter-terminal shuttle/bus pickup at T3 (level + curb zone/door number)?
The inter-terminal shuttle pickup is on T3 Arrivals (Level 0) at the curbside bay by Pillar 10.
Use the pillar numbering on the outer curb as your locator, not airline counters or taxi lines. The shuttle node is the Pillar 10 cluster that also hosts the inter-terminal transfer kiosk/booth where boarding coupons are handled, and it’s distinct from general cab pickup chaos. If you’re standing at Pillar 18 (the covered T2 walkway), you’re at the wrong transfer anchor and should backtrack along the terminal face toward Pillar 10.
What is the walking distance (meters) from T3 Arrivals exit to that shuttle/bus pickup point?
Walking takes about 100–150 meters from the main T3 Arrivals exit area to the inter-terminal shuttle pickup at Pillar 10.
Most passengers spill out of Customs into the public Arrivals hall and curb zone around the mid-pillars (commonly in the Pillar 12–14 range), then you track along the terminal frontage toward Pillar 10. The distance is short, but the path is slow in practice because you’re pushing through the densest “meeters & greeters” congestion right outside the doors. Use the pillar numbers overhead/at the curb to avoid getting pulled into taxi/Uber queues.
Where is the first mandatory ‘decision split’ inside T3 for International Arrivals: the point where passengers must choose between Transfers vs Exit?
The first mandatory split is immediately after you clear Customs, right after the Green/Red channels and the Customs glass doors.
You hit a short lobby transition zone before the full “meeters & greeters” hall opens up, and that’s where the flow forks. Domestic Transfers peel off to the right into a more controlled corridor/lobby area, while Exit/City traffic continues straight ahead and to the left into the noisy public arrivals space. The practical landmark is the moment you step past the Customs exit doors: if you don’t execute the right turn there, you’ll be carried forward by the crowd into landside and your recovery becomes elevators + departures-level security.
What is the distance (meters) from aircraft arrival corridor exit to that Transfers-vs-Exit split point?
Distance runs roughly 400–1,200 meters from the arrival corridor to the Transfers-vs-Exit split, depending on the gate and pier position.
T3’s long international piers create the biggest swing: a near-central gate can put you a few hundred meters from the processing core, while a far-end gate can add close to the full pier walk before you even reach the “Canyon” descent toward Immigration. After that, you still traverse Immigration, the Duty-Free chicane, Baggage Reclaim, and Customs before you reach the post-Customs lobby where the split happens. If you’re timing a tight connection, treat the pier location as the dominant variable and protect the post-Customs right turn as the non-negotiable decision point.
Where is the primary Immigration hall entrance located relative to T3 International Arrivals (level + landmark junction)?
The primary Immigration hall entrance is on Arrivals Level 0 at the base of the main “Canyon” descent escalators.
You reach it at the point where the long pier walk terminates into the central processing void, then funnels downward. The most reliable visual landmark is the pair of massive Mudra hand sculptures on the Canyon walls flanking the descent: once you’re alongside those installations and moving down to Level 0, the Immigration entry is the queue field you hit immediately at the bottom of that escalator/ramp junction. This is the last clear “orientation moment” before lane barriers make sideways corrections hard.
What is the distance (meters) from the Immigration hall exit to the first baggage belt in the International Arrivals reclaim area?
Distance is about 50–80 meters from the Immigration exit to the first visible baggage belt, but the walked path is forced through Duty-Free.
After stamping out of Immigration, you’re routed into a walkthrough retail zone that bends you around product islands before the space opens into Baggage Reclaim. The straight-line gap is short, yet the practical “boots-on-ground” distance feels longer because you can’t take a direct line. The anchor sequence to prevent panic is consistent: Immigration exit doors → Duty-Free chicane → first carousel row in the reclaim hall.
Where is the exact re-check / transfer desk area for passengers who must re-check bags after clearing customs in T3?
The re-check/transfer desk area is inside the Domestic Transfer Lobby reached by turning right immediately after Customs exit.
Once you pass through Customs (Green/Red) and step beyond the glass doors, don’t drift into the main public arrivals hall. The Domestic Transfer path breaks off to the right into a controlled lobby space with airline counters used for bag re-drop/re-check on onward domestic connections. This zone is physically separated from the meeters crowd by partitions/glass, and it sits before the dedicated vertical core that takes transferring passengers back up toward the departures-level transfer security channel.
What is the distance (meters) from baggage reclaim exit to that re-check/transfer desk area?
Walking takes about 15–20 meters from the baggage reclaim/customs exit to the re-check/transfer desk area.
The move is more about direction than distance: you clear Customs, step into the post-Customs transition lobby, and then immediately commit to the right-hand Domestic Transfer corridor. Because it’s a “blink and you miss it” turn, the real risk is overshooting into the public arrivals hall, not the length of the walk. If you can still see the Customs glass doors behind you, you’re in the correct zone to find the transfer counters.
Where is the first security screening entry point for passengers transferring onward (post-arrival transfer security) inside T3?
The first transfer security entry is on Departures Level 1, reached via the dedicated elevators/escalators inside the Domestic Transfer Lobby.
After Customs, you stay in the controlled transfer corridor (right turn) rather than entering the public arrivals hall. From the Domestic Transfer Lobby, a dedicated vertical transport core lifts you from Arrivals Level 0 to Level 1, depositing you into a channel that leads directly to the transfer security screening area rather than the general departures crowd. The key landmark is that you should still be inside the partitioned transfer zone when you start going up—if you’re outside at the curb, you’ve already missed the controlled path.
What is the walking distance (meters) from the transfer desk area to that transfer-security entry point?
Walking is about 50 meters horizontally, with the main displacement being a vertical ride from Level 0 to Level 1.
The re-check counters and the dedicated lift/escalator core sit in the same compact Domestic Transfer Lobby, so you’re not traversing the public terminal depth. After you go up to Departures Level 1, the remaining walk to the transfer security scanners is short and direct within the controlled transfer channel. In practice, the time cost comes from elevator waiting/loading, not from a long corridor walk.
Where is the assistance/buggy request point located in T3 (the physical stand/desk passengers are expected to reach)?
Buggy request points are positioned at pier junction nodes rather than at one central “dispatch desk.”
On the airside arrivals walk, look where the narrow gate corridors widen into the main concourse spine—those pier junctions are where buggies tend to stage and where staff can route you toward the Immigration descent. If you’re already landside, the practical request point shifts to staffed Information/Helpdesk counters in the Arrivals public hall, since buggies aren’t reliably hailed from random spots on the pier. The usable heuristic is: pier junctions for airside pickups, information desks for landside escalation.
What is the walking distance (meters) from the main T3 security entrance to that buggy/request point (if it exists near security)?
Walking is roughly 20–50 meters if you’re looking for a buggy/assistance request point near the departures security entry.
At T3 Departures (Level 1), assistance handling for PRM/buggy use is typically colocated with the security entry flow rather than being deep inside the terminal, so the distance is a short lateral move along the security frontage. The reliable anchor is the main security queue mouth: look immediately adjacent to that entry zone for staffed assistance counters/priority handling positions before you commit into the lane barriers.
Where is the closest ‘last-resort’ staffed help desk after exiting Immigration (exact location marker on Arrivals level)?
The closest last-resort staffed help desk is in the public Arrivals hall on Level 0, positioned near the Pillar 9 zone (often referenced around Gate 4 on the landside frontage).
To reach it, you must be out of the secure processing stream: Immigration → Duty-Free → Baggage Reclaim → Customs → public “meeters & greeters” hall. Once you’re in that landside hall, use the curbside pillar coordinate system to triangulate—Pillar 9 is the most dependable locator for staffed assistance because it sits by the main vertical circulation cluster and the busiest information/lost-and-found style counters.
What is the walking distance (meters) from that help desk to the International Arrivals curb pickup zone?
Walking takes about 10–30 meters from the landside help desk near the Pillar 9 area to the International Arrivals curb pickup edge.
The Arrivals hall frontage is shallow: help/information counters sit just inside the doors, and Pillar 9 is effectively at the curb interface immediately outside. The practical distance depends on which door bay you exit through, but it’s a short straight move from the interior wall line to the curbside lane once you’re already in the public hall.
Where is the nearest elevator bank that connects Arrivals level to Departures level in T3 (exact position relative to central check-in)?
The nearest public elevator bank runs between Arrivals Level 0 and Departures Level 1 near the Pillar 9–Pillar 10 interior zone.
On Arrivals, this is the vertical recovery node just inside the building line behind the curb pillars, not out on the roadway. It’s the fastest way back up if you accidentally spill landside or need to reach check-in from Arrivals without hunting for distant escalators. Relative to central check-in, these lifts deliver you onto the Departures side of the main check-in hall frontage, where the check-in islands extend deeper into the terminal.
What is the walking distance (meters) from that elevator bank to the main security queue entrance for departures?
Walking takes about 150–200 meters from the Pillar 9/10 elevator bank to the main departures security queue entrance.
After riding up to Departures Level 1, you still have to cross the depth of the check-in hall environment—past the front edge of the check-in islands and toward the rear processing boundary where the security entry lanes form. The route is mostly straight but slowed by trolley traffic and crowd eddies, so the distance is moderate even though the path is visually obvious once you’re oriented toward the back-of-hall security line.