London Heathrow Airport Terminal 5 Map (Most Up-To-Date)
Terminal 5 is a three-part, linear airside layout: the main building (T5A) with A-gates, then two satellite concourses (T5B and T5C) in a straight chain beyond it within the Heathrow airport complex. The key orientation is “A → B → C,” with vertical movement down to Level -2 (transit train) and Level -4 (pedestrian tunnel with travelators). Scale Warning: the A/B/C spread is large enough that a wrong level or connector choice can silently add many minutes.
Map Table
| Zone | Level band | Anchor nodes | Connectors |
|---|---|---|---|
| T5A Departures concourse | Level 3 | post-security FIDS wall; central retail spine; Gate A15/A16 area | vertical core to -2 / -4; A-gates piers |
| T5A Security exits | Level 3 | North Security exit; South Security exit | main concourse dispersal; central lift/escalator bank |
| T5A Inter-concourse hub | Levels -2 / -4 | transit train platforms (-2); tunnel entry (-4) | TTS train A–B–C; TTW tunnel A–B–C |
| T5B Satellite | Level 2 (+ mezzanine) | central core by train/tunnel arrival; B-gates linear pier | lifts/escalators to -2/-4; onward to C |
| T5C Satellite | Level 2 | central core by train/tunnel arrival; C-gates linear pier | lifts/escalators to -2/-4; tunnel back to B/A |
| T5 Arrivals & Baggage | Ground level | baggage reclaim hall; Customs exits; enquiries area | lifts to rail station; route up to car-park bridge |
| Rail station / Terminal Parking bridge | Levels -1/-2 (rail), Level 3 (bridge) | ticket hall; platforms; covered bridge link | step-free lifts; pedestrian bridge to Short Stay/Terminal Parking |
London Heathrow Airport Terminal 5 Map Strategy
- Assume late A/B/C gate assignment; camp near the post-security FIDS wall until “Bxx/Cxx” appears, then commit immediately.
- Prefer the Level -4 tunnel when buffers are tight or you might need to reverse direction; the train adds crowding variance and creates “wrong stream” risk if you’re trying to get back airside.
- Treat the central vertical core in T5A as the critical decision node: escalators often default you to -2 train behavior; lifts give clean access to -4 tunnel routing and step-free control.
- On arrivals, lock in recovery nodes before exiting Customs: baggage enquiries location, then step-free lift path down to the rail station; for pick-up, go up to the bridge level for Terminal Parking rather than trying to cross the forecourt at ground level.
2026 London Heathrow Airport Terminal 5 Map + Printable PDF (Official 2024 Edition)
Terminal 5 is operating as Heathrow’s primary British Airways terminal in 2026, with the same core A/B/C satellite structure and the same “train at -2 / tunnel at -4” decision mechanics. Follow on-site purple/yellow signage plus the nearest FIDS screens for real-time routing.
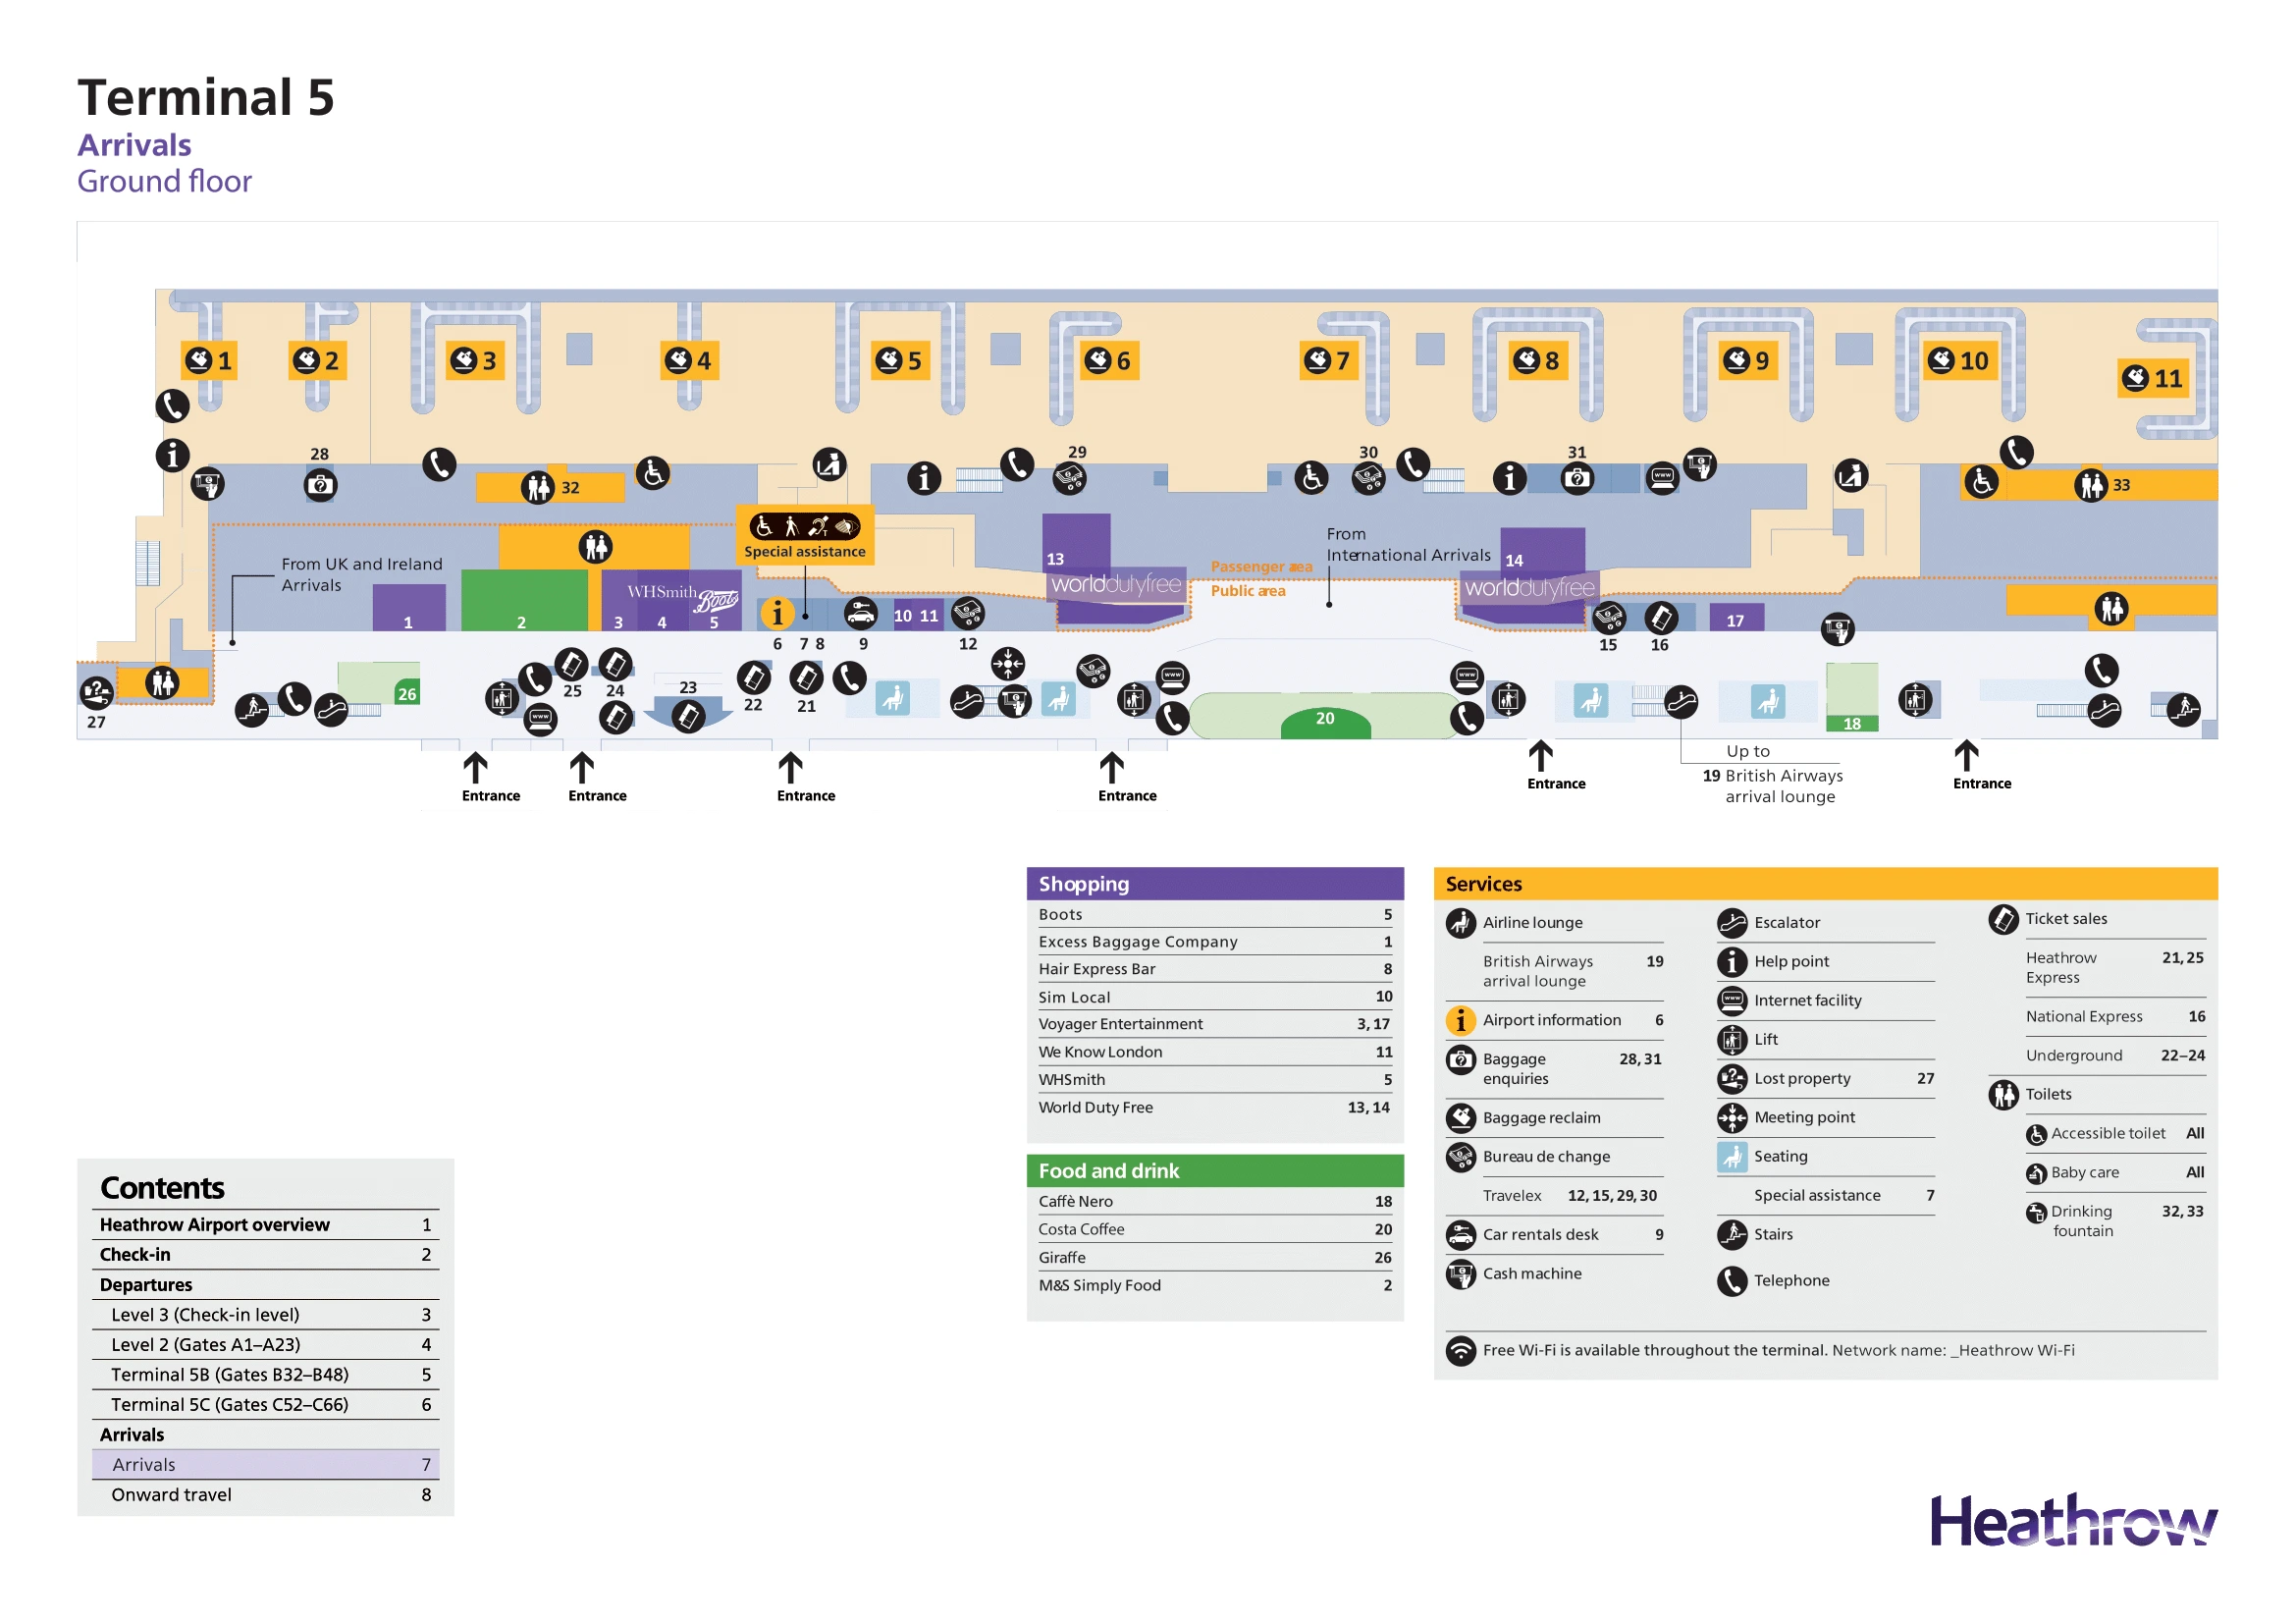
London Heathrow Airport Terminal 5 Arrivals (Onward Travel) Ground Floor Map 2025-2024
London Heathrow Airport Terminal 5 Arrivals Ground Floor Map 2025-2024
London Heathrow Airport Terminal 5 Check-In Level 3 Map 2025-2024

London Heathrow Airport Terminal 5 Departures Level 2 Map 2025-2024

London Heathrow Airport Terminal 5 Departures Level 3 Map 2025-2024

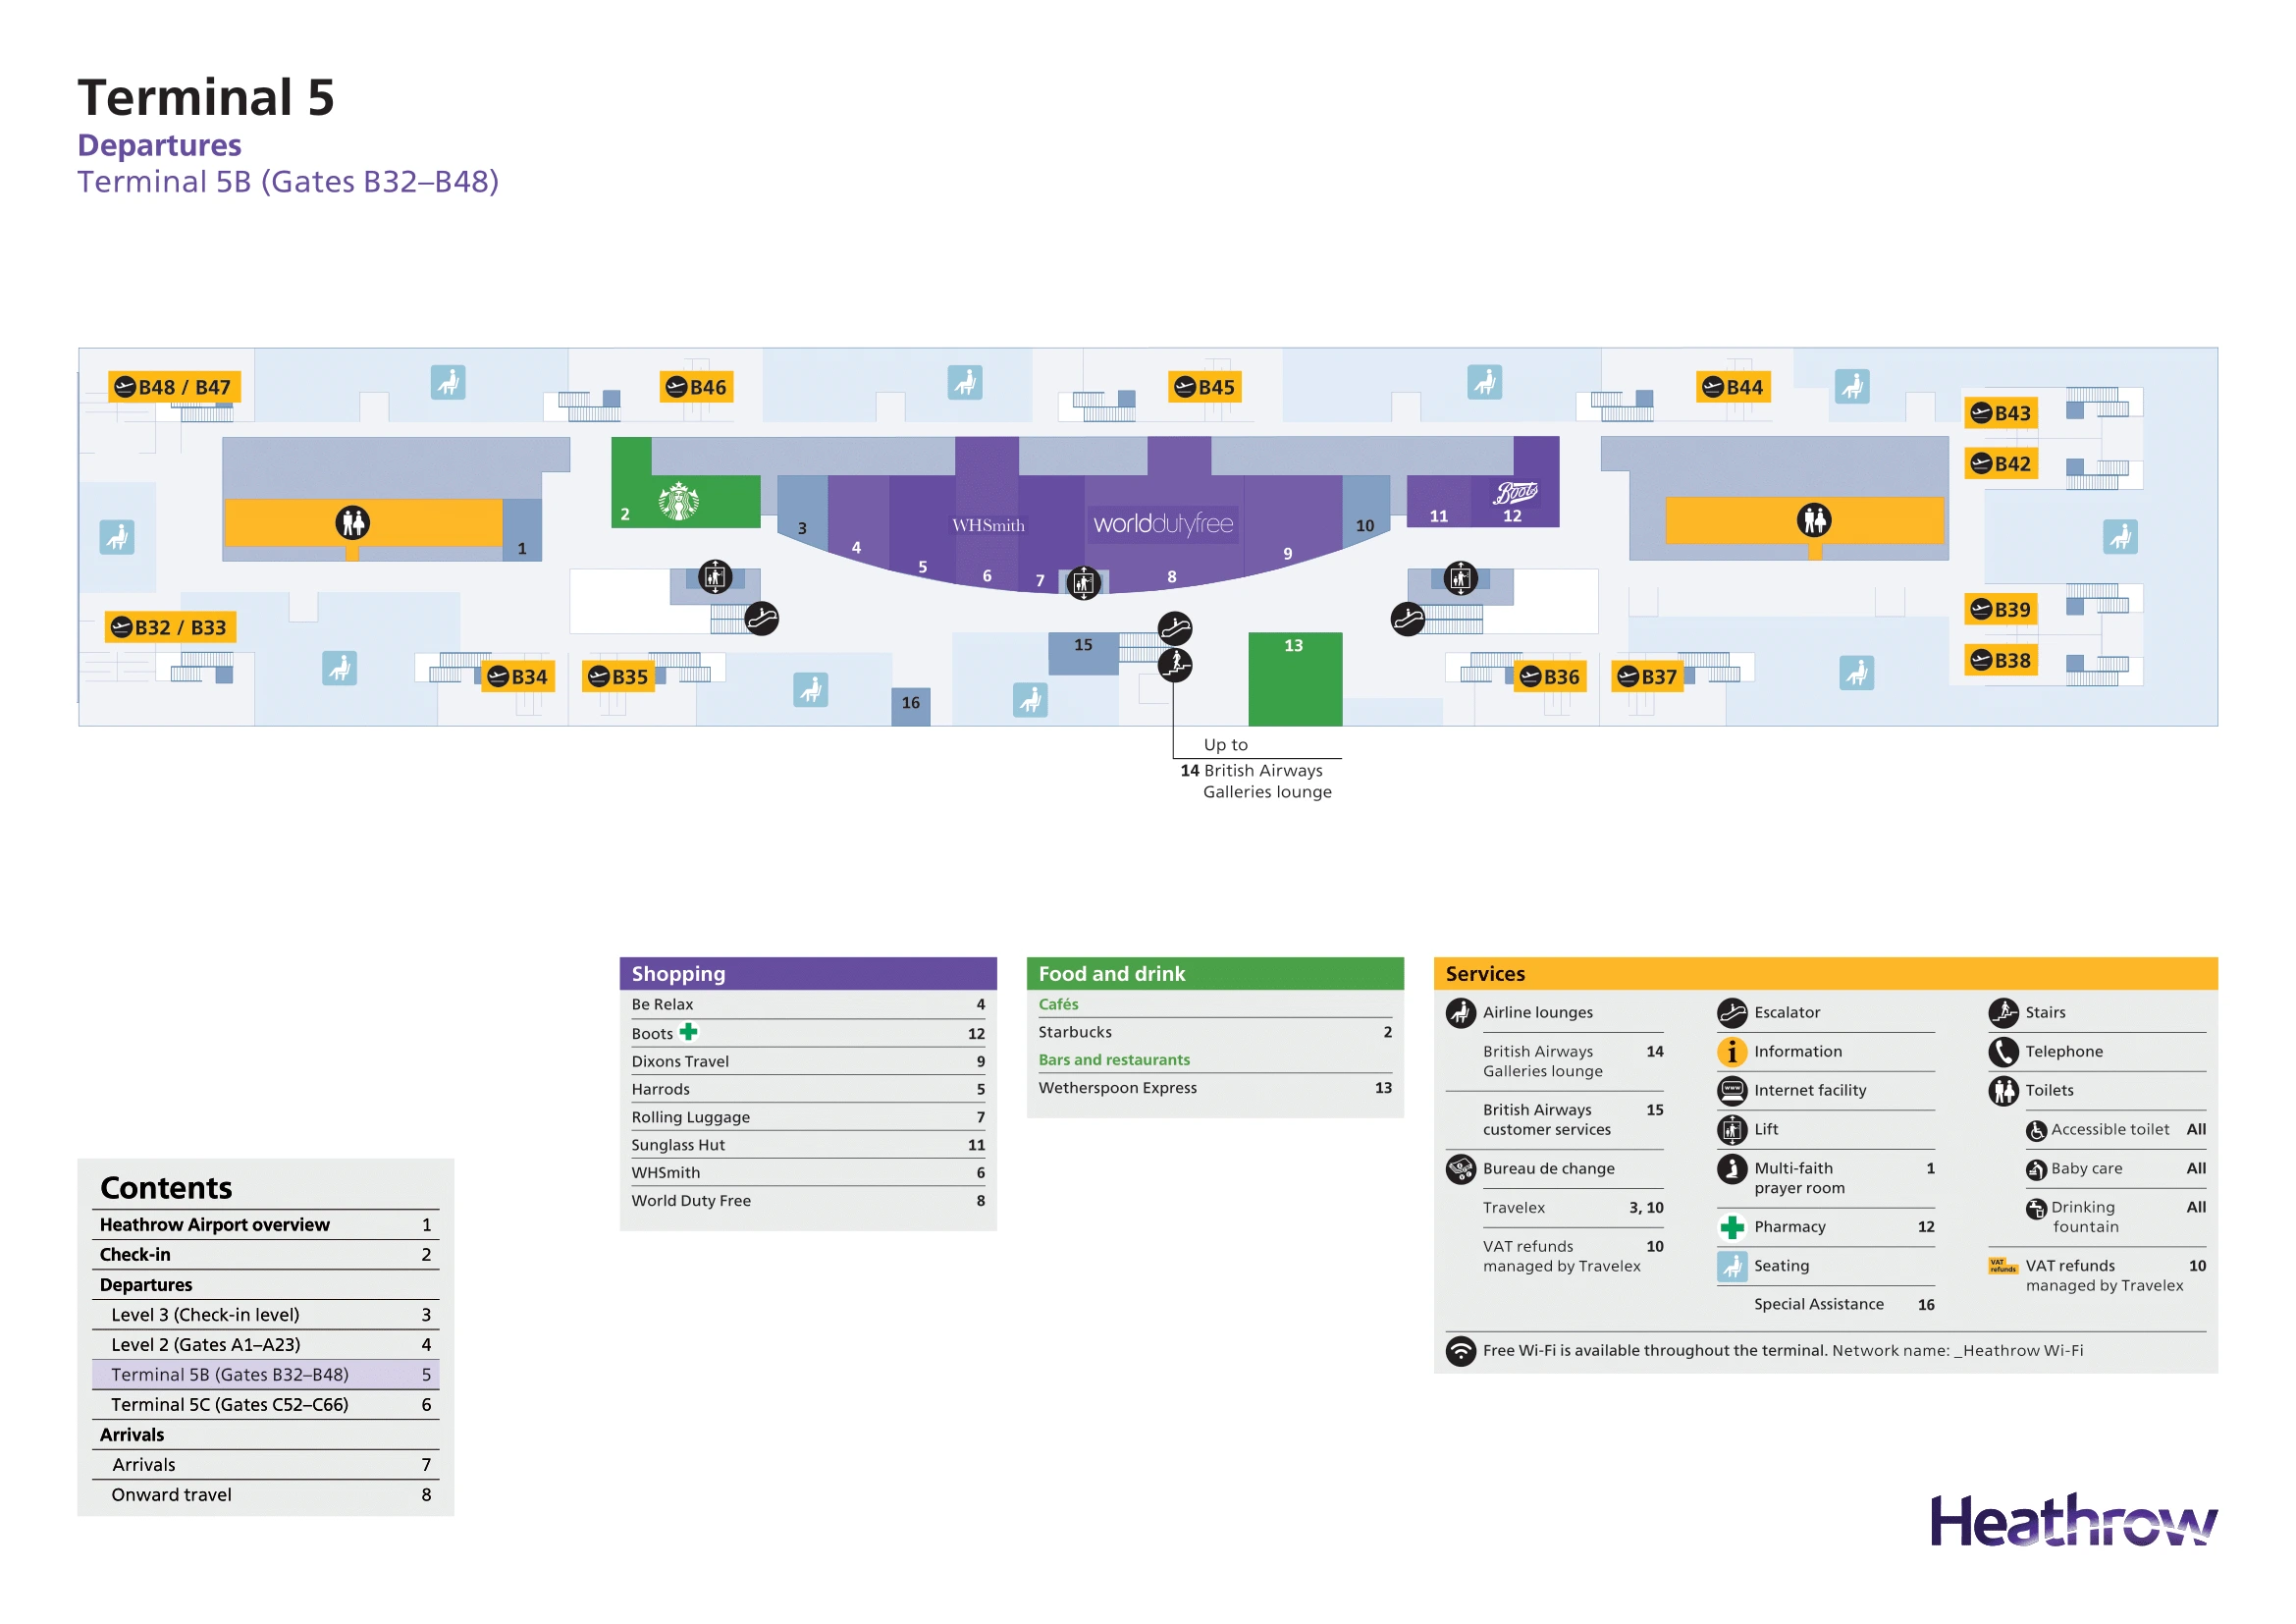
London Heathrow Airport Terminal 5 Departures Terminal 5B Map 2025-2024
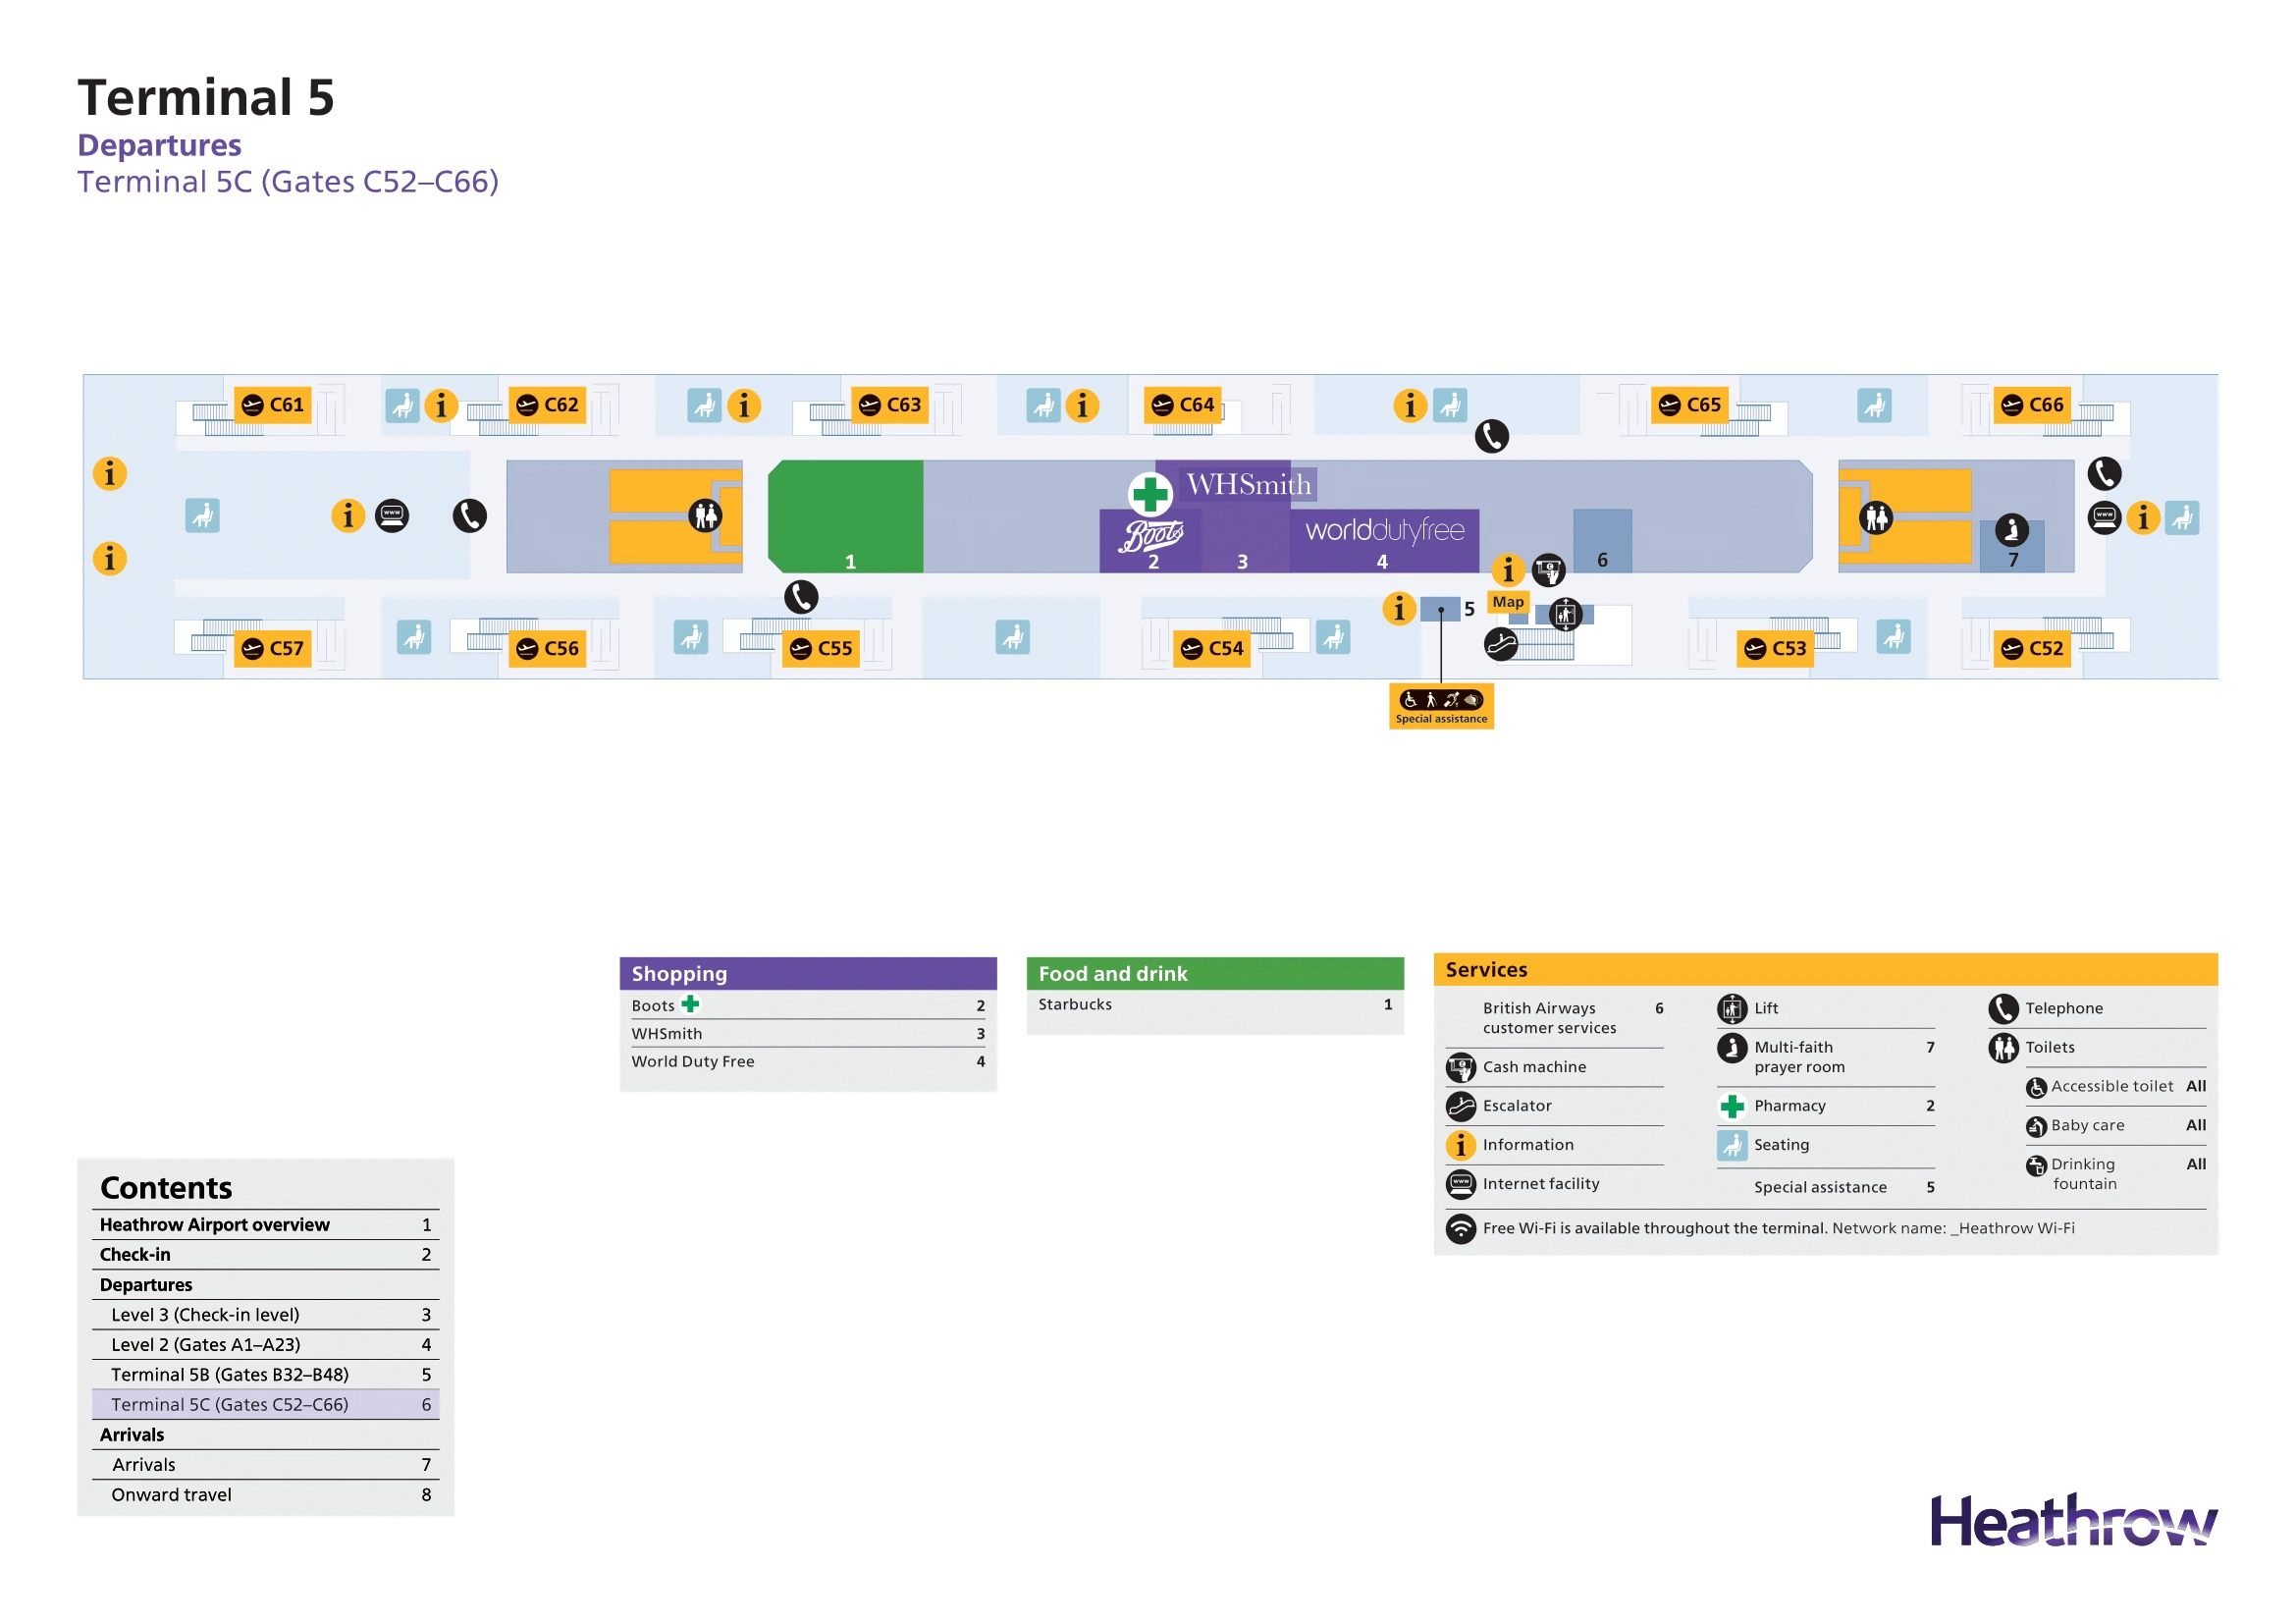
London Heathrow Airport Terminal 5 Departures Terminal 5C Map 2025-2024
2025 London Heathrow Airport Terminal 5 Map Guide
Where is the first decision-point split (physical fork/sign cluster) where “Flight Connections” diverges from “Arrivals” after leaving an inbound T5 gate flow?
The first hard split is in the T5A inbound arrivals corridor just before the Passport Control hall, at the purple “Flight Connections” vs yellow “Arrivals” sign cluster. It’s the fork where the arrivals stream continues into the immigration e-gates direction, while the flight connections stream peels off into a separate channel for the Flight Connections Centre.
| Path | What you’ll see | Direction cue | Point-of-no-return risk |
|---|---|---|---|
| Flight Connections (purple) | purple overhead signs; “Flight Connections” channel entrance | side turn off the main corridor | low if taken early; re-screening later if missed |
| Arrivals (yellow) | yellow “Arrivals” signs; immigration hall/e-gates approach | straight/forward continuation into border flow | high once you pass one-way barriers / enter immigration hall |
What is the walking time (minutes) from the main T5A security exit to the inter-concourse transit train entrance for B/C gates?
Walking takes about 2–3 minutes from the T5A security exit to the “Gates B & C” transit train entrance. The route is roughly 150 meters across the Level 3 departures concourse to the central vertical core that drops you to the Level -2 train platforms.
- Start: North Security exit or South Security exit, Level 3
- Midpoint anchor: main post-security departures lounge retail spine
- Target: central “Gates B & C” access bank by the Gate A15/A16 area, leading down toward Level -2 (Transit)
Where is the Level -4 tunnel access in T5A (the exact lift/escalator bank and entry point) that leads to the pedestrian tunnel toward T5B/T5C?
The Level -4 tunnel access is via the main central lift bank in T5A at the “Gates B & C” vertical core on the departures concourse (Level 3), near the Gate A15/A16 area. You enter the big lift lobby beside the main down-escalators (“The Canyon”) and select “-4” (often labeled “Walkway” / “Transit Walkway”) to reach the signed pedestrian tunnel entrance with travelators.
- Best entry: central lift bank beside the main B/C down-escalators, Level 3, near Gate A15/A16
- Common miss: taking the main escalators first to Level -2 (train), then failing to find the smaller secondary descent to -4 at the bottom of the escalators
What is the walking time (minutes) through the tunnel from T5A to T5B (using the signed pedestrian route with travelators)?
Walking takes about 5–7 minutes through the Level -4 tunnel from T5A to T5B using the signed travelator route. Fast walkers who keep moving on the travelators often do it in about 3–4 minutes, while standing on the travelators trends closer to 5–6 minutes.
| Pace style | Typical time | What it feels like | Anchor points |
|---|---|---|---|
| Walking on travelators | 3–4 min | steady brisk | tunnel entry at T5A “Walkway -4” → central core at T5B |
| Standing on travelators | 5–6 min | predictable, zero-wait | same signed travelator corridor |
| Slow / disrupted flow | 6–7 min | luggage drag, mobility friction | same route; no train variance |
In T5B, where exactly is the vertical transition point (lift/escalator) from the B-gates concourse down to the tunnel level (below the transit train level)?
The tunnel-level transition in T5B is at the central core where the train and tunnel meet, using the lift/escalator bank immediately beside the B-gates “Transit” arrival point. From the B-gates concourse (Level 2), go to the middle of the pier (near the B26/B36 area) and take the lifts directly down to Level -4 (Walkway), or take escalators down toward Level -2 and then the secondary descent to -4.
- Primary anchor: central hub of T5B, by the train/tunnel arrival doors, near Gate B26/B36 signage
- Fastest step-free: lifts from Level 2 straight to “-4 Walkway”
- Common confusion zone: escalators that drop first to Level -2 (train platform), where people accidentally re-enter train flow instead of continuing down to -4
Where are the no-return / wrong-direction control points that cause passengers returning from B/C by train to be forced back into an arrivals-style loop (the “you can’t stay on” trap)?
The main no-return trap is the return-direction train flow from T5C back toward T5A: it becomes an arrivals-only stream that opens onto arrivals-controlled corridors at T5B and T5A. The control points are the platform exits and one-way channeling barriers where doors/escalators feed you into the yellow “Arrivals” routing rather than back up to Level 3 departures.
| Trap point | What triggers it | Where it dumps you | Nearest anchor |
|---|---|---|---|
| Boarding/remaining on train at T5C to go back | using the train for C→B or C→A as a departing passenger | arrivals-segregated platform exit flow | T5C train platform doors at the terminus |
| Exiting at T5B on the return leg | stepping off the return-direction train | arrivals-style routing, not departures concourse | T5B train platform exit channels at the central core |
| Arriving at T5A by return train | taking the train back to main terminal | pre-immigration arrivals corridor toward UK Border | T5A Level -2 arrivals train station exits |
What is the walking distance (meters) from the T5B train/tunnel arrival point to the farthest B-gates cluster (B32–B48)?
The walking distance is roughly 200–300 meters from the T5B train/tunnel arrival point (the central core) to the farthest end of the B-gates pier (toward B32 or B48). The B-gates layout is a straight, linear concourse, so you’re basically walking from the middle to one end.
- Start anchor: T5B central core where the train/tunnel arrives
- Mid anchor: Gate B26 / central concourse node
- End anchors: outer gate clusters around B32 (one end) or B48 (other end)
Where is the baggage enquiries desk in T5 Arrivals relative to fixed landmarks (for example, the “south end / Cafe Nero” landmark guidance)?
The baggage enquiries desk is at the south end of the Terminal 5 baggage reclaim hall, close to the Customs “Goods to Declare” (red channel) side. It sits along the edge of the reclaim area near the lower-numbered carousels (often around Carousels 1–4) and is the place to go before you pass through the Customs exit doors.
- Primary anchor: south end of baggage reclaim, near the red-channel / “Goods to Declare” exit area
- Secondary anchor: near the lower-numbered carousel cluster (around 1–4) and the oversized-baggage belt area
What is the walking distance (meters) from the T5C train/tunnel arrival point to the farthest C-gates cluster (C52–C66)?
The walking distance is roughly 200–300 meters from the T5C train/tunnel arrival point (the central core) to the farthest end of the C-gates pier (toward C52 or C66). The C-gates concourse is a straight linear pier, so it’s the center-to-end walk.
- Start anchor: T5C central core at the train/tunnel arrival point
- Mid anchor: central concourse node at the base of the gate numbering runs
- End anchors: far gate clusters around C52 (one end) or C66 (other end)
Where is the closest BA lounge entrance to the T5B gates area, measured from the B-gates train arrival point (shortest signed route)?
The closest British Airways lounge to the T5B gates is the BA Galleries Lounge in T5B, entered on the lounge/mezzanine level above the B-gates concourse. From the B-gates train/tunnel arrival point at the central core, go up the escalators near Gate B26, then follow the concourse toward the lounge reception by Gate B36.
- Start anchor: T5B train/tunnel arrival point at the central core, Level 2
- Up point: escalators by Gate B26 (central node; pharmacy signage often nearby)
- Entrance anchor: BA Galleries Lounge reception by Gate B36, about a minute’s walk from the core once you’re on the lounge level
Where are the largest/most-visible flight information screens immediately after T5A security that reliably show B vs C gate assignments?
The biggest, easiest-to-spot flight information screens are the large FIDS “wall” immediately as you exit North Security or South Security into the Level 3 departures lounge. They’re positioned before you fully disperse into the main retail spine, so you can stop, check whether your flight is A/B/C, and then decide whether to head for the B/C vertical core.
- North Security exit: large FIDS bank directly ahead/adjacent before the retail flow splits
- South Security exit: matching large FIDS bank in the same immediate post-search zone
- Decision use: check for “Gates B” vs “Gates C” before committing to the down-escalators/lifts for -2/-4
From T5 Arrivals, where is the step-free route entrance to the Terminal 5 rail station (Elizabeth line / Heathrow Express access), including the correct level transition?
The step-free rail route starts at the central lift bank in the Terminal 5 Arrivals hall on the ground level, signed for “Trains” / “Heathrow Express” / “Elizabeth line.” Take the lifts down to the rail ticket hall level (often Level -1) and continue by lift to the platforms (Level -2), following the same rail signage the whole way.
- Start anchor: T5 Arrivals hall central lift bank, ground level, by the main “Trains” signage cluster
- Level transition: lift down to ticket hall (Level -1), then lift to platforms (Level -2)
- Rail node: shared Terminal 5 station for Heathrow Express and Elizabeth line access routes
From T5 Arrivals, where is the signed pedestrian path to the Short Stay Car Park used for passenger pick-up (the exact exit and crossing/walkway entry)?
The pick-up walk to Short Stay Car Park (Terminal Parking) starts by following “Car Park” / “Terminal Parking” signs from the T5 Arrivals hall to the lifts/escalators that take you up to the departures/bridge level, then entering the covered pedestrian bridge that links directly into the car park structure. The key is not trying to cross the forecourt lanes at ground level.
- Start anchor: T5 Arrivals hall, follow “Car Park” / “Terminal Parking” signs
- Level transition: go up to the bridge level (typically Departures Level 3) via lifts for step-free access
- Walkway entry: covered pedestrian bridge entrance from the terminal into the car park building
Archive London Heathrow Airport Terminal 5 Map
Below are all historical map versions for London Heathrow Airport. Each year includes the official map available for that period, presented as both WebP and PDF.
2024-2025 London Heathrow Airport Terminal 5 Map (Official 2024 Edition)
2018-2023 London Heathrow Airport Terminal 2 Map (Official 2018 Edition)