Minneapolis–Saint Paul International Airport Map (Most Up-To-Date)
MSP’s layout is a split-site airport with two separate terminals about 3 miles apart, plus a long “broken-H” Terminal 1 footprint where concourses stretch far from the central Mall hub. Within the Twin Cities main airport complex, most wayfinding risk comes from picking the wrong terminal (no airside connection) and from long, linear walks on C/G with connector decision points (bridge, tunnels, tram levels). Orient first by terminal, then by concourse leg.
Map Table
| Terminal | Key Airlines | Primary Function | Transfer Mode |
|---|---|---|---|
| Terminal 1 (Lindbergh) | Delta, partners | Main hub, most gates | Landside tram, concourse connectors |
| Terminal 2 (Humphrey) | Sun Country, LCCs | Secondary terminal | Light Rail, shuttle options |
| T1 ↔ T2 | — | Inter-terminal transfer | METRO Blue Line, vertical changes |
Minneapolis–Saint Paul International Airport Map Strategy
- Verify Terminal 1 vs Terminal 2 before you leave home; a wrong-terminal arrival forces a landside transfer and security re-screen, not a quick walk.
- Treat Terminal 1 as two long legs (C and G) joined by the Mall; for far gates, choose your crossover early (Mall vs the G↔C connector near high-G).
- Plan long connections like A ↔ F/G as “time + fatigue” moves; moving walkways are not continuous, and F has no moving walkways.
- For pickups, decide on curb vs rideshare ramps before the car moves; curb congestion and misread rideshare zones create the most common “missed pickup” failures.
2025 Minneapolis–Saint Paul International Airport Map + Printable PDF
Printing a 2026 MSP map matters because active concourse changes and checkpoint patterns make “memory navigation” unreliable, especially on long C/G walks and G-side construction zones. Use a printable PDF to lock in your terminal choice (1 vs 2), your best crossover (Mall vs G↔C bridge), and your pickup plan (curb vs ramps) before you arrive.
2026 Minneapolis–Saint Paul International Airport Map Guide
What is the exact landside route from Terminal 2 ticketing/baggage claim to Terminal 1 ticketing (including the precise station/bridge connection points)?
No airside or pedestrian connection links Terminal 2 and Terminal 1; you must go landside via the METRO Blue Line and then re-enter Terminal 1. The route runs through the Terminal 2 skyway into the Orange Ramp, down to the LRT platform, one stop to Terminal 1-Lindbergh Station, then up to the tram level and into the main terminal.
| Segment | Exact connection point | Directional anchor |
|---|---|---|
| Start | Terminal 2 Ticketing/Baggage Claim lobby (Level 1) | “Light Rail / LRT” overhead signs |
| Up + across | Escalators/elevators to Level 2 skyway | Enclosed skyway to Orange Parking Ramp |
| Down to rail | Orange Ramp interior to Ground Level platform | Descend to LRT station platform |
| Train | METRO Blue Line northbound | Exit at “Terminal 1–Lindbergh” |
| Up to tram | Terminal 1–Lindbergh Station → Level T | Long escalator bank to tram level |
| Tram + up | Hub/Landside Tram to Terminal Building stop | Up past Level 1 (baggage) to Level 2 (ticketing) |
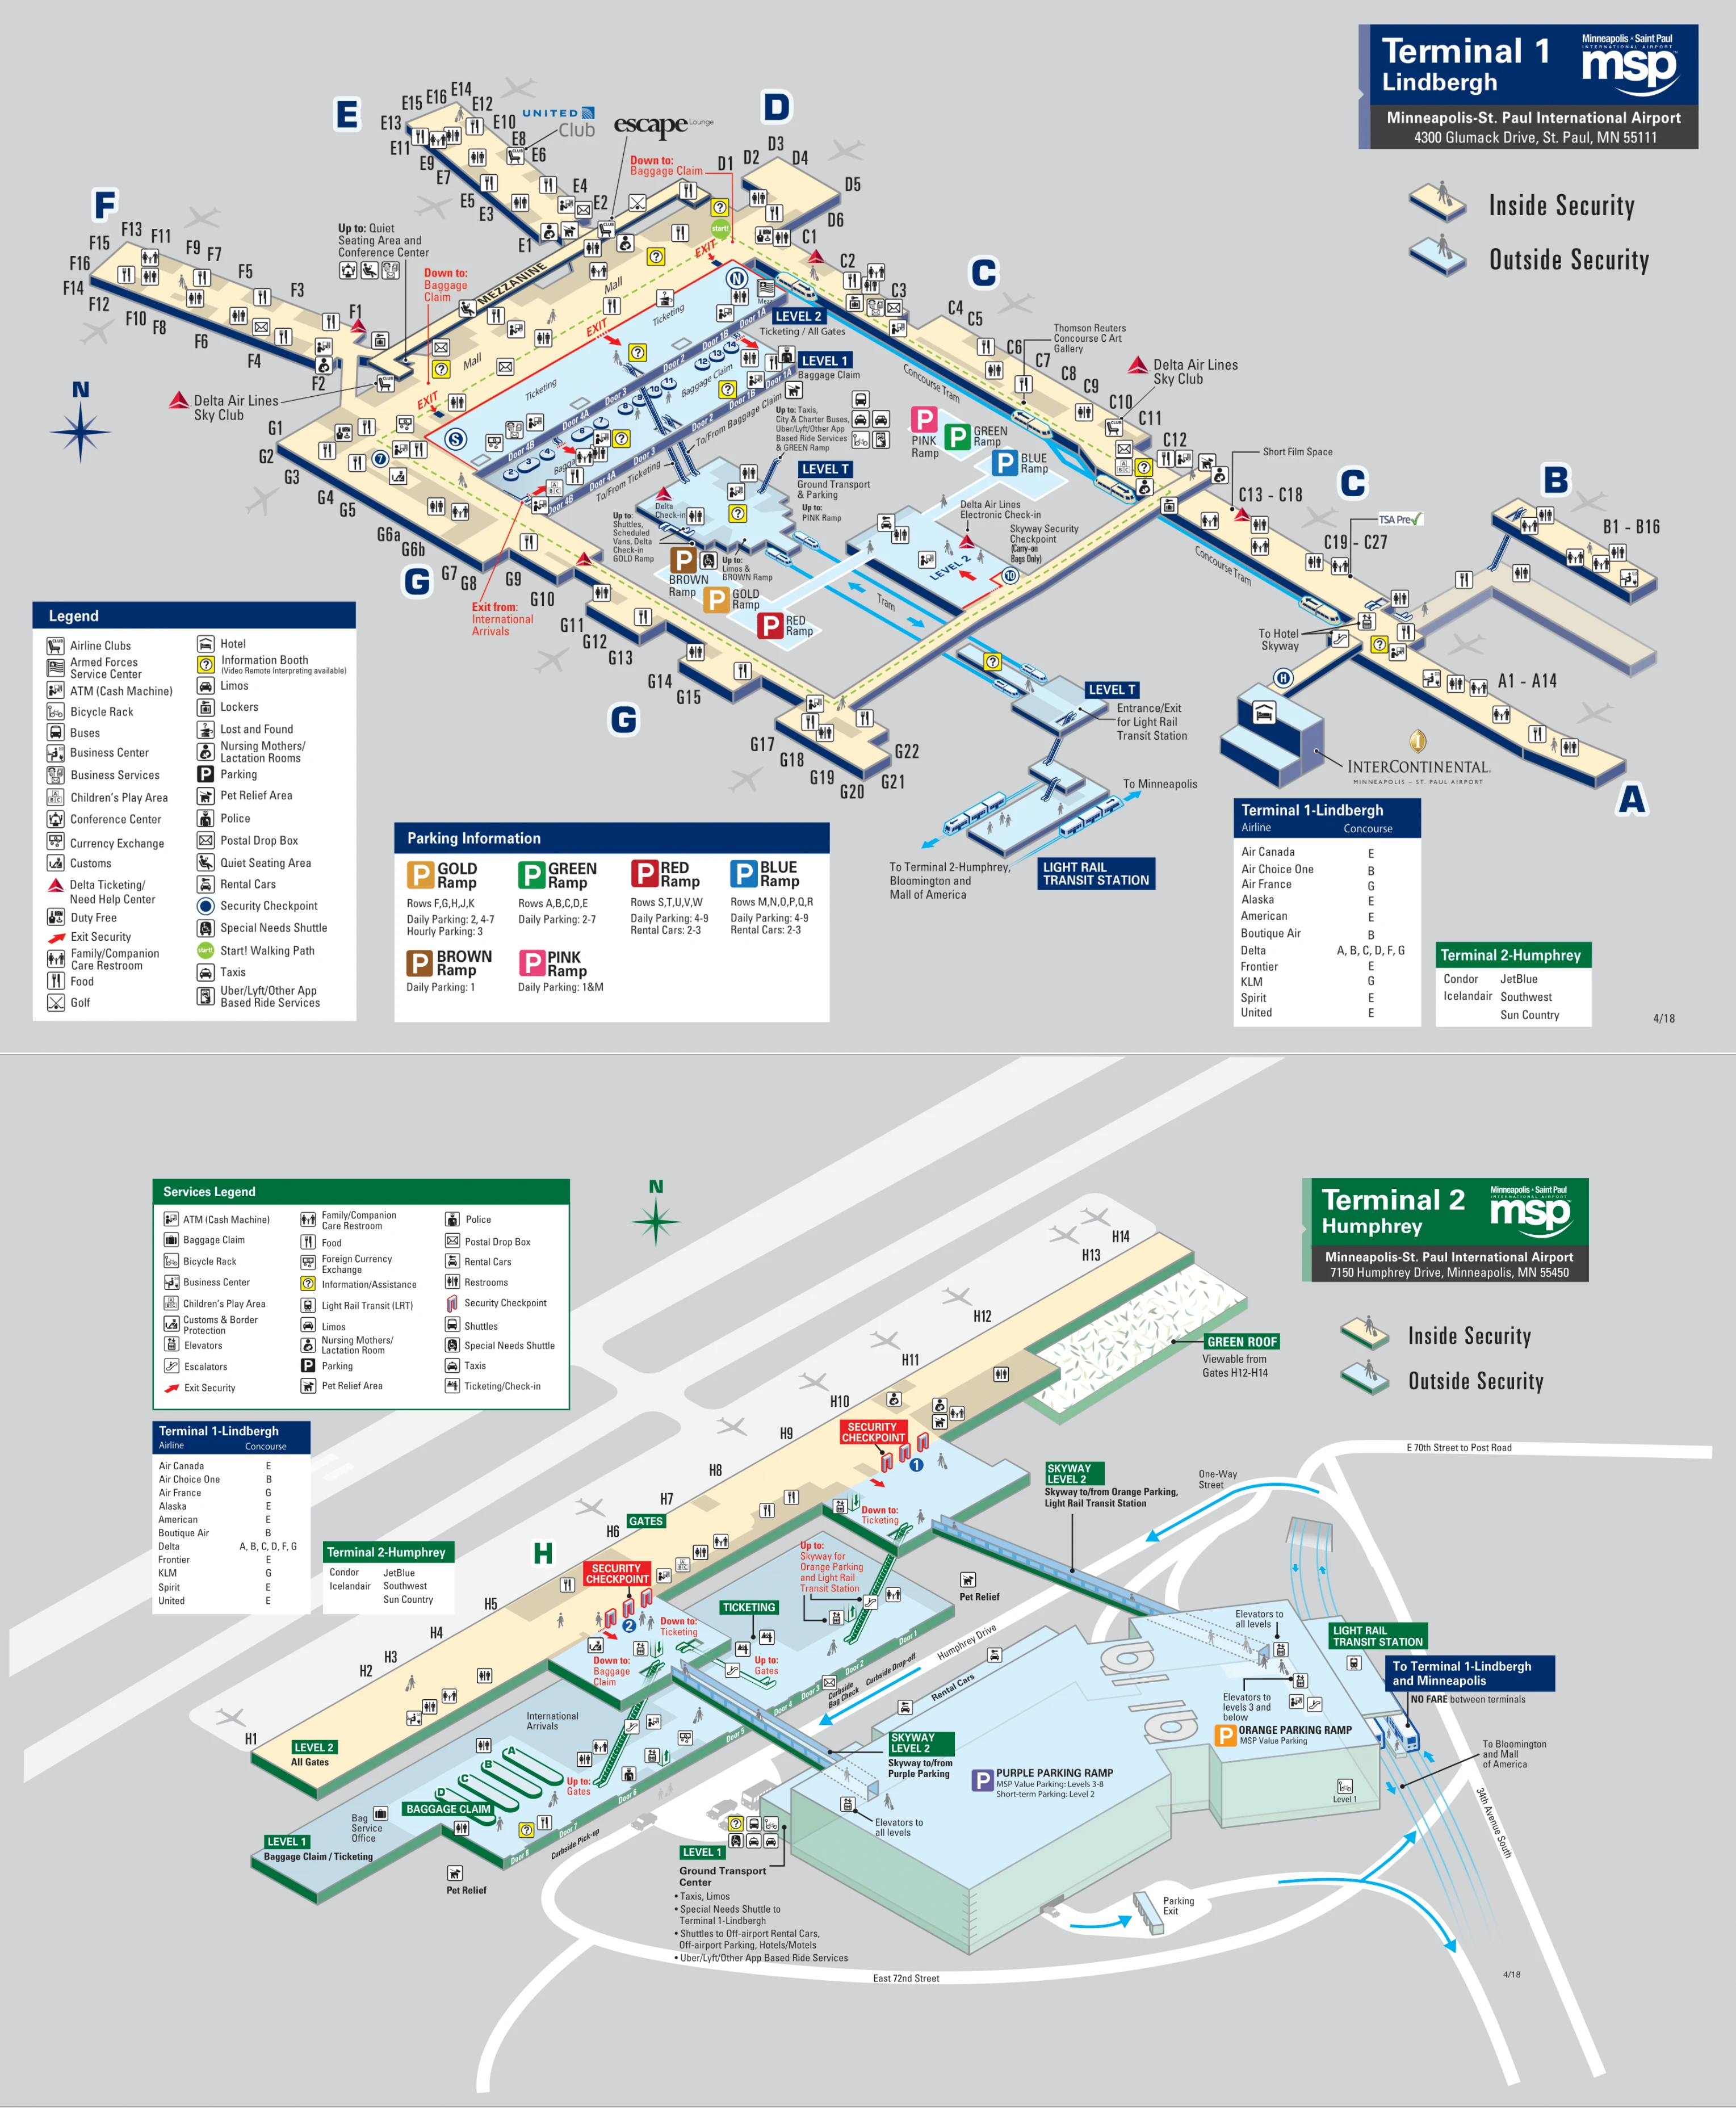
What is the door-to-door walking distance from Gate A14 to Gate F16?
Walking is about 1.0 to 1.1 miles (1.6–1.7 km) from Gate A14 to Gate F16 inside Terminal 1. The route runs the full length of Concourse A to the A/C junction, continues along Concourse C toward the Mall bottleneck, then turns into Concourse F and walks to the end of F (no moving walkways on F).
| Leg | Landmark-to-landmark | Approx. distance |
|---|---|---|
| A14 → A/C junction | End of A to the Concourse C connection near low-C | ~0.25 mi |
| C spine → Mall | Along C toward the central Mall/rotunda | ~0.35–0.45 mi |
| Mall → F16 | Mall entry into F, then to the end gate | ~0.35–0.40 mi |
Which Terminal 1 security checkpoint entrance is closest (shortest walking distance) to the G concourse gates?
The South Security Checkpoint is the closest Terminal 1 entrance to Concourse G. Entering there drops you nearest the G-side of the Mall and the start of the G concourse, while the skyway/connector checkpoint on the C↔G bridge does not function as an entry point.
The fastest practical approach is to use South Security from Ticketing Level 2 and then follow Concourse G signage from the Mall-side junction. If you see signs for the skyway checkpoint on the connector bridge, treat it as an exit-only node and do not plan to clear security there.
Where is the cell phone lot entrance on the airport road loop, and what is the exact driving path back to the Terminal 1 arrivals curb from that lot?
The Cell Phone Waiting Lots enter directly from Post Road on the south side of the airport, roughly between the Terminal 1 and Terminal 2 access points. Returning to Terminal 1 arrivals requires rejoining the MN-5 highway flow; you can’t drive straight in on surface streets from the lot.
Drive this sequence: exit the lot and turn left (west) onto Post Road, continue west over the MN-5 bridge, turn left at the signal/interchange to merge onto MN-5 westbound, take the Terminal 1 (Lindbergh) exit almost immediately, then follow “Arrivals” signs (left-lane bias on the approach) to the Terminal 1 baggage-claim curb.
From Gate G18, what is the exact access point to the G↔C skyway/walkway connector, and where does it exit on the C side (nearest gate/landmark)?
The G↔C connector access is immediately by Gate G18 via an elevator/escalator up to the bridge level. The bridge crosses airside and exits on Concourse C’s mezzanine near Gates C12/C13, by the C12 rotunda area.
From G18, follow signs for the connector bridge, go up one level, cross the enclosed bridge (with moving walkways), then descend into Concourse C at the C12/C13 area. If you step out near C12, you’re at the correct C-side landing; turning toward decreasing C numbers heads you toward the Mall.
What is the exact pedestrian route from the Silver parking ramp (entry level) to Terminal 1 check-in/security, including any tram/escalator decision points?
Walking from the Silver Ramp entry level to Terminal 1 check-in requires dropping to the underground tram level and riding the Hub Tram into the terminal, then going up to ticketing and security. There is no direct skyway from Silver Ramp into the Ticketing Level.
From the Silver Ramp/Transit Center lobby on Level 1, go through the main glass doors toward the ramp/terminal connection corridor, then take the escalator down one level to Level T (tram level). Board the Hub/Landside Tram toward the Terminal Building, exit at the Terminal Building stop, then take the central elevators/escalators up past Level 1 (baggage claim) to Level 2 (ticketing). From ticketing, choose the nearest open checkpoint (South is typically the shortest for G).
Where is the single tunnel/connection to Concourse B located, and what is the walking distance from that tunnel entrance to the nearest main concourse junction?
The only Concourse B connection is a pedestrian tunnel reached from Concourse C near Gate C27. The tunnel walk to Concourse B’s first main junction is about 3–5 minutes, with roughly 400–500 feet of tunnel length before you re-emerge into B.
From the C-side entrance by C27, take the escalator/elevator down to the tunnel level, walk straight through the subway corridor, then come up into Concourse B at its central junction. With no moving walkways and no services in B, the C27 area is the last reliable “grab food/use restroom” anchor before you descend.
What is the fastest mapped route from Gate G20 to Gate D4, and what is the walking distance for that route?
Walking is fastest by cutting across the G↔C connector bridge instead of walking the full length of G back to the Mall. The quickest mapped route is G20 → G18 → up to the connector bridge → exit near C12 → walk down Concourse C to the Mall → enter Concourse D → D4, at roughly 0.5 miles.
| Step | Route node | Anchor point |
|---|---|---|
| 1 | G20 → G18 | High-G corridor toward the bridge access |
| 2 | Up to connector level | Elevator/escalator by Gate G18 |
| 3 | Bridge → C-side landing | Exit near C12/C13 mezzanine |
| 4 | C12 → Mall | Walk toward decreasing C numbers |
| 5 | Mall → D4 | Concourse D spur off the Mall |
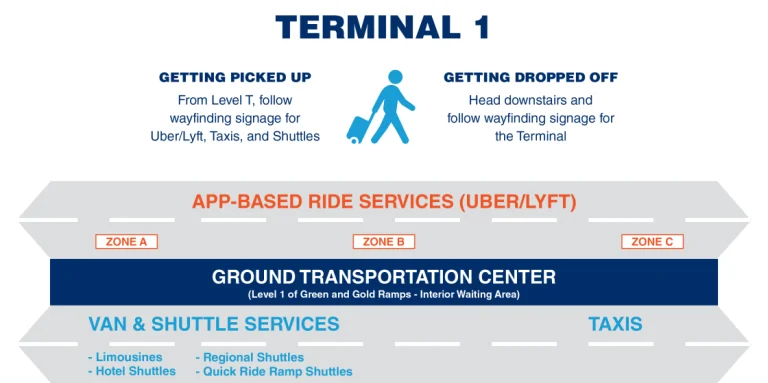
From Terminal 1 baggage claim, what is the exact indoor route to the rideshare pickup zone (level + door/bay area)?
Rideshare pickup is on Level 1 of the Green and Gold Parking Ramps, not on the Terminal 1 arrivals curb. The indoor route drops you to the tram level, rides one stop to the parking-ramp hub, then walks you into the signed app-based pickup zones.
From Terminal 1 Baggage Claim (Level 1), go to the nearest escalators/elevators and descend to Level T (tram level). Board the Hub/Landside Tram toward Parking/Rental Cars, get off at the first stop serving the ramps node, then follow overhead signs for “App-Based Ride Services” into the Green/Gold ramps on Level 1. Enter the marked pickup area and use the posted Zone letters (A/B/C) as your meet point rather than a terminal door number.
At Terminal 1, which curb segment corresponds to the “Upper East Curbside Dropoff” guidance, and how do you enter that lane from the main approach road?
The Upper East Curbside Dropoff is the departures-side east roadway serving Doors 5–8. Access requires staying on the Departures (upper level) approach and taking an early, counter-intuitive left before you reach the main west curb doors.
Approaching Terminal 1 on Glumack Drive, keep to lanes signed for Departures/Upper Level. As the ramp rises and the roadway splits for the terminal loop, follow the digital signage for “Upper East Roadway / Delta Curbside,” then take the immediate first left at the top of the rise. If you pass the main curb Door 1 area, you’ve missed the Upper East entrance and will be forced to continue the loop.
What is the shortest route between C/D gates and the first moving-walkway segment toward F/G, avoiding the most congested “mall” corridor?
Avoiding the Mall is not possible when moving between Concourse D and F/G at Terminal 1. The Mall is the mandatory crossover node that links the C-side and the F/G-side, so any route from D to F/G must pass through the Mall bottleneck.
The shortest practical line is to exit Concourse D directly into the Mall, cross the Mall straight toward the F/G entrance, and then continue into F or G. Detouring down Concourse C to reach the G↔C connector (near C12/G18) adds distance and time for D-based origins because D already sits on the Mall.
Where do the moving walkways begin and end along the G concourse, and what is the walking distance from the first G moving-walkway entry to low-numbered G gates?
Moving walkways on Concourse G are segmented, with a notable gap near Gate G4 and additional disruption through the mid-G construction zone around G8–G13. The most reliable continuous moving-walkway segment you can count on is on the G↔C connector bridge at the high-G end near G18, while low-G (G1–G6) requires more plain walking.
A practical wayfinding read is: expect intermittent walkways around roughly G6–G10, assume a break approaching the G4 area, and plan to walk normally from the first available walkway segment down to the low-numbered gates. From the first dependable walkway entry you’ll typically encounter on low-G (around the mid–low G corridor), reaching gates like G1–G4 is still a several-minute walk because the final approach crosses the gap area and the denser Mall-side junction.
Archive Minneapolis–Saint Paul International Airport Map
Below are all historical map versions for Minneapolis–Saint Paul International Airport. Each year includes the official map available for that period, presented as both WebP and PDF.
2018-2025 Minneapolis–Saint Paul International Airport Map (Official 2018 Edition)
2016 Minneapolis–Saint Paul International Airport Map